This content originally appeared on DEV Community and was authored by DEV Community
In this article, we are going to see how to integrate redux in your project by following few simple steps.
So, lets begin!
Step 1 : Create a new project and add all the dependencies
npx create-react-app my-app
After the installation is done, you can remove all unnecessary code in App.js.
Now we need to use following dependencies in the project.
npm i redux redux-devtools-extension redux-thunk react-redux
Let us see briefly what are the function of these dependencies.
- redux : Redux maintains the state of an entire application in a single immutable state tree (object), which can't be changed directly. To read more about redux, you can refer to its documentation. It has one of the most easiest documentation you will find.
redux-devtools-extension :
This is basically an extension that you can use to visualize redux workflow in your browser. To use this in your browser, you need to install this extension in your browser as well. linkredux-thunk :
This is basically a middleware that allows us to use dispatch and getState methods inside store.react-redux :
React Redux is the official React binding for Redux. It allows React components to read data from a Redux Store, and dispatch Actions to the Store to update data. Redux helps apps to scale by providing a sensible way to manage state through a unidirectional data flow model. You can refer to its documentation. It will surely help you to clear most of your doubts, so please give it a read.
Step 2 : Redux folder and store
Add a redux folder in src folder and use following structure for the folder.
redux
 ├── actions
 │    ├── counterActions.js
 │    ├── ...
 ├── reducers
 │    ├── counterReducer.js
 │    ├── index.js
 |    ├── ...
 ├── constants.js
Now, let us setup store for the project.
Create a file named store.js in src folder.
import { createStore, applyMiddleware } from "redux";
import thunk from "redux-thunk";
import { composeWithDevTools } from "redux-devtools-extension";
import rootReducer from "./redux/reducers";

const store = createStore(
  rootReducer,
  {},
  composeWithDevTools(applyMiddleware(thunk))
);

export default store;
The empty brackets after the rootReducer denotes initial state, which in our case is empty.
Please note :- We havn't yet added rootReducer, so it might give you an error. We will solve this in next step.
Now, to connect redux store to react application, we need to add a provider in src/index.js file.
import React from "react";
import ReactDOM from "react-dom";
import "./index.css";
import App from "./App";
import reportWebVitals from "./reportWebVitals";
import { Provider } from "react-redux";
import store from "./store";

ReactDOM.render(
  <React.StrictMode>
    <Provider store={store}>
      <App />
    </Provider>
  </React.StrictMode>,
  document.getElementById("root")
);

reportWebVitals();
The Provider component wraps whole app's components with store.
- Step 3 : Root Reducer Now let us add root reducer. We are using a root reducer so that we can combine all the reducers inside a single function. Inside redux/reducers/index.js, we write following code to combmine reducers.
import { combineReducers } from "redux";

const rootReducer = combineReducers({});

export default rootReducer;
That's it!. Now let us see an example to get a clear understanding.
Counter Example
- Create constants
Here we are going to have three constants for increasing, decreasing and reset. Although you can skip this step, but for a large scale application this is very useful as it reduces chances of spelling mistake.
Inside redux/constants.js
export const INCREASE = "INCREASE"
export const DECREASE = "DECREASE"
export const RESET = "RESET"
- Create actions.
In redux/actions/counterActions we add following actions:
import {DECREASE, INCREASE, RESET} from "../types"

export const increase = () => (dispatch) => {
    dispatch({type : INCREASE})
}

export const decrease = () => (dispatch) => {
    dispatch({type : DECREASE})
}

export const reset = () => (dispatch) => {
    dispatch({type : RESET})
}
- Create reducers.
In redux/actions/counterReducer we add following reducer:
import { DECREASE, INCREASE, RESET } from "../types";

const counterReducer = (state = 0, action) => {
  const { type, payload } = action;
  switch (type) {
    case INCREASE:
      return state + 1;
    case DECREASE:
      return state - 1;
    case RESET:
      return 0;
    default:
      return state;
  }
};

export default counterReducer;
Here we are not passing any data so payload is set empty, otherwise we can pass any data in an action on dispatch.
- Add reducer to rootReducer :
import { combineReducers } from "redux";
import counterReducer from "./counterReducer";

const rootReducer = combineReducers({ counter: counterReducer });

export default rootReducer;
- Final step : dispatch action on click of button
In App.js :
import { useSelector } from "react-redux";
import { useDispatch } from "react-redux";
import "./App.css";
import { decrease, increase, reset } from "./redux/actions/counterActions";

function App() {
  const dispatch = useDispatch();
  const counter = useSelector((state) => state.counter);
  return (
    <div className="App">
      <div>
        <button onClick={() => dispatch(increase())}>Increase</button>
        <button onClick={() => dispatch(reset())}>Reset</button>
        <button onClick={() => dispatch(decrease())}>Decrease</button>
      </div>
      <div>{counter}</div>
    </div>
  );
}

export default App;
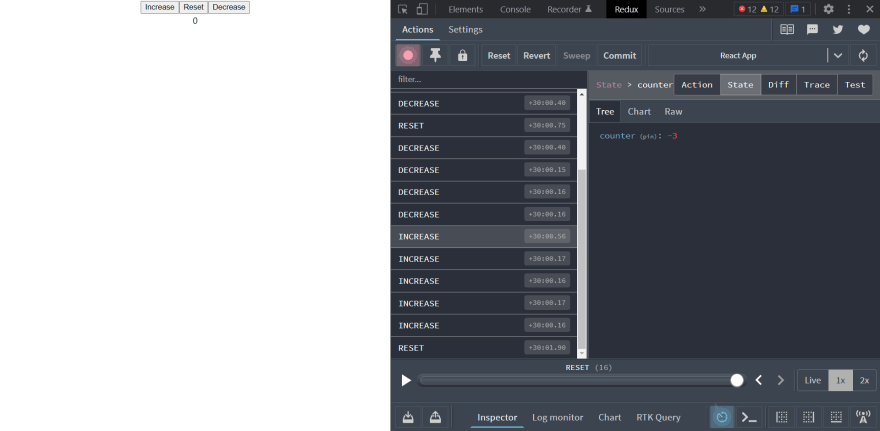
It works!!. You can see all dispatch events and state of the application in the redux devtools extension.
For this press alt+shift+tab and switch to redux tab.
You can see the full code here
Please note :- You might think that using redux for such a small task is quiet an overkill, but when you are creating a medium to large scale application, this will surely benefit you.
If you want to know more about redux I will recommend you to read this article
Thanks for reading this article. I hope you get some basic understanding of working with redux.
Happy coding 🚀
This content originally appeared on DEV Community and was authored by DEV Community
DEV Community | Sciencx (2022-02-23T18:30:47+00:00) Setup Redux for your react application in few simple steps!. Retrieved from https://www.scien.cx/2022/02/23/setup-redux-for-your-react-application-in-few-simple-steps/
Please log in to upload a file.
There are no updates yet.
Click the Upload button above to add an update.

