This content originally appeared on Level Up Coding - Medium and was authored by Dennis
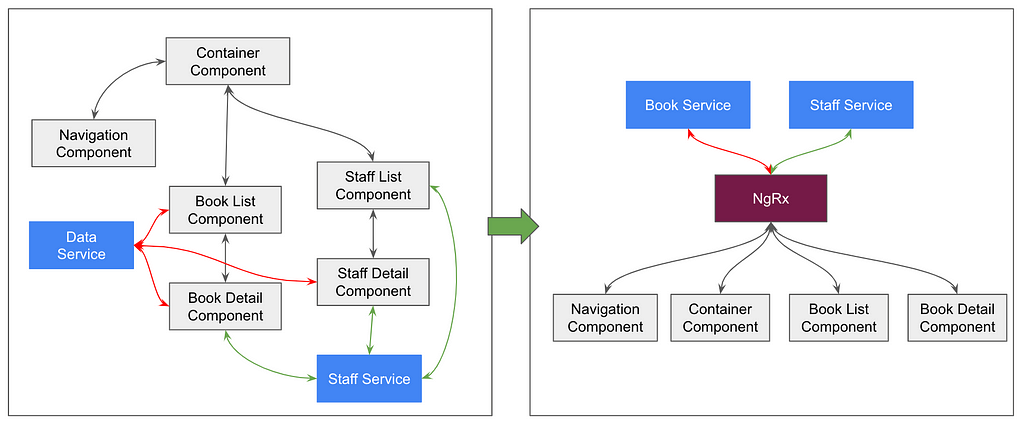
Often times, when our angular applications grows, our code becomes quite messy to follow. We have multiple components, referencing a myriad number of services, and we need to create various channels in order to pass data between child and parent components. It makes our supposedly user-interface frontend application polluted with logic, and the code becomes more difficult to follow.
As IT solutions always go, it is just natural to outsource the managing of all the data to a framework. In doing so, we no longer inject any services directly into our components, and we don’t create unnecessary event emitters and input between our parent-child components just for the sake of passing data. Instead, we just focus on what is needed in our UI, and when we need the data, we just reference the framework. Thus, we effectively separate the “backend” part out of our frontend application.
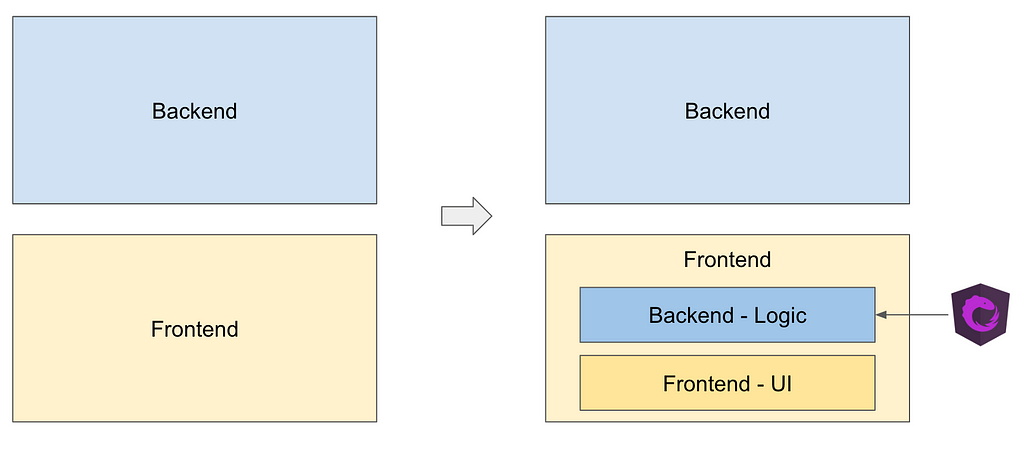
This presents a paradigm shift in how we develop our frontend applications. Instead of having individual components manage their own data, we combine all the data required by all the components in the entire application to be referenced through a single store. And we call these data as state.
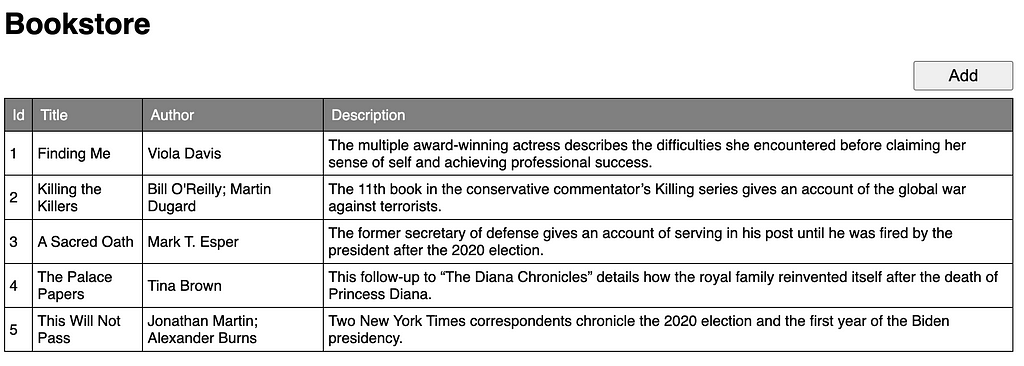
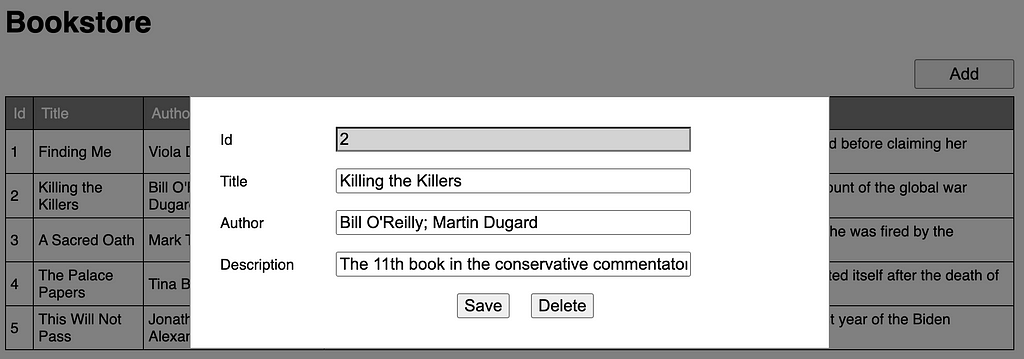
Supposed we have a simple CRUD application written in angular to manage books, it should show a list of books in a table, and it should show a popup to display the book details when the user wants to create new books, or update any existing books.
We add ngrx to the application by running npm install @ngrx/store --save.
The first step we do is to define our state, what are the data we are going to need, and what are their respective data types. It is like the database of our frontend application. So we create a folder called state, and create a new file books.state.ts in the newly created folder.
As all database goes, we don’t directly access the data, but we create getter methods to access the state. And to ensure our components always have the most up-to-date state, instead of static getter methods, we create selectors to return Observables of the individual states, and let our components subscribe to it. In this way, state changes will be updated automatically to our components, and they can react to it accordingly. So a new books.selector.ts is created to consolidate the selectors.
The createFeatureSelector method is provided by ngrx to help us directly select the state by the name and the generic parameter type. This is why we have the actual state bookStore created under an AppState, so that we can have a name to select. The createSelector method accepts other selectors in the first parameter, then the last parameter accepts a method which will use the selectors passed in to get to the states in the lower hierarchy. Though it is not in the example, note that you can pass up to 8 selectors in the parameters, if your selector depends on multiple selectors to determine which state to get.
We never update the state directly using setter methods. Instead, the state will only change based on certain prescribed events. So we have actions to define what are the possible events that can take place. Then we have reducers, that defines the initial state of the application, and how the state will change depending on what action has taken place and what was the state before the action took place.
Actions are identified by a string, and it’s payload to be passed to the reducer. Ngrx provides the createAction method that accepts an identification string for the action, and the data type of the payload in the generic parameter. As always, a books.actions.ts is created to consolidate the actions.
Reducers are pure functions that return a new state, given the action and the current state. So in order to have a state to work with, it needs an initial state defined in the first parameter of the createReducer method provided by ngrx. Then subsequent on methods for each action. A books.reducer.ts will then be created as such.
Notice that this only reduces the bookStore state, and not the highest level AppState. So that if there are other states at the same level of this bookStore, there can be different reducer files created. This helps to keep the code clean and easy to read. Then it comes the question - how then do we map the reducer to the state?. We add the link in the forRoot when we import the StoreModule - StoreModule.forRoot({bookStore: booksReducer}). So the module will look something like this.
Also notice that not all the actions has a reducer, for example, the loadBooks action is missing a reducer. This is because the reducer’s purpose is solely to update the state, and if the action doesn’t change the state, a reducer is not required.
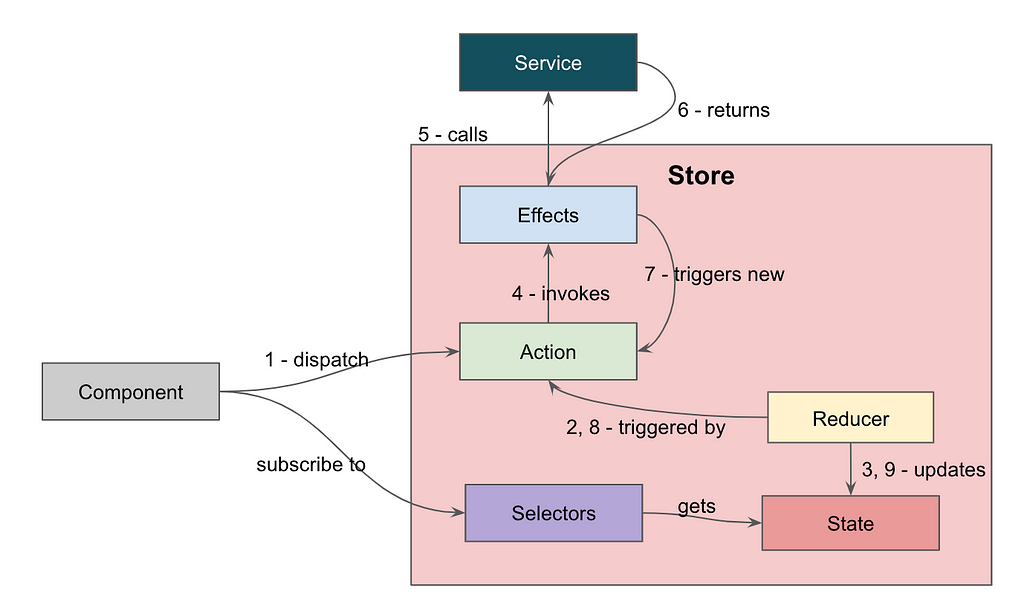
By now, you might have noticed that something is missing, where do we call our service to get, update, create, delete data? This shall be handled by side effects. Yes, side effects! Because our reducers is supposed to provide the latest state whenever anything happens, and we have components subscribing to it, we can’t have asynchronous processes running within the reducers. That’s why we have a loadData and a dataLoaded action separately. Like how we define the reducer for each action, we can also define side effects which will run based on which action is triggered. These side effects will handle the asynchronous jobs to call the services, and when the job is done, it will trigger another action. And then the reducer for the new action can update the state once again.
To have side effects, we need to install it separately with npm install @ngrx/effects --save. And as usual, we create the books.effects.ts.
And since we imported a new module for the effects, we need to add it in the imports array of our ngModule, and we have to pass the list of effects class in the forRoot - EffectsModule.forRoot([BooksEffects]). So our updated module will become this.
We are done creating all the backend stuff for our part, now let’s get to how we use it. Firstly, we need to import the @ngrx\store into our component, and inject it in the constructor.
import {Store} from "@ngrx/store";constructor(private store: Store) {
}Then, we subscribe to all the selectors we need in the component in the ngOnInit. Note that we use this.store.select(<selector>) to reference the selectors we created earlier on.
And we something is triggered, like when the add button is clicked, instead of emitting an event or process the logic, we simply call the this.store.dispatch(<action>) to trigger the action.
addBook(): void {
  this.store.dispatch(BookStoreActions.newBook())
}
If the action is defined with a payload, we simply pass the data in the parameter of the action.
showBook(book: Book): void {
  this.store.dispatch(BookStoreActions.showBook({book}))
}
So when the action is triggered, the reducer updates the state, and because we have already subscribed to the state changes via the selector, our component will be updated whenever there is a change of state. As can be seen in the subscription of the Selector.showDetail, the application will run either showPopup() or dismissPopup() when the showDetail state changes.
The data flow of the application can be visually as such.
The sample application described in this article is available on https://github.com/thecodinganalyst/bookstore.
This article is originally published on https://thecodinganalyst.github.io/knowledgebase/ngrx-explained/
NgRx Explained was originally published in Level Up Coding on Medium, where people are continuing the conversation by highlighting and responding to this story.
This content originally appeared on Level Up Coding - Medium and was authored by Dennis
Dennis | Sciencx (2022-06-13T22:22:06+00:00) NgRx Explained. Retrieved from https://www.scien.cx/2022/06/13/ngrx-explained/
Please log in to upload a file.
There are no updates yet.
Click the Upload button above to add an update.
