This content originally appeared on DEV Community and was authored by James 'Dante' Midzi
I would like to take you back to our blog section on our site. When we looked at collections we setup a way such that when we create a new post all we have to worry about adding in the frontmatter is the title, description and date.
What if I told you there was a way to streamline this process as well... How you may ask? Well, by connecting a CMS to our Eleventy site.
Initially I had no plan of doing this, but it would so happen that the people at CloudCannon approached me with a very interesting proposition.
What is CloudCannon?
CloudCannon is a CMS powered by Git. It is built for developers and offers a plethora of features to facilitate the smooth running of your site.
You can choose to build your site directly from CloudCannon or connect your favourite SSG to take advantage of their CMS features.
It supports quite a number of Static Site Generators like:
- Eleventy (still in beta)
- Hugo
- Gatsby
- Next.js (still in beta)
- Jekyll
What Makes CloudCannon Different?
CloudCannnon offers:
- A Visual Editor: To allow anyone to be to edit.
- Developer workflows: Being powered by git, it allows your to take advantage of different kinds of developer workflows.
- Collaborative Publishing: Collaboration is a breeze
- Edge Hosting: CloudCannon helps make your websites that feel instant for every visitor, without setting up a single server.
Connecting Eleventy to CloudCannon
We will be using the repository we made for our site to c
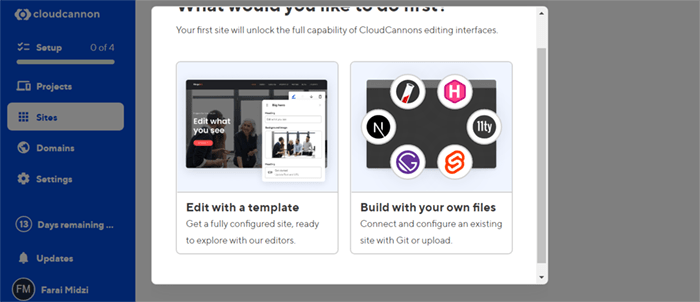
Head over to CloudCannon and create an account. Afterwards, you should be met with something like this:
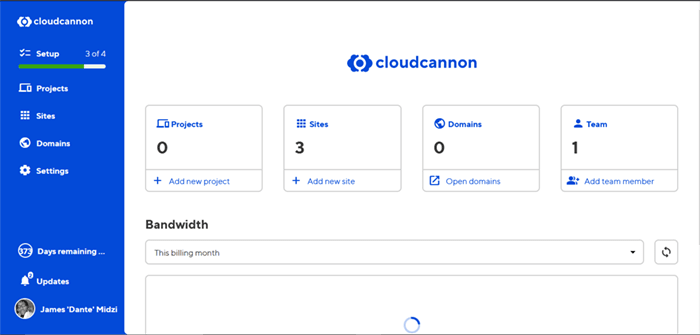
If you already have an account you'll see this:
Select Add New Site, then Connect your own files
Setup Your Site
Sync Files
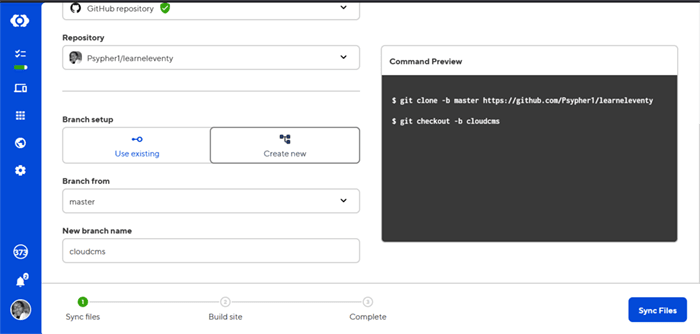
Here are the things you have to setup:
- Site name: Give your site a name
- File source: We'll choose Github
- Repository: Select the repository we created for our site when we deployed to Netlify
- Branch setup: Here you can choose the existing branch or create a new one. I recommend creating a new on to keep the main branch clean.
- With this method, we would need to give the new branch a name.
When everything is done click Sync Files and wait for the syncing to complete.
Build Site
The next thing we have to do is build our site. In the next screen you will see some configuration options that may be specific to your site like Environment variables.
You will notice that is has picked up that we are using an Eleventy site.
We are not going to touch anything on this screen as we currently have none of that for our site.
Let's click Build Site
Adding A New Post
As you'll notice, the posts we made have been imported. Let's make a new one - give Cloudcannon a whirl
Select Add new
We are met with a nice WYSIWYG editor. The sidebar on the left refers to the data we setup in our frontmatter earlier - you can modify this, but that's beyond the scope of this series.
We'll add some content and click Save
When we move back to the previous screen, our new post has been added:
A Cool Little Thing
You might have noticed that CloudCannon keeps referencing site as we were setting it up.
Well in addition to being a CMS, CloudCannnon also gives your a URL for your site. Say you didn't want to use something like Netlify or Vercel to host you site you could make use of the one they provide.
I mention this because you can use either the CloudCannon URL or the Netlify one to view our site.
If you choose to stick to Netlify route, you have to merge the changes from the branch we made into the master so the changes take effect.
Conclusion
I have worked with my fair share of CMSs (Finding A CMS), CloudCannon has to be my most favourite so far. Things just work with minimal configuration required - if you know me, I'm all for this. I will absolutely be playing around more in it to see what else it can do.
We have gone from a blank slate (an empty folder) to a full fledged site that is synced to a CMS. For now, go explore my children. Build your sites, make them your own - share them with me while you're at it. :D
I have not forgotten the things I said I would revisit. I will update you in time, when I have a better grasp.
As always:
- The live site: https://learneleventy.netlify.app
- The working repo: https://github.com/Psypher1/learneleventy
- The docs: https://www.11ty.dev/docs/
- The discord: https://www.11ty.dev/blog/discord/
A Life Update
I have been going hard at it since January - haven't taken a break since. I am feeling those effects now. To curb this and not burn out completely I am going to be a taking a break for a bit.
So if you don't see any posts from me, you know why.
I appreciate every one of you for coming with me on these voyages. I will be back soon, ready to take you on yet more journeys into the farthest reaches of the dev world.
For now, I must rest...
Thank you for reading, let's connect!
Thank you for visiting this little corner of mine. Let's connect on Twitter, Polywork and [LinkedIn](https://www.linkedin.com/in/jamesmidz
This content originally appeared on DEV Community and was authored by James 'Dante' Midzi
James 'Dante' Midzi | Sciencx (2022-06-21T17:36:03+00:00) Let’s Learn 11ty Part 8: Connecting A CMS. Retrieved from https://www.scien.cx/2022/06/21/lets-learn-11ty-part-8-connecting-a-cms/
Please log in to upload a file.
There are no updates yet.
Click the Upload button above to add an update.


