Building a Conflict-free UI with Leasing and Heartbeat using Django REST and Vue.js

A Proof of Concept (POC) on how to implement a conflict-free UI

Photo by Leon Bredella on Unsplash

Background

Imagine a system where there are many users who need to edit several forms that are in a queue. Imagine also that those forms have multiple lengthy sections. It can happen that multiple users may start editing the same form and fill in a lot of fields. And when they hit save, one of them gets an error that there was a “Stale exception” because the form was already edited by someone else. Or even worse, one of the user’s changes is lost and the user doesn’t even get an exception. So all the user’s work goes to waste. This is not ideal because of the wasted effort, so we want to find a solution to this problem.

A real-life example of such lengthy forms could be application approval forms that government agencies might have. These documents are typically assigned to multiple application assessors who need to review external applications and add more metadata to the application.

Solution

An elegant solution to this problem is to use the “Leasing with Heartbeat “ algorithm that is typically used in distributed systems for maintaining a lock on any given entity. An example distributed system that uses this algorithm is The Google File System (GFS) paper.

The idea is that the user who is updating the document will also keep the lock of that document and will periodically send a heartbeat message to the server to extend that lock. This way the user keeps the lock alive for as long as their page remains open and can continue updating the document. When no heartbeat is sent to the server within a configured timeout period, the server does not extend the lease period, so the lock will expire automatically. Then the next user can obtain the lock.

If user “Alice” is editing the document “A”, then the database will have an entry that document “A” is locked until a certain time period.
If user “Bob” opens the page while the lock is not expired, “Bob” will not even be allowed to start editing the form and he will see a message that the form is locked. If “Alice” closes her webpage, then the lock is released after some time, so “Bob” can start working on the document later if necessary.

This solves the problem of wasting the effort of our users because we preemptively tell the users with a clear message that the page is being edited by someone else. Our clear message can also contain the name of the other user that is editing the page and the time until the page is locked as an extension.

Below we go into technical details of how to implement this proof of concept. We use a sample project where users can add/edit/create Notes.

The code of the proof of concept can be found in the GitHub repository found in this link.

Technologies used:

Python 3.10
Django 4.0
Vue.js 2.7.0
Django REST framework (DRF)

Note: This article assumes that you already know the basics of Django and DRF.

We will follow these steps to create our Notes web application:

  1. Set up a Django project
  2. Create database models
  3. Create the CRUD APIs
  4. Create the Heartbeat API

For the readers who are interested only in the implementation of leasing with heartbeat then please go to section 4. Create the Heartbeat API.

1. Set up a Django project

In this step, we’re going to build a basic Django application. When starting a Django project, some boilerplate code is involved, so I’ll include all the boilerplate steps to set up a Django project using the shell script below.

Note that you can run these commands on the terminal following the same order.

https://medium.com/media/179c249c6c208fbf1f1d2fc1077414cb/href

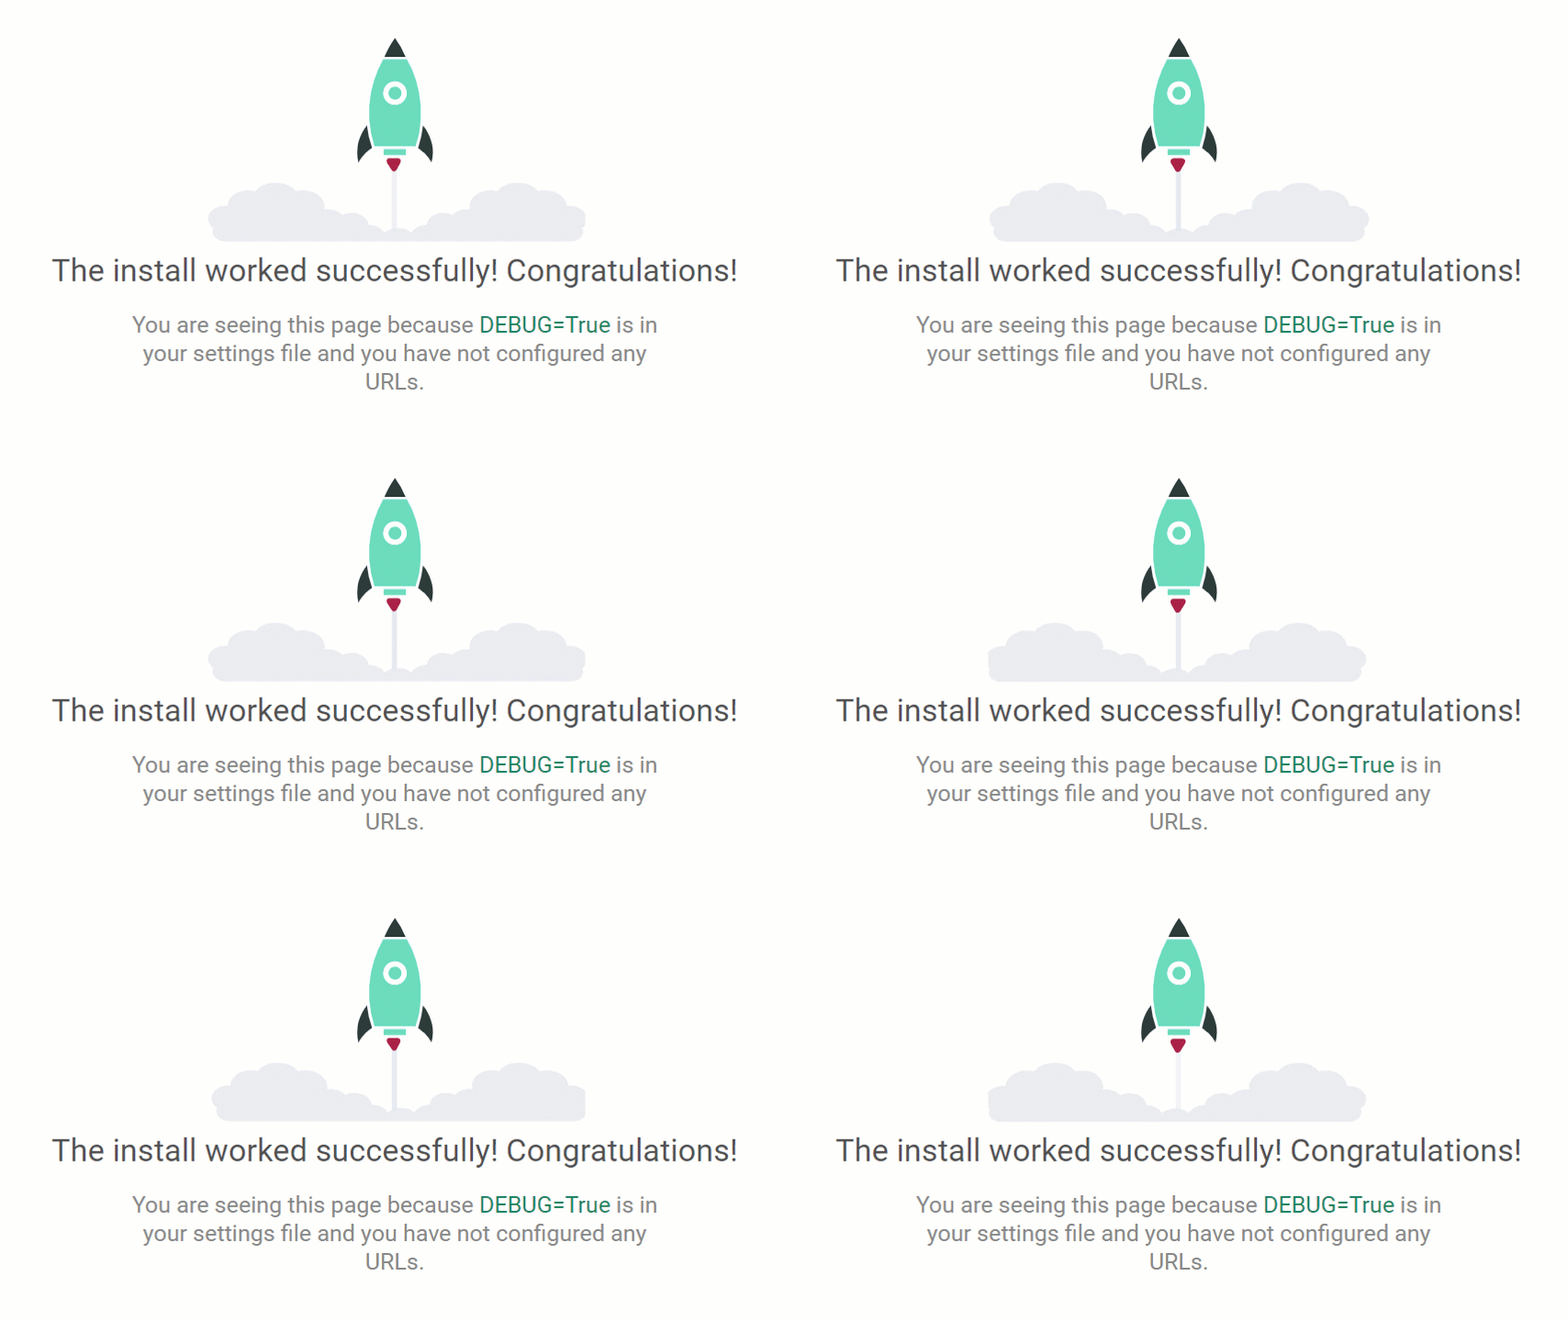
At this point, our basic Django project should be up and running, and when you open http://127.0.0.1:8000/ in your browser and see the rocket, then everything is fine:

After we have successfully created our new application we have to add it to INSTALLED_APPS inside settings.py file.

Note: We also have to add ‘rest_framework’ in the INSTALLED_APPS. So the INSTALLED_APPS list at this point would look like the below:

INSTALLED_APPS = [
'django.contrib.admin',
'django.contrib.auth',
'django.contrib.contenttypes',
'django.contrib.sessions',
'django.contrib.messages',
'django.contrib.staticfiles',

'rest_framework',
'notes_app',

]

And the project tree should look like this:

django-vuejs-heartbeat
├── notes_app
│ ├── __init__.py
│ ├── admin.py
│ ├── apps.py
│ ├── migrations
│ │ └── __init__.py
│ ├── models.py
│ ├── tests.py
│ └── views.py
├── manage.py
├── notes_heartbeat_project
│ ├── __init__.py
│ ├── asgi.py
│ ├── settings.py
│ ├── urls.py
│ └── wsgi.py
└── env

2. Create database models

We need to create a model called Note

from django.db import models


class Note(models.Model):
title = models.CharField(max_length=255, blank=True, null=True)
content = models.TextField(blank=True, null=True)
last_updated_on = models.DateTimeField(auto_now=True)

def __str__(self):
return self.title

Create a new python file called serializers.py and add the serialized model

from rest_framework import serializers

from notes_heartbeat.notes_app.models import Note


class NoteSerializer(serializers.ModelSerializer):
class Meta:
model = Note
fields = ('id', 'title', 'content', 'last_updated_on',)

Run migrations to create the new Note model in the database

python manage.py makemigrations
python manage.py migrate

You know that the migrations run successfully if you see something like this after you run the commands above:

~django-vuejs-heartbeat/notes_heartbeat_project ❯ python manage.py makemigrations                                                                                                      
Migrations for 'notes_app':
notes_app/migrations/0001_initial.py
- Create model Note
~/django-vuejs-heartbeat/notes_heartbeat_project ❯ python manage.py migrate                                                                                                             
Operations to perform:
Apply all migrations: admin, auth, contenttypes, notes_app, sessions
Running migrations:
Applying notes_app.0001_initial... OK

3. Create CRUD APIs

Now let’s create the APIs to create new notes, edit notes, delete notes, or view them.

from rest_framework.viewsets import ModelViewSet

from .models import Note
from .serializers import NoteSerializer


class NoteViewSet(ModelViewSet):
queryset = Note.objects.all()
serializer_class = NoteSerializer

As you can see we only wrote a few lines of code and we created our basic create, retrieve, update, and delete APIs. Django is amazing!!!
In order to access those APIs, we must add the router to the URLs. We can do it as shown below.

Create a new file routers.py under the notes_heartbeat_project and add the following code to it.

from rest_framework import routers

from notes_app.views import NoteViewSet

router = routers.DefaultRouter()
router.register(r'note', NoteViewSet, basename='note')

Create a new urls.py file under the notes_app folder and add the newly created router to it.

from django.urls import path, include

from notes_heartbeat_project.routers import router

urlpatterns = [
path('api/', include(router.urls)),
]

Append the URLs of notes_app to the urls.py under the notes_heartbeat_project folder.

The code inside notes_heartbeat_project/urls.py now looks like so:

from django.contrib import admin
from django.urls import path, include

urlpatterns = [
path('admin/', admin.site.urls),
path('', include('notes_app.urls'))
]

At this point, we are ready to test our APIs using the browsable DRF API.
These are our APIs:

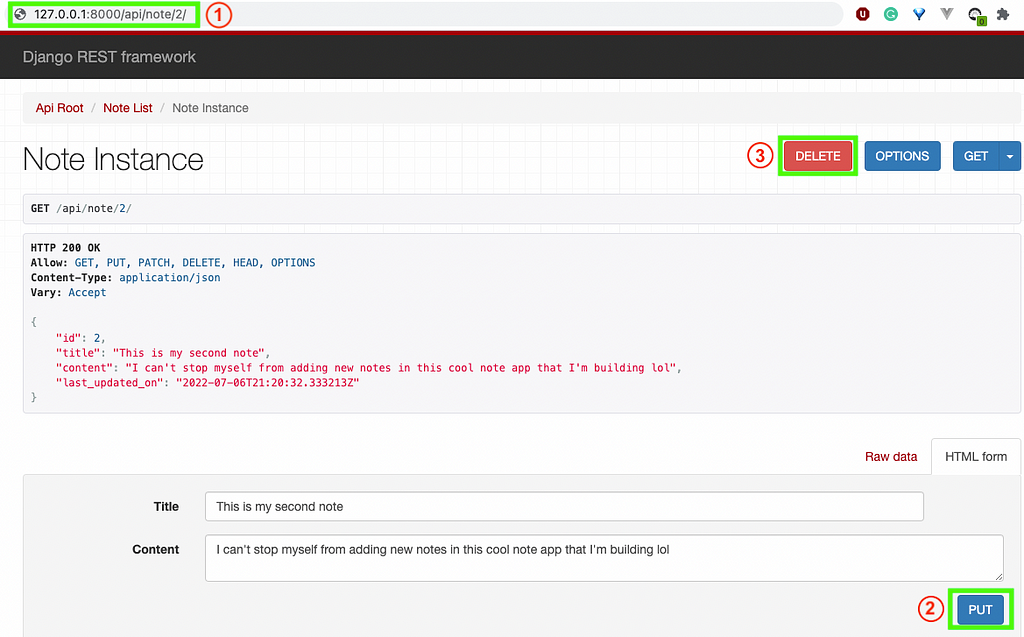
You can add new notes, update them or delete them using the newly created API links. For instance, if you want to update or delete an existing note you can do it using the Django REST browsable API like in the screenshot below:

DRF Browsable API for PUT/DELETE methods

From the screenshot above:

1 → Shows the URL which allows us to access the API for PUT/DELETE methods for the note with id=2: http://127.0.0.1:8000/api/note/2/
2 →With the PUT button we can update the note with id=2
3 →With the DELETE button we can delete the note with id=2

3.1 Frontend code

Let’s add the UI for the backend that we have built so far and play with it.
I will use Vue.js for the front-end part of the Notes application. Now that we have the working APIs we will add the Django templates to make it easy for us to add new notes or edit/delete them.

Here is the code for the “Note Update” view in notes_app/views.py:

class NoteUpdateView(UpdateView):
template_name = 'notes_app/note_edit.html'
model = Note
fields = ['title', 'content']

And add the URL to notes_app/urls.py and the URLs now look as below:

urlpatterns = [
path('', TemplateView.as_view(template_name='notes_app/notes.html')),
path('api/', include(router.urls)),
path('note/<int:pk>/update/', NoteUpdateView.as_view(), name='note_update'),
]

We will add the Vue.js part now where we will create the functions needed to do the CRUD actions using the UI. The code where we get all the notes and populate the landing page with all the notes looks as below:

3.1.1 Configuring Vue.js with Django

The easiest way to configure Vue.js with our project is to add the CDN of Vue.js to the notes_app/templates/notes_app/index.html.

<script src="https://cdn.jsdelivr.net/npm/vue@2.7.0/dist/vue.js"></script>

The full code for index.html can be found here.

3.1.2 Adding Vue instance to work with Django

https://medium.com/media/d183495531576b9b5bde8470588d88e7/href

3.1.3 Adding Vue.js functionality for Update Note API

BASE_URL = 'http://127.0.0.1:8090/'
BACKEND_PATH = 'api/note/'
new Vue({
el: '#note_edit',
delimiters: ['[[', ']]'],
data: {
current_note: note_obj,
message: false,
},
methods: {
updateNote: function () {
this.loading = true;
this.$http.put(`${BASE_URL + BACKEND_PATH + this.current_note.id}/`, this.current_note)
.then((response) => {
this.current_note = response.data;
this.message = true;
})
.catch((err) => {
this.message = false;
console.log(err);
})

},
closeWindow: function () {
window.close()
}
},
});

3.1.4 Adding a Django template to show the list of Notes on the landing page.

https://medium.com/media/e9d252d098a97ef33293ed1501ce47c4/href

3.1.5 Adding the template to update a singular note.

Add this note_edit.html template under notes_app/templates/notes_app folder.

{% extends 'notes_app/index.html' %}

{% block content %}
<div id="note_edit">
{% include 'notes_app/partials/edit.html' %}
</div>
{% endblock content %}

{% block scripts %}
{% load static %}
<script>
let note_obj = {
id: '{{ object.id }}',
title: '{{ object.title|escapejs }}',
content: '{{ object.content|escapejs }}'
};
</script>
<script src="{% static 'notes_app/js/note_edit.js' %}"></script>
{% endblock scripts %}

Add the edit partial:
In the partials folder, i.e. notes_app/templates/notes_app/partials add edit.html partial with this code:

<div v-if="message">
<div class="container">
<div class="alert alert-success alert-dismissable" role="alert">
<button type="button" class="close" data-dismiss="alert" aria-label="Close">
<span aria-hidden="true">&times;</span>
</button>
Note updated successfully.
</div>
</div>
</div>

{% csrf_token %}
<form v-on:submit.prevent="updateNote()">
<div class="modal-body">
<div class="form-group">
<label for="note_title">Title</label>
<input
type="text"
class="form-control"
id="note_title"
placeholder="Enter Note Title"
v-model="current_note.title"
required="required">
</div>
<div class="form-group">
<label for="note_content">Content</label>
<textarea
class="form-control"
id="note_content"
placeholder="Enter Note Content"
v-model="current_note.content"
required="required"
rows="3"></textarea>
</div>
</div>
<div class="modal-footer">
<button type="button" class="btn btn-secondary m-progress" @click="closeWindow()">
Close
</button>
<button type="submit" class="btn btn-primary">Save changes</button>
</div>
</form>

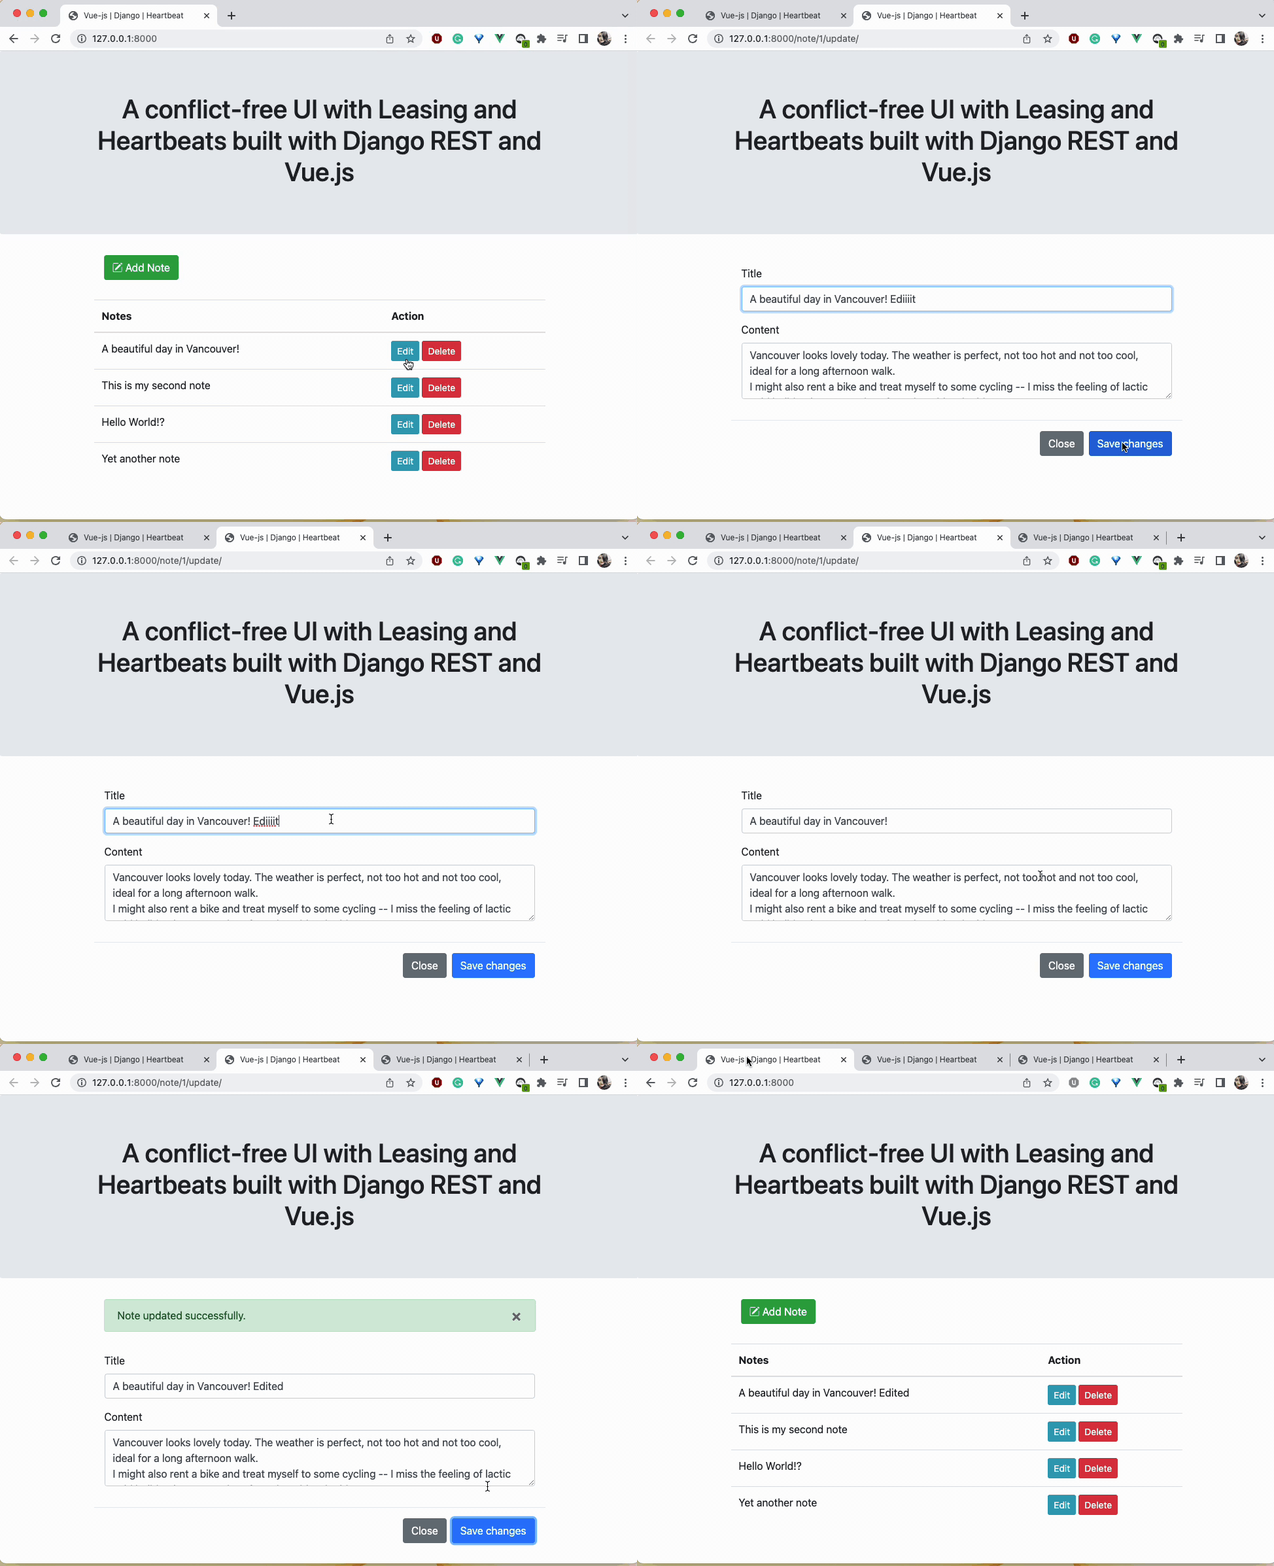
Now that we added all the functionality needed to add/edit/delete notes using the UI, our app behaves as shown in the screenshot below.

Edit Notes — Conflicting UI

What is going on in the scenario above?

1. The landing page shows the list of notes

2. User1 opens note_id=1 and edits it

3. User2 also opens note_id=1 and edits it

4. User1 is not aware of User2 action and thus thinks that they have the updated version of the note_id=1

5. User2 also is not aware that User1 is updating the note_id=1

6. User1 and User2 submit the form and save the changes

7. Database saves the last updated version of note_1=1

8. Changes of User1 have been lost or changes of User2 have been lost, depending on which database save operation succeeds first.

“Leasing with Heartbeat” to the rescue.

4. Create the Heartbeat API

In this section, we will create the Heartbeat API and fix the problem described above.

4.1 Adding the “last_updated_on” field to the Note model

Now our models in notes_app/models.py look like the below:

https://medium.com/media/bf42804d0a2faf9a618c7ee2fc7eefee/href

4.2 Adding the fields to serialization

We also have to update the serialization of the Note model and add the new field to it. The updated serializer class in notes_app/serializers.py is below:

from rest_framework import serializers

from .models import Note


class NoteSerializer(serializers.ModelSerializer):
class Meta:
model = Note
fields = ('id', 'title', 'content', 'last_updated_on', 'locked_at', 'is_locked',)

4.3 Adding Heartbeat API to the views

This is our heartbeat API in notes_app/view.py:

class LockNoteAPI(APIView):
def post(self, request, **kwargs):
note = get_object_or_404(Note, id=self.kwargs['pk'])
note.lock()
return HttpResponse(status=status.HTTP_200_OK)

We also want to add some messaging to the UI to let the user know that someone else is editing this Note and that they have to wait until the Note gets unlocked. The updated notes_app/view.py now looks like so:

https://medium.com/media/a4a92dc20afdef0496c3041536b634cb/href

4.4 Adding Heartbeat API to the URLs

Now let’s also update the notes_app/urls.py to reflect the new changes.

from django.urls import path, include
from django.views.generic import TemplateView

from notes_heartbeat_project.routers import router

from .views import NoteUpdateView, LockNoteAPI

urlpatterns = [
path('', TemplateView.as_view(template_name='notes_app/notes.html')),
path('api/', include(router.urls)),
path('api/note/lock-note/<int:pk>/', LockNoteAPI.as_view()),
path('note/<int:pk>/update/', NoteUpdateView.as_view(), name='note_update'),

]

4.5 Adding the front-end changes to put this functionality into place

We will add the method responsible to extend the lock for 60 seconds called “lockNoteHeartbeat” in notes_app/js/note_edit.js. We will periodically call this method in the mounted() hook using JavaScript’s setInterval() method.

https://medium.com/media/3bab04b89172fb17b4915c65a7616075/href

4.6 Adding view template

We need to add a view.html partial that will not allow users to edit the Note that is being edited by someone else.

This is our notes_app/templates/notes_app/partials/view.py

<div id="note_view">
<div class="modal-body">
<div class="form-group">
<label for="note_title">Title</label>
<input
type="text"
class="form-control"
id="note_title"
value="{{ object.title }}"
required="required"
readonly>
</div>
<div class="form-group">
<label for="note_content">Content</label>
<textarea
class="form-control"
id="note_content"
required="required"
rows="3"
readonly>{{ object.content }}</textarea>
</div>
</div>
<div class="modal-footer">
<button type="button" class="btn btn-secondary m-progress" onclick="window.close()">
Close
</button>
</div>
</div>

And the final version of note_edit.html now looks like the below:

https://medium.com/media/eb680951a42cd4cc9e83f0e506c5dd8d/href

4.7 Running the migrations

What’s left now is to run the migrations again to reflect changes made to the Note model and add the new field ‘locked_at’ to the Note table in the database.

~/django-vuejs-heartbeat/notes_heartbeat_project ❯ python manage.py makemigrations                                                                                         
Migrations for 'notes_app':
notes_app/migrations/0002_note_locked_at.py
- Add field locked_at to note
~/Desktop/django-vuejs-heartbeat/notes_heartbeat_project ❯ python manage.py migrate
Operations to perform:
Apply all migrations: admin, auth, contenttypes, notes_app, sessions
Running migrations:
Applying notes_app.0002_note_locked_at... OK

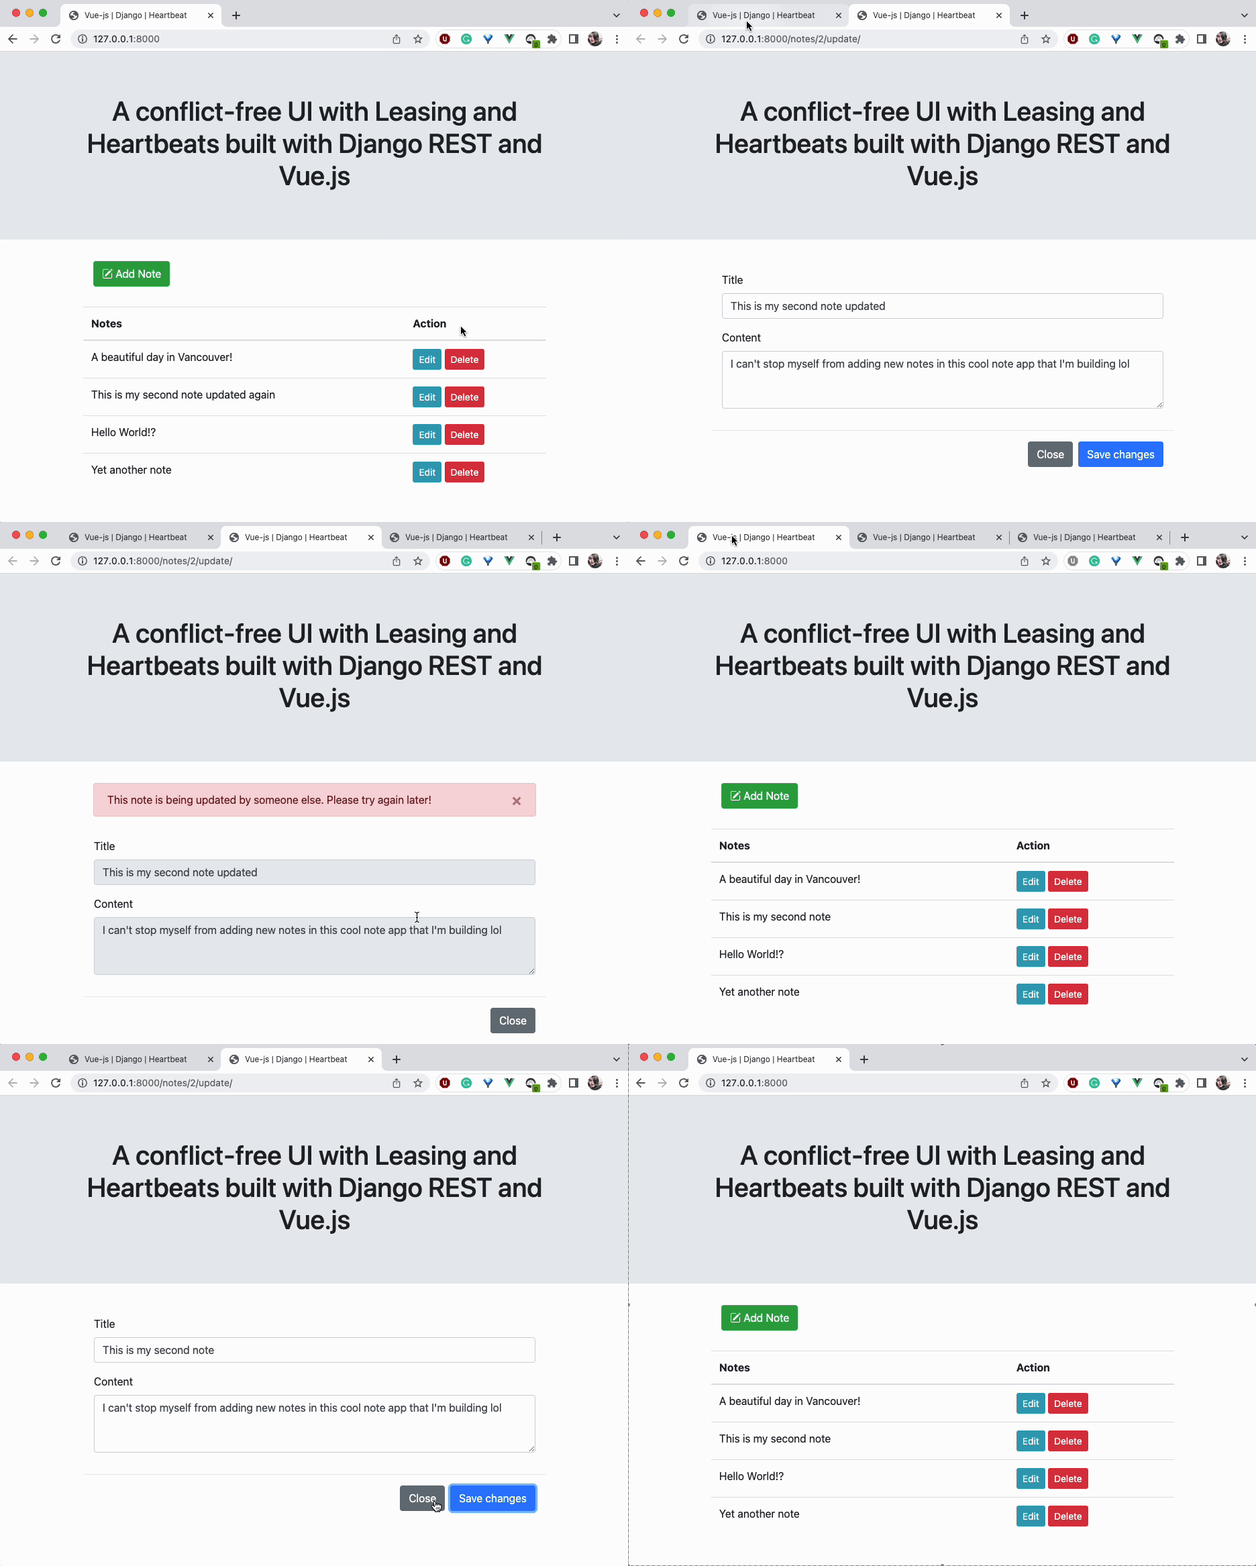
Now our example will look as below:

Conflict-free UI

As we can see from the example above we have fixed the outstanding issue of note editing by multiple users.

1. The landing page shows the list of notes

2. User1 opens note_id=1 and edits it successfully as note_id=1 is not locked

3. User1 extends the lock by 60 seconds

4. User2 also opens note_id=1

5. User2 is redirected to the read-only version of the note

6. User2 sees the message saying “This note is being updated by someone else. Please try again later!”

7. Database saves the updated version of note_1=1 by User1

8. Changes of User1 have been saved

Conclusion

In this tutorial, we have shown how to use the heartbeat with lease mechanism to ensure a conflict-free editing experience for multiple users. I hope you find this tutorial useful and I’d be happy to hear your feedback in the comments!

References and resources:

https://static.googleusercontent.com/media/research.google.com/en//archive/gfs-sosp2003.pdf

Level Up Coding

Thanks for being a part of our community! More content in the Level Up Coding publication.
Follow: Twitter, LinkedIn, Newsletter
Level Up is transforming tech recruiting 👉 Join our talent collective


Building a Conflict-free UI with Leasing and Heartbeat using Django REST and Vue.js was originally published in Level Up Coding on Medium, where people are continuing the conversation by highlighting and responding to this story.


This content originally appeared on Level Up Coding - Medium and was authored by Fatime Selimi

A Proof of Concept (POC) on how to implement a conflict-free UI

Photo by Leon Bredella on Unsplash

Background

Imagine a system where there are many users who need to edit several forms that are in a queue. Imagine also that those forms have multiple lengthy sections. It can happen that multiple users may start editing the same form and fill in a lot of fields. And when they hit save, one of them gets an error that there was a “Stale exception” because the form was already edited by someone else. Or even worse, one of the user’s changes is lost and the user doesn’t even get an exception. So all the user’s work goes to waste. This is not ideal because of the wasted effort, so we want to find a solution to this problem.

A real-life example of such lengthy forms could be application approval forms that government agencies might have. These documents are typically assigned to multiple application assessors who need to review external applications and add more metadata to the application.

Solution

An elegant solution to this problem is to use the “Leasing with Heartbeat “ algorithm that is typically used in distributed systems for maintaining a lock on any given entity. An example distributed system that uses this algorithm is The Google File System (GFS) paper.

The idea is that the user who is updating the document will also keep the lock of that document and will periodically send a heartbeat message to the server to extend that lock. This way the user keeps the lock alive for as long as their page remains open and can continue updating the document. When no heartbeat is sent to the server within a configured timeout period, the server does not extend the lease period, so the lock will expire automatically. Then the next user can obtain the lock.

If user “Alice” is editing the document “A”, then the database will have an entry that document “A” is locked until a certain time period.
If user “Bob” opens the page while the lock is not expired, “Bob” will not even be allowed to start editing the form and he will see a message that the form is locked. If “Alice” closes her webpage, then the lock is released after some time, so “Bob” can start working on the document later if necessary.

This solves the problem of wasting the effort of our users because we preemptively tell the users with a clear message that the page is being edited by someone else. Our clear message can also contain the name of the other user that is editing the page and the time until the page is locked as an extension.

Below we go into technical details of how to implement this proof of concept. We use a sample project where users can add/edit/create Notes.

The code of the proof of concept can be found in the GitHub repository found in this link.

Technologies used:

Python 3.10
Django 4.0
Vue.js 2.7.0
Django REST framework (DRF)

Note: This article assumes that you already know the basics of Django and DRF.

We will follow these steps to create our Notes web application:

  1. Set up a Django project
  2. Create database models
  3. Create the CRUD APIs
  4. Create the Heartbeat API
For the readers who are interested only in the implementation of leasing with heartbeat then please go to section 4. Create the Heartbeat API.

1. Set up a Django project

In this step, we’re going to build a basic Django application. When starting a Django project, some boilerplate code is involved, so I’ll include all the boilerplate steps to set up a Django project using the shell script below.

Note that you can run these commands on the terminal following the same order.

At this point, our basic Django project should be up and running, and when you open http://127.0.0.1:8000/ in your browser and see the rocket, then everything is fine:
After we have successfully created our new application we have to add it to INSTALLED_APPS inside settings.py file.

Note: We also have to add ‘rest_framework’ in the INSTALLED_APPS. So the INSTALLED_APPS list at this point would look like the below:

INSTALLED_APPS = [
'django.contrib.admin',
'django.contrib.auth',
'django.contrib.contenttypes',
'django.contrib.sessions',
'django.contrib.messages',
'django.contrib.staticfiles',

'rest_framework',
'notes_app',

]

And the project tree should look like this:

django-vuejs-heartbeat
├── notes_app
│ ├── __init__.py
│ ├── admin.py
│ ├── apps.py
│ ├── migrations
│ │ └── __init__.py
│ ├── models.py
│ ├── tests.py
│ └── views.py
├── manage.py
├── notes_heartbeat_project
│ ├── __init__.py
│ ├── asgi.py
│ ├── settings.py
│ ├── urls.py
│ └── wsgi.py
└── env

2. Create database models

We need to create a model called Note

from django.db import models


class Note(models.Model):
title = models.CharField(max_length=255, blank=True, null=True)
content = models.TextField(blank=True, null=True)
last_updated_on = models.DateTimeField(auto_now=True)

def __str__(self):
return self.title

Create a new python file called serializers.py and add the serialized model

from rest_framework import serializers

from notes_heartbeat.notes_app.models import Note


class NoteSerializer(serializers.ModelSerializer):
class Meta:
model = Note
fields = ('id', 'title', 'content', 'last_updated_on',)

Run migrations to create the new Note model in the database

python manage.py makemigrations
python manage.py migrate

You know that the migrations run successfully if you see something like this after you run the commands above:

~django-vuejs-heartbeat/notes_heartbeat_project ❯ python manage.py makemigrations                                                                                                      
Migrations for 'notes_app':
notes_app/migrations/0001_initial.py
- Create model Note
~/django-vuejs-heartbeat/notes_heartbeat_project ❯ python manage.py migrate                                                                                                             
Operations to perform:
Apply all migrations: admin, auth, contenttypes, notes_app, sessions
Running migrations:
Applying notes_app.0001_initial... OK

3. Create CRUD APIs

Now let’s create the APIs to create new notes, edit notes, delete notes, or view them.

from rest_framework.viewsets import ModelViewSet

from .models import Note
from .serializers import NoteSerializer


class NoteViewSet(ModelViewSet):
queryset = Note.objects.all()
serializer_class = NoteSerializer

As you can see we only wrote a few lines of code and we created our basic create, retrieve, update, and delete APIs. Django is amazing!!!
In order to access those APIs, we must add the router to the URLs. We can do it as shown below.

Create a new file routers.py under the notes_heartbeat_project and add the following code to it.
from rest_framework import routers

from notes_app.views import NoteViewSet

router = routers.DefaultRouter()
router.register(r'note', NoteViewSet, basename='note')
Create a new urls.py file under the notes_app folder and add the newly created router to it.
from django.urls import path, include

from notes_heartbeat_project.routers import router

urlpatterns = [
path('api/', include(router.urls)),
]
Append the URLs of notes_app to the urls.py under the notes_heartbeat_project folder.
The code inside notes_heartbeat_project/urls.py now looks like so:
from django.contrib import admin
from django.urls import path, include

urlpatterns = [
path('admin/', admin.site.urls),
path('', include('notes_app.urls'))
]

At this point, we are ready to test our APIs using the browsable DRF API.
These are our APIs:

You can add new notes, update them or delete them using the newly created API links. For instance, if you want to update or delete an existing note you can do it using the Django REST browsable API like in the screenshot below:
DRF Browsable API for PUT/DELETE methods

From the screenshot above:

1 → Shows the URL which allows us to access the API for PUT/DELETE methods for the note with id=2: http://127.0.0.1:8000/api/note/2/
2 →With the PUT button we can update the note with id=2
3 →With the DELETE button we can delete the note with id=2

3.1 Frontend code

Let’s add the UI for the backend that we have built so far and play with it.
I will use Vue.js for the front-end part of the Notes application. Now that we have the working APIs we will add the Django templates to make it easy for us to add new notes or edit/delete them.

Here is the code for the “Note Update” view in notes_app/views.py:

class NoteUpdateView(UpdateView):
template_name = 'notes_app/note_edit.html'
model = Note
fields = ['title', 'content']

And add the URL to notes_app/urls.py and the URLs now look as below:

urlpatterns = [
path('', TemplateView.as_view(template_name='notes_app/notes.html')),
path('api/', include(router.urls)),
path('note/<int:pk>/update/', NoteUpdateView.as_view(), name='note_update'),
]

We will add the Vue.js part now where we will create the functions needed to do the CRUD actions using the UI. The code where we get all the notes and populate the landing page with all the notes looks as below:

3.1.1 Configuring Vue.js with Django

The easiest way to configure Vue.js with our project is to add the CDN of Vue.js to the notes_app/templates/notes_app/index.html.

<script src="https://cdn.jsdelivr.net/npm/vue@2.7.0/dist/vue.js"></script>

The full code for index.html can be found here.

3.1.2 Adding Vue instance to work with Django

3.1.3 Adding Vue.js functionality for Update Note API

BASE_URL = 'http://127.0.0.1:8090/'
BACKEND_PATH = 'api/note/'
new Vue({
el: '#note_edit',
delimiters: ['[[', ']]'],
data: {
current_note: note_obj,
message: false,
},
methods: {
updateNote: function () {
this.loading = true;
this.$http.put(`${BASE_URL + BACKEND_PATH + this.current_note.id}/`, this.current_note)
.then((response) => {
this.current_note = response.data;
this.message = true;
})
.catch((err) => {
this.message = false;
console.log(err);
})

},
closeWindow: function () {
window.close()
}
},
});

3.1.4 Adding a Django template to show the list of Notes on the landing page.

3.1.5 Adding the template to update a singular note.

Add this note_edit.html template under notes_app/templates/notes_app folder.

{% extends 'notes_app/index.html' %}

{% block content %}
<div id="note_edit">
{% include 'notes_app/partials/edit.html' %}
</div>
{% endblock content %}

{% block scripts %}
{% load static %}
<script>
let note_obj = {
id: '{{ object.id }}',
title: '{{ object.title|escapejs }}',
content: '{{ object.content|escapejs }}'
};
</script>
<script src="{% static 'notes_app/js/note_edit.js' %}"></script>
{% endblock scripts %}

Add the edit partial:
In the partials folder, i.e. notes_app/templates/notes_app/partials add edit.html partial with this code:

<div v-if="message">
<div class="container">
<div class="alert alert-success alert-dismissable" role="alert">
<button type="button" class="close" data-dismiss="alert" aria-label="Close">
<span aria-hidden="true">&times;</span>
</button>
Note updated successfully.
</div>
</div>
</div>

{% csrf_token %}
<form v-on:submit.prevent="updateNote()">
<div class="modal-body">
<div class="form-group">
<label for="note_title">Title</label>
<input
type="text"
class="form-control"
id="note_title"
placeholder="Enter Note Title"
v-model="current_note.title"
required="required">
</div>
<div class="form-group">
<label for="note_content">Content</label>
<textarea
class="form-control"
id="note_content"
placeholder="Enter Note Content"
v-model="current_note.content"
required="required"
rows="3"></textarea>
</div>
</div>
<div class="modal-footer">
<button type="button" class="btn btn-secondary m-progress" @click="closeWindow()">
Close
</button>
<button type="submit" class="btn btn-primary">Save changes</button>
</div>
</form>

Now that we added all the functionality needed to add/edit/delete notes using the UI, our app behaves as shown in the screenshot below.
Edit Notes — Conflicting UI

What is going on in the scenario above?

1. The landing page shows the list of notes
2. User1 opens note_id=1 and edits it
3. User2 also opens note_id=1 and edits it
4. User1 is not aware of User2 action and thus thinks that they have the updated version of the note_id=1
5. User2 also is not aware that User1 is updating the note_id=1
6. User1 and User2 submit the form and save the changes
7. Database saves the last updated version of note_1=1
8. Changes of User1 have been lost or changes of User2 have been lost, depending on which database save operation succeeds first.
“Leasing with Heartbeat” to the rescue.

4. Create the Heartbeat API

In this section, we will create the Heartbeat API and fix the problem described above.

4.1 Adding the “last_updated_on” field to the Note model

Now our models in notes_app/models.py look like the below:

4.2 Adding the fields to serialization

We also have to update the serialization of the Note model and add the new field to it. The updated serializer class in notes_app/serializers.py is below:

from rest_framework import serializers

from .models import Note


class NoteSerializer(serializers.ModelSerializer):
class Meta:
model = Note
fields = ('id', 'title', 'content', 'last_updated_on', 'locked_at', 'is_locked',)

4.3 Adding Heartbeat API to the views

This is our heartbeat API in notes_app/view.py:

class LockNoteAPI(APIView):
def post(self, request, **kwargs):
note = get_object_or_404(Note, id=self.kwargs['pk'])
note.lock()
return HttpResponse(status=status.HTTP_200_OK)

We also want to add some messaging to the UI to let the user know that someone else is editing this Note and that they have to wait until the Note gets unlocked. The updated notes_app/view.py now looks like so:

4.4 Adding Heartbeat API to the URLs

Now let’s also update the notes_app/urls.py to reflect the new changes.

from django.urls import path, include
from django.views.generic import TemplateView

from notes_heartbeat_project.routers import router

from .views import NoteUpdateView, LockNoteAPI

urlpatterns = [
path('', TemplateView.as_view(template_name='notes_app/notes.html')),
path('api/', include(router.urls)),
path('api/note/lock-note/<int:pk>/', LockNoteAPI.as_view()),
path('note/<int:pk>/update/', NoteUpdateView.as_view(), name='note_update'),

]

4.5 Adding the front-end changes to put this functionality into place

We will add the method responsible to extend the lock for 60 seconds called “lockNoteHeartbeat” in notes_app/js/note_edit.js. We will periodically call this method in the mounted() hook using JavaScript’s setInterval() method.

4.6 Adding view template

We need to add a view.html partial that will not allow users to edit the Note that is being edited by someone else.

This is our notes_app/templates/notes_app/partials/view.py

<div id="note_view">
<div class="modal-body">
<div class="form-group">
<label for="note_title">Title</label>
<input
type="text"
class="form-control"
id="note_title"
value="{{ object.title }}"
required="required"
readonly>
</div>
<div class="form-group">
<label for="note_content">Content</label>
<textarea
class="form-control"
id="note_content"
required="required"
rows="3"
readonly>{{ object.content }}</textarea>
</div>
</div>
<div class="modal-footer">
<button type="button" class="btn btn-secondary m-progress" onclick="window.close()">
Close
</button>
</div>
</div>

And the final version of note_edit.html now looks like the below:

4.7 Running the migrations

What’s left now is to run the migrations again to reflect changes made to the Note model and add the new field ‘locked_at’ to the Note table in the database.

~/django-vuejs-heartbeat/notes_heartbeat_project ❯ python manage.py makemigrations                                                                                         
Migrations for 'notes_app':
notes_app/migrations/0002_note_locked_at.py
- Add field locked_at to note
~/Desktop/django-vuejs-heartbeat/notes_heartbeat_project ❯ python manage.py migrate
Operations to perform:
Apply all migrations: admin, auth, contenttypes, notes_app, sessions
Running migrations:
Applying notes_app.0002_note_locked_at... OK

Now our example will look as below:
Conflict-free UI

As we can see from the example above we have fixed the outstanding issue of note editing by multiple users.

1. The landing page shows the list of notes
2. User1 opens note_id=1 and edits it successfully as note_id=1 is not locked
3. User1 extends the lock by 60 seconds
4. User2 also opens note_id=1
5. User2 is redirected to the read-only version of the note
6. User2 sees the message saying “This note is being updated by someone else. Please try again later!”
7. Database saves the updated version of note_1=1 by User1
8. Changes of User1 have been saved

Conclusion

In this tutorial, we have shown how to use the heartbeat with lease mechanism to ensure a conflict-free editing experience for multiple users. I hope you find this tutorial useful and I’d be happy to hear your feedback in the comments!

References and resources:

https://static.googleusercontent.com/media/research.google.com/en//archive/gfs-sosp2003.pdf

Level Up Coding

Thanks for being a part of our community! More content in the Level Up Coding publication.
Follow: Twitter, LinkedIn, Newsletter
Level Up is transforming tech recruiting 👉 Join our talent collective

Building a Conflict-free UI with Leasing and Heartbeat using Django REST and Vue.js was originally published in Level Up Coding on Medium, where people are continuing the conversation by highlighting and responding to this story.


This content originally appeared on Level Up Coding - Medium and was authored by Fatime Selimi


Print Share Comment Cite Upload Translate Updates
APA

Fatime Selimi | Sciencx (2022-07-11T11:52:08+00:00) Building a Conflict-free UI with Leasing and Heartbeat using Django REST and Vue.js. Retrieved from https://www.scien.cx/2022/07/11/building-a-conflict-free-ui-with-leasing-and-heartbeat-using-django-rest-and-vue-js/

MLA
" » Building a Conflict-free UI with Leasing and Heartbeat using Django REST and Vue.js." Fatime Selimi | Sciencx - Monday July 11, 2022, https://www.scien.cx/2022/07/11/building-a-conflict-free-ui-with-leasing-and-heartbeat-using-django-rest-and-vue-js/
HARVARD
Fatime Selimi | Sciencx Monday July 11, 2022 » Building a Conflict-free UI with Leasing and Heartbeat using Django REST and Vue.js., viewed ,<https://www.scien.cx/2022/07/11/building-a-conflict-free-ui-with-leasing-and-heartbeat-using-django-rest-and-vue-js/>
VANCOUVER
Fatime Selimi | Sciencx - » Building a Conflict-free UI with Leasing and Heartbeat using Django REST and Vue.js. [Internet]. [Accessed ]. Available from: https://www.scien.cx/2022/07/11/building-a-conflict-free-ui-with-leasing-and-heartbeat-using-django-rest-and-vue-js/
CHICAGO
" » Building a Conflict-free UI with Leasing and Heartbeat using Django REST and Vue.js." Fatime Selimi | Sciencx - Accessed . https://www.scien.cx/2022/07/11/building-a-conflict-free-ui-with-leasing-and-heartbeat-using-django-rest-and-vue-js/
IEEE
" » Building a Conflict-free UI with Leasing and Heartbeat using Django REST and Vue.js." Fatime Selimi | Sciencx [Online]. Available: https://www.scien.cx/2022/07/11/building-a-conflict-free-ui-with-leasing-and-heartbeat-using-django-rest-and-vue-js/. [Accessed: ]
rf:citation
» Building a Conflict-free UI with Leasing and Heartbeat using Django REST and Vue.js | Fatime Selimi | Sciencx | https://www.scien.cx/2022/07/11/building-a-conflict-free-ui-with-leasing-and-heartbeat-using-django-rest-and-vue-js/ |

Please log in to upload a file.


There are no updates yet.
Click the Upload button above to add an update.

You must be logged in to translate posts. Please log in or register.