This content originally appeared on Level Up Coding - Medium and was authored by Louise Findlay
How 1Password secrets automation will help secure, update & sync your developer secrets

The Problem with Secrets
As a developer, you’ll inevitably work with secrets. Sensitive information such as API Keys, user credentials, and database URLs to name a few. But how to best secure them?
After all, a .env file is just a text file albeit hidden. A hacker with access to the server or development filesystem would be able to read this information and often environment variables are leaked when logging.
The issue with alternatives such as Docker secrets is that they rely on you using a particular tool or piece of software for all your projects. It isn’t cross-platform.
There’s also the challenge of keeping them updated. If you modify your secrets on your development machine or server, then you also need to change this in production. This is particularly prevalent when working in teams. What if you could secure your secrets easily in both development and production as well as share them across your team?
The password manager, 1Password has recently released a great new feature to solve this: 1Password Secrets Automation.
What Is 1Password Secrets Automation?
1Password Secrets Automation refers to 1Password’s method of being able to securely store, sync, and retrieve secrets. There’s a range of different tools, extensions, and plugins behind it that allows you to use secrets wherever you need to such as code editors and cloud servers, etc.
At its core are secret references. A secret reference is the form of data that 1Password stores secrets as. They are made up of three parts: vault, item, and field. Vault refers to the 1Password vault you store your secret in, Item the name of the 1Password entry and field, the name of the field the secret is stored in.
A secret reference looks like this: op://Vault1/Sample API Key/api_key . The secret reference is what will be in your code and 1Password will translate that into your real secret.
How Do We Integrate 1Password Secrets Into Our Code Editor?

The first question is how do we get started with 1Password Secrets Automation? We often begin development either locally or remotely through our code editor. Visual Studio Code (VS Code) is one of the most popular and there’s an extension that will allow us to use 1Password to store our secrets.
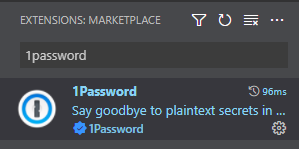
First, we need to install the 1Password extension via the VS Code Extension Marketplace. Open VS Code and go to the Extensions tab. Type 1Password into the search and install the extension.
Install 1Password CLI

If you haven’t used the Developer side of 1Password before, then a popup will appear in the bottom right informing you that CLI is not installed.
1Password CLI is the command-line interface for 1Password and is required for most developer integrations including 1Password Secrets Automation. Click the button: Open installation documentation and follow the instructions for your OS (operating system).
Once you’ve installed 1Password CLI, another popup will appear on VS Code prompting you to Choose account. Click the account you wish to use and authenticate yourself.

You don’t just have to use your password to authenticate with the VS Code extension. You can also enable biometric unlock for 1Password CLI in 1Password > Settings > Developer to use any of the biometric authentication methods you already use with the 1Password desktop app such as fingerprint (Touch ID and Windows Hello), PIN, facial recognition (Face ID and Windows Hello) or Apple Watch.
Finally, choose a 1Password Vault you wish to use. If you’re collaborating with a team, then choose a shared vault so your secrets are shared amongst your team members. That’s the setup complete for the 1Password extension.
Create New Secret References

We can either create a new secret reference that uses 1Password to generate a secure password for us (which is useful for creating user credentials for services such as API Keys or other developer software) or save an existing secret in 1Password and replace the existing one with a secret reference.
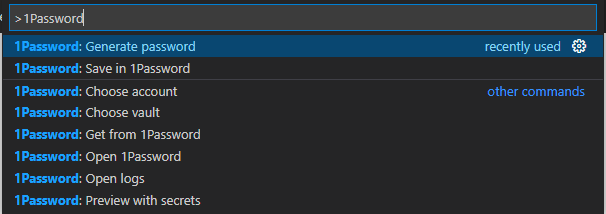
To create a new secure password and save it as a secret reference, open the command palette and access 1Password: Generate Password. Once you’ve entered a title for the entry, 1Password will generate a secure password, store it in your vault and add the secret reference to your code.
Convert Existing Secrets to Secret References
To save an existing secret in 1Password, highlight the secret you wish to add. If you want to add multiple secrets to the same entry because they’re related (for example, working with an API that requires a URL, email, and API Key, then highlight them all with multiple cursors.
Next, open the command palette and go to 1Password: Save in 1Password. The dialog box will ask you for the name of the entry and the title of the field. Once complete, your secrets will be replaced with secret references.
Click on the reference to reveal the 1Password Item Name, date of creation, and last update and the contents of the secret.
One great advantage of the extension is that if we’ve already added secrets to our code, the extension will detect them and suggest to us we should turn them into secret references instead. Click on Save In 1Password to initiate the process.
But What About Our Remote Servers?
How will 1Password Secrets Automation work on remote headless servers? When we deploy our code to production, this is often on remote headless servers in the cloud.
Since they are headless and don’t have a GUI (graphical user interface), we can’t install 1Password Desktop on them to authenticate ourselves so we can’t retrieve the correct values for our secret references or can we?
1Password CLI has the solution.
Set up 1Password CLI on a Remote Server

First, install 1Password CLI on your remote server in the same way we did on your host OS for VS Code. Then run op vault ls. This will prompt you to add your 1Password account. We can’t authenticate biometrically since we’re using a remote server but we can add our account manually.
Next, add the sign-in address of your 1Password account. If you’re using a Personal or Family account in the default region, this will be https://my.1password.com. You can check your sign-in address by opening the 1Password desktop app, clicking on your username in the top-left > Set Up Another Device, and noting your Sign-in Address.
You’ll also need your email address, secret key, and master password. These can all be found in your 1Password Account entry. You may also be asked for a six-digit authentication code if you’ve activated 2FA (two-factor authentication) for your account.
Once you’ve added your account details, run eval$(op signin)as requested. Finally, you’ll need to enter your password again and then you’ll be signed in to your 1Password account. Run op vault ls to confirm. You should now see a list of your 1Password vaults.
Integrate 1Password Secrets in a Remote Server
In a production environment, often all the secrets are located in one config file. In this scenario, we can use 1Password secret references to safely commit the config file to source control so everyone can access the latest version (otherwise team members will run into issues running the latest code without updated secrets) without exposing their real values.
Either create a new config file via VS Code and create the relevant secret references or you can do this via the 1Password CLI in your remote server. Visit the docs if you want to use the CLI approach. The file should have a .tpl file extension such as config.json.tpl.
Finally, we need to replace the secret references with the real secret values when we want to run our application by using the 1Password CLI’s inject command. op inject -i config.json.tpl -o config.json.
Congrats, You’ve Set Up 1Password Secrets Automation
Congratulations. You’ve now set up 1Password Secrets Automation in both your code editor and a remote server. Your secrets are safe and can be securely shared and updated across multiple environments.
Want to Read More?
Subscribe to my newsletter for more technical guides and tutorials for developers.
Resources
1Password Visual Studio Code Announcement
Getting Started with 1Password CLI 2
Load Secrets Into Config Files|1Password CLI Docs
Level Up Coding
Thanks for being a part of our community! More content in the Level Up Coding publication.
Follow: Twitter, LinkedIn, Newsletter
Level Up is transforming tech recruiting 👉 Join our talent collective
The Awesome New 1Password Feature for Developers to Secure and Manage Your Secrets was originally published in Level Up Coding on Medium, where people are continuing the conversation by highlighting and responding to this story.
This content originally appeared on Level Up Coding - Medium and was authored by Louise Findlay
Louise Findlay | Sciencx (2022-07-13T01:42:48+00:00) The Awesome New 1Password Feature for Developers to Secure and Manage Your Secrets. Retrieved from https://www.scien.cx/2022/07/13/the-awesome-new-1password-feature-for-developers-to-secure-and-manage-your-secrets/
Please log in to upload a file.
There are no updates yet.
Click the Upload button above to add an update.
