Building a localized jet tracker using a Raspberry Pi

RTL-SDR Blog RTL2832U & Raspberry Pi 4

After seeing all of the jet tracking news and finishing my last project around radio frequency, I remembered that the ADS-B system all aircraft support uses RF as well. This got me wondering — how easy is it to work with these ADS-B messages and how could I build a project around it?

To test this out, we’ll set up a Raspberry Pi using a custom image and intercept the ADS-B messages as they are broadcasted from the aircraft using a bit of special hardware called a software-defined radio. We can then set up some automation to parse that data and log which exact aircraft are flying overhead every minute — or even better send us an email if a specific aircraft flies overhead.

ADS-B

Automatic Dependent Surveillance–Broadcast, or ADS-B, is the technology used in different aircraft to transmit information like its unique tail number or flight number, its altitude, speed, heading, and more. ADS-B information is typically received by ground stations to help provide context around incoming or outgoing aircraft in addition to their radar. It’s also received by other aircraft to help provide situational awareness and helps pilots keep themselves separated from other aircraft.

This information is broadcasted over 1090 MHz, which luckily for us, is well within the range that can be picked up by hobbyist software-defined radios. It’s also required on all aircraft (with some exceptions for military or government), so there is no avoiding being seen. However, the data will require special software to decode it and turn it into something that can easily be used.

SDR

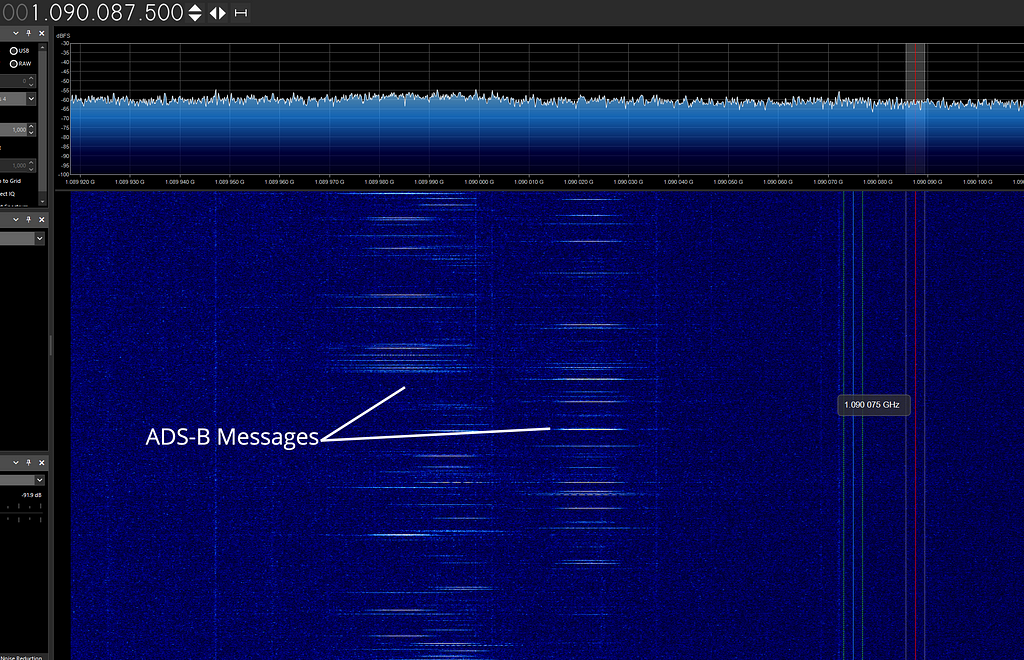
An SDR, or software-defined radio, is just like a regular radio receiver except instead of physical controls all of the controls are implemented and controlled through software. Tools can then tune this radio to the frequency they desire and parse the incoming data, or you can use an application like SDRSharp or CubicSDR and browse the different frequencies visually:

SDRSharp’s waterfall graph is shown with some ADS-B messages visible
ADS-B messages are shown in SDRSharp’s waterfall graph when tuned to 1090 MHz

While SDRs are not a new technology, they have usually been too expensive for the average tinkerer — costing in the range of hundreds to usually thousands of dollars. The RTL-SDR was discovered via cheap DVB-T TV tuner dongles that allowed hardware access thus allowing it to be controlled via a custom driver. Even now the RTL-SDR is still one of the cheapest SDRs as most are $100+.

I picked up the RTL-SDR Blog RTL2832U SDR for $30 along with a dipole antenna for $15. I figured this would be a good starting point for my SDR experiments since it is a low price point and well supported in the community.

The RTL-SDR Blog RTL2832U SDR
RTL-SDR device

And while we are only using this SDR for one frequency, this device supports any frequency from 500 kHz to 1.7 GHz so it could pick up a lot more than just ADS-B messages. During some of my initial testing, I picked up radar systems, amateur radio, first responder communication channels, weather channels, airport communication, and much more.

Software

To start intercepting and decoding the ADS-B messages, we first need to install our decoder. There are a few community-prepared images that we can use to jumpstart our SDR tests and will make installing the decoder easier.

PiSDR

PiSDR is a modified Raspbian image with a whole host of SDR-related software and drivers pre-installed. I ran into some issues installing some of the libraries required for this project on my default Raspbian image, so this image took all of the headaches away.

Since this is a prepared image, we can download the image via the GitHub Releases page for the project, extract it, and then flash it onto an SD Card for use in our Raspberry Pi. The images are compressed in XZ format, so you’ll need to have the appropriate packages installed for your operating system:

# Mac OS
$ brew install xz
# Debian Linux
$ sudo apt install xz-utils
# Extract the image
$ unxz 2022-01-07-PiSDR-vanilla.img.xz

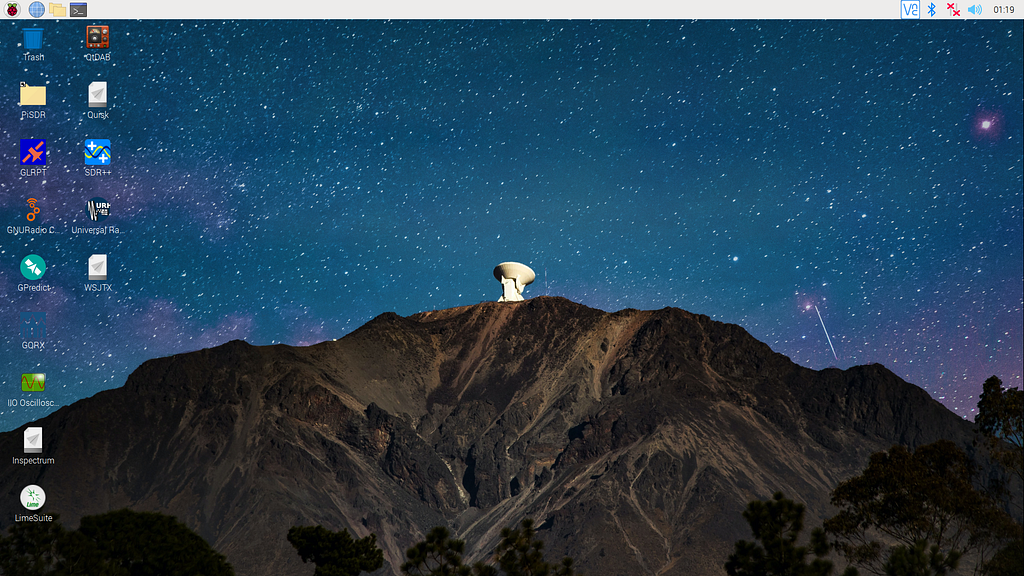
Once extracted, you’ll want to use a program like Balena Etcher to flash the image file onto the 16GB+ SD card of your choosing. Once you have the image flashed, it can be booted like a normal Raspbian image and configured in the same manner using the guided tour on launch. PiSDR supports every Raspberry Pi model (even the zero!)

The PiSDR desktop is shown
PiSDR Desktop

Now that we have PiSDR installed, we can move on to installing the specific software we need to intercept the ADS-B messages!

Dump1090

dump1090 is a tool to parse the incoming ADS-B messages and get all the relevant information from the packets. It’ll handle connecting to the SDR, and parsing the messages and it can also provide a web interface that we can use to fetch the flight information from our own script.

To get started, we first need to clone the repository for the tool and build it. If you aren’t using the PiSDR image, you’ll need to install rtl-sdr beforehand. To clone and build dump1090, we can do it like so:

# Clone the repo
$ cd /opt
$ git clone https://github.com/antirez/dump1090
$ cd dump1090
# Build the binary
$ make

Antenna configuration

Before we run the tool, we first need to set up our antenna. I purchased a dipole kit along with the SDR, which works well enough but there are better (and more expensive) antennas sold specifically for 1090 MHz. Depending on which frequency you are targeting and your antenna, it will need to be a specific length or configuration. Using an online calculator, it let me know that I needed each antenna of the dipole to be 6.5 CM long for optimal reception.

A dipole antenna mounted on a tripod

Getting started

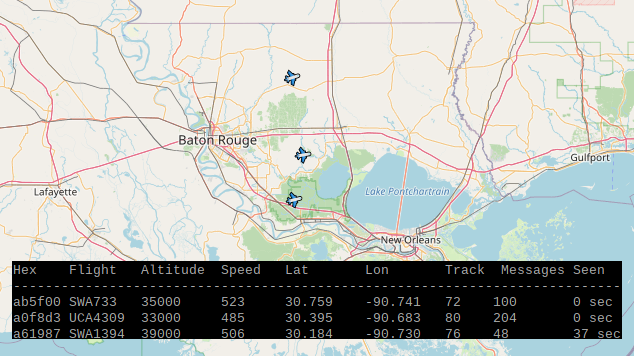
Now that we have our antenna and dump1090 built and installed, you could use it as is since it provides an interactive table and web interface to use if desired:

$ dump1090 --net --interactive

This will give us a table view of the flights in range, or we can navigate over to the web interface to see a visual representation:

But this would require us to constantly watch the flight information and see who’s flying over — it would be much cooler if we could set up alerts for specific planes. Luckily, we can use the web interface’s JSON endpoint to remotely fetch the information in our own script which we can automate easily.

Detecting jets

Each aircraft has a unique tail number assigned like N315DU, much like our cars have license plate numbers. This tail number is communicated in the ADS-B packets as well, so we can see which exact planes are flying overhead. If it is a commercial airline, it may communicate its flight number like ENY3432 instead.

As we fetch the flight information from the dump1090 endpoint, we’ll trim out any extra whitespace and keep just the flight numbers since that’s all we’ll really need. We can then use the requests library to build a simple script to get all of the flights in range:

import json
import requests

DUMP1090_ENDPOINT = 'http://192.168.86.202:8080'

def get_flights():
# Load the flight data from a local JSON file
#with open('example.json', encoding='utf-8') as f:
# data = json.load(f)

# Load the flight data from a dump1090 endpoint
response = requests.get(f'{DUMP1090_ENDPOINT}/data.json')
data = response.json()

# Get only the flight names from the data records
flights = map(lambda record: record['flight'].strip(), data)

# Return a set of flights which are not empty
return set(filter(lambda name: name, flights))

flights = get_flights()

print('Found flights:', flights)

Running the script, I was able to pick up all of the flights in range, verified through Flight Radar 24:

Found flights: {'N779JG'}

Automation

However, we need to automate our script and have it run at regular intervals so we can always see which jets are flying overhead. Luckily, we can create a few systemd services and a timer to take care of that for us!

Systemd

We’ll first need to set up a service to run dump1090 and keep it up, which can be done using this service file. Then, we need to create a parser service and a timer for our script. Afterward, we can install these files into systemd and start them up:

# Copy the files to systemd
$ git clone https://github.com/makvoid/Blog-Articles
$ mv Blog-Articles/Localized-Jet-Tracker /opt/
$ cd /opt/Localized-Jet-Tracker/systemd
$ sudo cp dump1090* /usr/lib/systemd/system
# Load the new services/timer
$ sudo systemctl daemon-reload
# Start the dump1090 service and the parser timer
$ sudo systemctl enable dump1090 && sudo systemctl start dump1090
$ sudo systemctl enable dump1090-parser.timer && \
sudo systemctl start dump1090-parser.timer

As configured, it runs the parser every minute. But this is easily modified by changing the OnCalendar value within the timer’s file.

Notifications

As is, the script would just log the flights to the timer’s journal, which you could access by running journalctl -u dump1090-parser.timer. A step further would be to set up automatic email notifications using an email service like Amazon SES or Twilio SendGrid. In the script, we just need to specify which tail numbers we are interested in and then let the script do all the hard work for us! I already use SES in a few other projects so I proceeded forward with that service:

import boto3
from botocore.exceptions import ClientError
import datetime
import json
import requests

# Configuration
CHARSET = 'UTF-8'
FLIGHTS_OF_INTEREST = ['FLY711']
DUMP1090_ENDPOINT = 'http://192.168.86.202:8080'

# Create a new SES resource and specify the region
client = boto3.client('ses', region_name='us-west-2')

def get_flights():
# Load the flight data from a dump1090 endpoint
response = requests.get(f'{DUMP1090_ENDPOINT}/data.json')
data = response.json()

# Get only the flight names from the data records
flights = map(lambda record: record['flight'].strip(), data)

# Return a set of flights which are not empty
return set(filter(lambda name: name, flights))

# Helper function to iterate over a list and fn
def each(fn, items):
for item in items:
fn(item)

def get_history():
try:
with open("history.json", "r") as f:
history = json.load(f)
except FileNotFoundError:
history = {}
return history

def save_timestamp(flight):
history = get_history()
history[flight] = datetime.datetime.now().isoformat()
with open("history.json", "w") as f:
json.dump(history, f)

def should_send_alert(flight):
history = get_history()
# Check if we haven't logged this flight yet
if flight not in history:
return True
# Calculate the total minutes since the last alert
ts = datetime.datetime.fromisoformat(history[flight])
delta = (datetime.datetime.now() - ts).total_seconds() / 60
# Only send an alert if we last sent one over 30 minutes ago
return delta >= 30

def send_alert(flights):
# Save each flights 'last sent' timestamp
each(lambda flight: save_timestamp(flight), flights)

# Build up the body text / HTML
flight_list = ', '.join(flights)
BODY_TEXT = f"The following flights have been seen: {flight_list}"
BODY_HTML = f"""<html><body><p>{BODY_TEXT}</p></body></html>"""

try:
# Attempt to send the email
response = client.send_email(
Destination={ 'ToAddresses': [ "you@example.com" ] },
Message={
'Body': {
'Html': { 'Charset': CHARSET, 'Data': BODY_HTML },
'Text': { 'Charset': CHARSET, 'Data': BODY_TEXT },
},
'Subject': { 'Charset': CHARSET, 'Data': f"Flight Alert - {flight_list}" },
},
Source="Flight Alert <you@example.com>"
)
# Display an error if something goes wrong.
except ClientError as e:
print(e.response['Error']['Message'])
else:
print(f"Alert sent ({flight_list}! Message ID:", response['MessageId']),

# Load the flights
flights = get_flights()

# Filter out any flights we are not interested in as well as
# any flights we should not send alert about (already sent recently)
targets = list(filter(lambda flight: flight in FLIGHTS_OF_INTEREST and should_send_alert(flight), flights))

# Send an alert for any flights of interest
if len(targets):
send_alert(targets)

print('Total flights seen:', flights)

AWS’s SDK will automatically read your credentials either from your environment variables or from your credentials file. This would then send you an email any time that plane appeared near your home with the subject Flight Alert — FLY711 for example.

Conclusion

This was a pretty fun project to work on! It’s introduced me to the world of SDRs and I can already tell I am going to go down that rabbit hole. I also really like that the SDR can be used for many different projects since it has so many uses and can handle a wide frequency range.

Also, there are commercial and community projects established to aggregate everyone’s ADS-B data into a live-view map. Some of these projects have pre-built images you can just install or others you can hook your own custom setup into. If you were looking to join one of these projects, it’d probably be advisable to upgrade the antenna to one of those pre-built antennas specifically for 1090 MHz to maximize the range.

Please feel free to leave a comment with any questions! You can find the code repository linked below with all of the relevant files and documentation as well.

Resources

Level Up Coding

Thanks for being a part of our community! Before you go:

🚀👉 Join the Level Up talent collective and find an amazing job


Building a localized jet tracker using a Raspberry Pi was originally published in Level Up Coding on Medium, where people are continuing the conversation by highlighting and responding to this story.


This content originally appeared on Level Up Coding - Medium and was authored by Michael K

RTL-SDR Blog RTL2832U & Raspberry Pi 4

After seeing all of the jet tracking news and finishing my last project around radio frequency, I remembered that the ADS-B system all aircraft support uses RF as well. This got me wondering — how easy is it to work with these ADS-B messages and how could I build a project around it?

To test this out, we’ll set up a Raspberry Pi using a custom image and intercept the ADS-B messages as they are broadcasted from the aircraft using a bit of special hardware called a software-defined radio. We can then set up some automation to parse that data and log which exact aircraft are flying overhead every minute — or even better send us an email if a specific aircraft flies overhead.

ADS-B

Automatic Dependent Surveillance–Broadcast, or ADS-B, is the technology used in different aircraft to transmit information like its unique tail number or flight number, its altitude, speed, heading, and more. ADS-B information is typically received by ground stations to help provide context around incoming or outgoing aircraft in addition to their radar. It’s also received by other aircraft to help provide situational awareness and helps pilots keep themselves separated from other aircraft.

This information is broadcasted over 1090 MHz, which luckily for us, is well within the range that can be picked up by hobbyist software-defined radios. It’s also required on all aircraft (with some exceptions for military or government), so there is no avoiding being seen. However, the data will require special software to decode it and turn it into something that can easily be used.

SDR

An SDR, or software-defined radio, is just like a regular radio receiver except instead of physical controls all of the controls are implemented and controlled through software. Tools can then tune this radio to the frequency they desire and parse the incoming data, or you can use an application like SDRSharp or CubicSDR and browse the different frequencies visually:
SDRSharp’s waterfall graph is shown with some ADS-B messages visible
ADS-B messages are shown in SDRSharp’s waterfall graph when tuned to 1090 MHz

While SDRs are not a new technology, they have usually been too expensive for the average tinkerer — costing in the range of hundreds to usually thousands of dollars. The RTL-SDR was discovered via cheap DVB-T TV tuner dongles that allowed hardware access thus allowing it to be controlled via a custom driver. Even now the RTL-SDR is still one of the cheapest SDRs as most are $100+.

I picked up the RTL-SDR Blog RTL2832U SDR for $30 along with a dipole antenna for $15. I figured this would be a good starting point for my SDR experiments since it is a low price point and well supported in the community.

The RTL-SDR Blog RTL2832U SDR
RTL-SDR device

And while we are only using this SDR for one frequency, this device supports any frequency from 500 kHz to 1.7 GHz so it could pick up a lot more than just ADS-B messages. During some of my initial testing, I picked up radar systems, amateur radio, first responder communication channels, weather channels, airport communication, and much more.

Software

To start intercepting and decoding the ADS-B messages, we first need to install our decoder. There are a few community-prepared images that we can use to jumpstart our SDR tests and will make installing the decoder easier.

PiSDR

PiSDR is a modified Raspbian image with a whole host of SDR-related software and drivers pre-installed. I ran into some issues installing some of the libraries required for this project on my default Raspbian image, so this image took all of the headaches away.

Since this is a prepared image, we can download the image via the GitHub Releases page for the project, extract it, and then flash it onto an SD Card for use in our Raspberry Pi. The images are compressed in XZ format, so you’ll need to have the appropriate packages installed for your operating system:

# Mac OS
$ brew install xz
# Debian Linux
$ sudo apt install xz-utils
# Extract the image
$ unxz 2022-01-07-PiSDR-vanilla.img.xz

Once extracted, you’ll want to use a program like Balena Etcher to flash the image file onto the 16GB+ SD card of your choosing. Once you have the image flashed, it can be booted like a normal Raspbian image and configured in the same manner using the guided tour on launch. PiSDR supports every Raspberry Pi model (even the zero!)
The PiSDR desktop is shown
PiSDR Desktop

Now that we have PiSDR installed, we can move on to installing the specific software we need to intercept the ADS-B messages!

Dump1090

dump1090 is a tool to parse the incoming ADS-B messages and get all the relevant information from the packets. It’ll handle connecting to the SDR, and parsing the messages and it can also provide a web interface that we can use to fetch the flight information from our own script.

To get started, we first need to clone the repository for the tool and build it. If you aren’t using the PiSDR image, you’ll need to install rtl-sdr beforehand. To clone and build dump1090, we can do it like so:

# Clone the repo
$ cd /opt
$ git clone https://github.com/antirez/dump1090
$ cd dump1090
# Build the binary
$ make

Antenna configuration

Before we run the tool, we first need to set up our antenna. I purchased a dipole kit along with the SDR, which works well enough but there are better (and more expensive) antennas sold specifically for 1090 MHz. Depending on which frequency you are targeting and your antenna, it will need to be a specific length or configuration. Using an online calculator, it let me know that I needed each antenna of the dipole to be 6.5 CM long for optimal reception.

A dipole antenna mounted on a tripod

Getting started

Now that we have our antenna and dump1090 built and installed, you could use it as is since it provides an interactive table and web interface to use if desired:

$ dump1090 --net --interactive

This will give us a table view of the flights in range, or we can navigate over to the web interface to see a visual representation:
But this would require us to constantly watch the flight information and see who’s flying over — it would be much cooler if we could set up alerts for specific planes. Luckily, we can use the web interface’s JSON endpoint to remotely fetch the information in our own script which we can automate easily.

Detecting jets

Each aircraft has a unique tail number assigned like N315DU, much like our cars have license plate numbers. This tail number is communicated in the ADS-B packets as well, so we can see which exact planes are flying overhead. If it is a commercial airline, it may communicate its flight number like ENY3432 instead.

As we fetch the flight information from the dump1090 endpoint, we’ll trim out any extra whitespace and keep just the flight numbers since that’s all we’ll really need. We can then use the requests library to build a simple script to get all of the flights in range:

import json
import requests

DUMP1090_ENDPOINT = 'http://192.168.86.202:8080'

def get_flights():
# Load the flight data from a local JSON file
#with open('example.json', encoding='utf-8') as f:
# data = json.load(f)

# Load the flight data from a dump1090 endpoint
response = requests.get(f'{DUMP1090_ENDPOINT}/data.json')
data = response.json()

# Get only the flight names from the data records
flights = map(lambda record: record['flight'].strip(), data)

# Return a set of flights which are not empty
return set(filter(lambda name: name, flights))

flights = get_flights()

print('Found flights:', flights)

Running the script, I was able to pick up all of the flights in range, verified through Flight Radar 24:

Found flights: {'N779JG'}

Automation

However, we need to automate our script and have it run at regular intervals so we can always see which jets are flying overhead. Luckily, we can create a few systemd services and a timer to take care of that for us!

Systemd

We’ll first need to set up a service to run dump1090 and keep it up, which can be done using this service file. Then, we need to create a parser service and a timer for our script. Afterward, we can install these files into systemd and start them up:

# Copy the files to systemd
$ git clone https://github.com/makvoid/Blog-Articles
$ mv Blog-Articles/Localized-Jet-Tracker /opt/
$ cd /opt/Localized-Jet-Tracker/systemd
$ sudo cp dump1090* /usr/lib/systemd/system
# Load the new services/timer
$ sudo systemctl daemon-reload
# Start the dump1090 service and the parser timer
$ sudo systemctl enable dump1090 && sudo systemctl start dump1090
$ sudo systemctl enable dump1090-parser.timer && \
sudo systemctl start dump1090-parser.timer

As configured, it runs the parser every minute. But this is easily modified by changing the OnCalendar value within the timer’s file.

Notifications

As is, the script would just log the flights to the timer’s journal, which you could access by running journalctl -u dump1090-parser.timer. A step further would be to set up automatic email notifications using an email service like Amazon SES or Twilio SendGrid. In the script, we just need to specify which tail numbers we are interested in and then let the script do all the hard work for us! I already use SES in a few other projects so I proceeded forward with that service:

import boto3
from botocore.exceptions import ClientError
import datetime
import json
import requests

# Configuration
CHARSET = 'UTF-8'
FLIGHTS_OF_INTEREST = ['FLY711']
DUMP1090_ENDPOINT = 'http://192.168.86.202:8080'

# Create a new SES resource and specify the region
client = boto3.client('ses', region_name='us-west-2')

def get_flights():
# Load the flight data from a dump1090 endpoint
response = requests.get(f'{DUMP1090_ENDPOINT}/data.json')
data = response.json()

# Get only the flight names from the data records
flights = map(lambda record: record['flight'].strip(), data)

# Return a set of flights which are not empty
return set(filter(lambda name: name, flights))

# Helper function to iterate over a list and fn
def each(fn, items):
for item in items:
fn(item)

def get_history():
try:
with open("history.json", "r") as f:
history = json.load(f)
except FileNotFoundError:
history = {}
return history

def save_timestamp(flight):
history = get_history()
history[flight] = datetime.datetime.now().isoformat()
with open("history.json", "w") as f:
json.dump(history, f)

def should_send_alert(flight):
history = get_history()
# Check if we haven't logged this flight yet
if flight not in history:
return True
# Calculate the total minutes since the last alert
ts = datetime.datetime.fromisoformat(history[flight])
delta = (datetime.datetime.now() - ts).total_seconds() / 60
# Only send an alert if we last sent one over 30 minutes ago
return delta >= 30

def send_alert(flights):
# Save each flights 'last sent' timestamp
each(lambda flight: save_timestamp(flight), flights)

# Build up the body text / HTML
flight_list = ', '.join(flights)
BODY_TEXT = f"The following flights have been seen: {flight_list}"
BODY_HTML = f"""<html><body><p>{BODY_TEXT}</p></body></html>"""

try:
# Attempt to send the email
response = client.send_email(
Destination={ 'ToAddresses': [ "you@example.com" ] },
Message={
'Body': {
'Html': { 'Charset': CHARSET, 'Data': BODY_HTML },
'Text': { 'Charset': CHARSET, 'Data': BODY_TEXT },
},
'Subject': { 'Charset': CHARSET, 'Data': f"Flight Alert - {flight_list}" },
},
Source="Flight Alert <you@example.com>"
)
# Display an error if something goes wrong.
except ClientError as e:
print(e.response['Error']['Message'])
else:
print(f"Alert sent ({flight_list}! Message ID:", response['MessageId']),

# Load the flights
flights = get_flights()

# Filter out any flights we are not interested in as well as
# any flights we should not send alert about (already sent recently)
targets = list(filter(lambda flight: flight in FLIGHTS_OF_INTEREST and should_send_alert(flight), flights))

# Send an alert for any flights of interest
if len(targets):
send_alert(targets)

print('Total flights seen:', flights)

AWS’s SDK will automatically read your credentials either from your environment variables or from your credentials file. This would then send you an email any time that plane appeared near your home with the subject Flight Alert — FLY711 for example.

Conclusion

This was a pretty fun project to work on! It’s introduced me to the world of SDRs and I can already tell I am going to go down that rabbit hole. I also really like that the SDR can be used for many different projects since it has so many uses and can handle a wide frequency range.

Also, there are commercial and community projects established to aggregate everyone’s ADS-B data into a live-view map. Some of these projects have pre-built images you can just install or others you can hook your own custom setup into. If you were looking to join one of these projects, it’d probably be advisable to upgrade the antenna to one of those pre-built antennas specifically for 1090 MHz to maximize the range.

Please feel free to leave a comment with any questions! You can find the code repository linked below with all of the relevant files and documentation as well.

Resources

Level Up Coding

Thanks for being a part of our community! Before you go:

🚀👉 Join the Level Up talent collective and find an amazing job


Building a localized jet tracker using a Raspberry Pi was originally published in Level Up Coding on Medium, where people are continuing the conversation by highlighting and responding to this story.


This content originally appeared on Level Up Coding - Medium and was authored by Michael K


Print Share Comment Cite Upload Translate Updates
APA

Michael K | Sciencx (2023-01-05T15:35:32+00:00) Building a localized jet tracker using a Raspberry Pi. Retrieved from https://www.scien.cx/2023/01/05/building-a-localized-jet-tracker-using-a-raspberry-pi/

MLA
" » Building a localized jet tracker using a Raspberry Pi." Michael K | Sciencx - Thursday January 5, 2023, https://www.scien.cx/2023/01/05/building-a-localized-jet-tracker-using-a-raspberry-pi/
HARVARD
Michael K | Sciencx Thursday January 5, 2023 » Building a localized jet tracker using a Raspberry Pi., viewed ,<https://www.scien.cx/2023/01/05/building-a-localized-jet-tracker-using-a-raspberry-pi/>
VANCOUVER
Michael K | Sciencx - » Building a localized jet tracker using a Raspberry Pi. [Internet]. [Accessed ]. Available from: https://www.scien.cx/2023/01/05/building-a-localized-jet-tracker-using-a-raspberry-pi/
CHICAGO
" » Building a localized jet tracker using a Raspberry Pi." Michael K | Sciencx - Accessed . https://www.scien.cx/2023/01/05/building-a-localized-jet-tracker-using-a-raspberry-pi/
IEEE
" » Building a localized jet tracker using a Raspberry Pi." Michael K | Sciencx [Online]. Available: https://www.scien.cx/2023/01/05/building-a-localized-jet-tracker-using-a-raspberry-pi/. [Accessed: ]
rf:citation
» Building a localized jet tracker using a Raspberry Pi | Michael K | Sciencx | https://www.scien.cx/2023/01/05/building-a-localized-jet-tracker-using-a-raspberry-pi/ |

Please log in to upload a file.


There are no updates yet.
Click the Upload button above to add an update.

You must be logged in to translate posts. Please log in or register.