This content originally appeared on DEV Community 👩💻👨💻 and was authored by Johnpaul Eze
HTML is a powerful markup language that can be used to give our web applications structure and provide powerful accessibility benefits, but only when used appropriately.
In this article, we’ll discover the top ten HTML elements you might not have known existed but can help you create more accessible and structurally-sound web applications.
Translate
The translate attribute in HTML is used to specify whether the content of an element is translated or not. This attribute is new in HTML5. The translate attribute is part of the Global Attributes and can be used on any HTML element.
Syntax:
<element translate = "yes|no">
Attribute Values: The translate attribute contains two values which are listed below:
- yes: This attribute is used to specify that the content of the element can be translated.
- no: This attribute is used to specify that the content of the element can not be translated.
Example:
<!DOCTYPE html>
<html>
    <head>
      <title>translate attribute</title>
        <style>
          </>
        </style>
    </head>
        <body>
          <h2><strong >translate attribute</strong></h2>
          <p translate="no">Don't translate this!</p>
          <p translate="yes">This tag can be translated to any language.</p>
        </body>
</html>
In the above example, we specified that the first paragraph tag should not be translated.
Map
The <map> tag is used to define an image map. An image map is an image with clickable areas.
The required name attribute of the <map> element is associated with the <img>'s usemap attribute and creates a relationship between the image and the map.
The <map> element contains a number of <area> elements, that defines the clickable areas in the image map.
The <map> tag supports the Global Attributes in HTML and also supports the Event Attributes in HTML.
Syntax:
<map name=""> </map>
Example:
<!DOCTYPE html>
<html>
 <head>
    <title>
        HTML | <map> Tag
    </title>
</head>
  <body>

<h1>The map and area elements</h1>

<p>Click on the sun or on one of the planets to watch it closer:</p>

<img src="planets.gif" width="145" height="126" alt="Planets" usemap="#planetmap">

<map name="planetmap">
  <area shape="rect" coords="0,0,82,126" alt="Sun" href="sun.htm">
  <area shape="circle" coords="90,58,3" alt="Mercury" href="mercur.htm">
  <area shape="circle" coords="124,58,8" alt="Venus" href="venus.htm">
</map>

</body>
</html>
Draggable
This draggable attribute is used to specify whether an element is draggable or not. Links and images are by default draggable. The draggable attribute is often used in the drag and drop operations.
The draggable attribute supports the Global Attributes in HTML.
Syntax:
<element draggable = "true|false|auto">
draggable can have the following Values:
- true: the element can be dragged
- false: the element cannot be dragged.
- auto: This value represents the uses of the default browser.
Example:
For this example we will create a draggable div element:
Step 1) Add HTML:
    <!-- Draggable DIV -->
     <div id="mydiv">
      <!-- Include a header DIV with the same name as the draggable DIV, followed by "header" -->
       <div id="mydivheader">Click here to move</div>
      <p>Move</p>
      <p>this</p>
      <p>DIV</p>
    </div>
Step 2) Add CSS:
    #mydiv {
      position: absolute;
      z-index: 9;
      background-color: #f1f1f1;
      border: 1px solid #d3d3d3;
      text-align: center;
    }

    #mydivheader {
      padding: 10px;
      cursor: move;
      z-index: 10;
      background-color: #2196F3;
      color: #fff;
    }
The only important style is position: absolute, the rest is up to you.
Step 3) Add JavaScript:
    // Make the DIV element draggable:
    dragElement(document.getElementById("mydiv"));

    function dragElement(elmnt) {
      var pos1 = 0, pos2 = 0, pos3 = 0, pos4 = 0;
      if (document.getElementById(elmnt.id + "header")) {
        // if present, the header is where you move the DIV from:
        document.getElementById(elmnt.id + "header").onmousedown = dragMouseDown;
      } else {
        // otherwise, move the DIV from anywhere inside the DIV:
        elmnt.onmousedown = dragMouseDown;
      }

      function dragMouseDown(e) {
        e = e || window.event;
        e.preventDefault();
        // get the mouse cursor position at startup:
        pos3 = e.clientX;
        pos4 = e.clientY;
        document.onmouseup = closeDragElement;
        // call a function whenever the cursor moves:
        document.onmousemove = elementDrag;
      }

      function elementDrag(e) {
        e = e || window.event;
        e.preventDefault();
        // calculate the new cursor position:
        pos1 = pos3 - e.clientX;
        pos2 = pos4 - e.clientY;
        pos3 = e.clientX;
        pos4 = e.clientY;
        // set the element's new position:
        elmnt.style.top = (elmnt.offsetTop - pos2) + "px";
        elmnt.style.left = (elmnt.offsetLeft - pos1) + "px";
      }

      function closeDragElement() {
        // stop moving when mouse button is released:
        document.onmouseup = null;
        document.onmousemove = null;
      }
    }
The overall code and output will look like this:
Capture
The capture attribute specifies that, optionally, a new file should be captured, and which device should be used to capture that new media of a type defined by the accept attribute. The capture attribute is supported on the file input type.
Values include user and environment.
The capture attribute takes as its value a string that specifies which camera to use for capture of image or video data, if the accept attribute indicates that the input should be of one of those types.
Note: Capture was previously a Boolean attribute which, if present, requested that the device's media capture device(s) such as camera or microphone be used instead of requesting a file input.
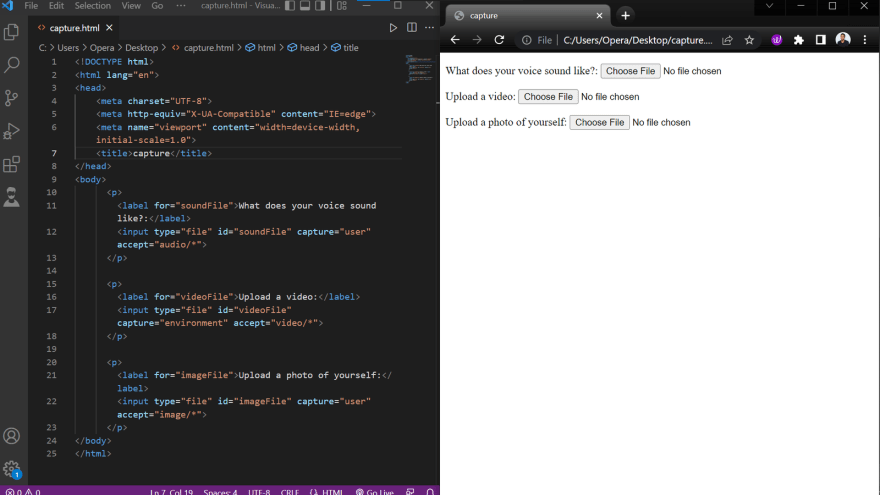
Example:
When set on a file input type, operating systems with microphones and cameras will display a user interface allowing the selection of an existing file or the creation of a new one:
    <p>
      <label for="soundFile">What does your voice sound like?:</label>
      <input type="file" id="soundFile" capture="user" accept="audio/*">
      </p>
      <p>
      <label for="videoFile">Upload a video:</label>
      <input type="file" id="videoFile" capture="environment" accept="video/*">
      </p>
      <p>
      <label for="imageFile">Upload a photo of yourself:</label>
      <input type="file" id="imageFile" capture="user" accept="image/*">
      </p>
The overall code and output will look like this:
Spellcheck
The Spell Check feature in HTML is used to detect grammatical or spelling mistakes in the text fields.
The Spell Check feature can be applied to HTML forms using the spellcheck attribute. The spellcheck attribute is an enumerated attribute which defines whether the HTML element will be checked for errors or not. It can be used with input and textarea fields in HTML.
It may have the following values:
-
true: which indicates that the element should be, if possible, checked for spelling errors; -
false: which indicates that the element should not be checked for spelling errors.
When the attribute is not set, it takes the default value which is generally element type and browser defined. The value can be also be inherited from the ancestral element, which means that the element content will be checked for spelling errors only if its nearest ancestor has a spellcheck state of true.
Syntax:
Syntax for spellcheck attribute in an input field in html:
<input type="text" spellcheck="value">
Syntax for spellcheck in a textarea field in html:
<textarea type="text" spellcheck="value"></textarea>
In the above syntax the value assigned to spellcheck will define whether spellcheck will be enabled or not on the element.
Enabling Spell Check in a HTML Form
To enable spellcheck in a HTML form the spellcheck attribute is set to true.
Below is a sample HTML program with enabled spellcheck:
    <!DOCTYPE html>
    <html>
       <body>
            <h3>Example of Enabling SpellCheck</h3>
           <form>
                <p>
                    <input type="text" spellcheck="true">
                </p>

                <p>
                    <textarea spellcheck="true"></textarea>
                </p>
                <button type="reset">Reset</button>
            </form>
        </body>
    </html>
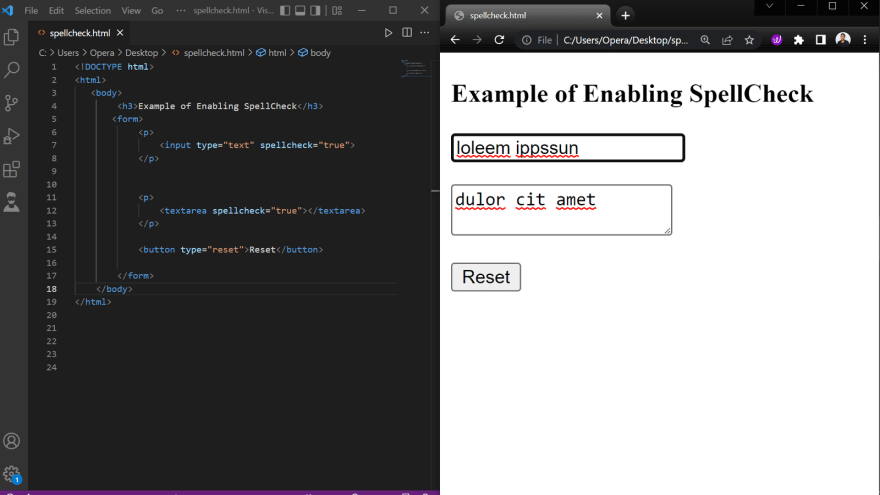
Output:
notice that while we typed in the
inputandtextarea box, it was checking the spelling and thus flagged “loleem ippssun” and “dulor cit amet” as wrongly spelt.
Disabling Spell Check in a HTML Form
To disable spellcheck in a HTML form the spellcheck attribute is set to false.
Below is the sample HTML program with disabled spellcheck:
    <!DOCTYPE html>
    <html>
       <body>
            <h3>Example of Disabling SpellCheck</h3>
           <form>
                <p>
                    <input type="text" spellcheck="false">
                </p>

                <p>
                    <textarea spellcheck="false"></textarea>
                </p>
                <button type="reset">Reset</button>
            </form>
        </body>
    </html>
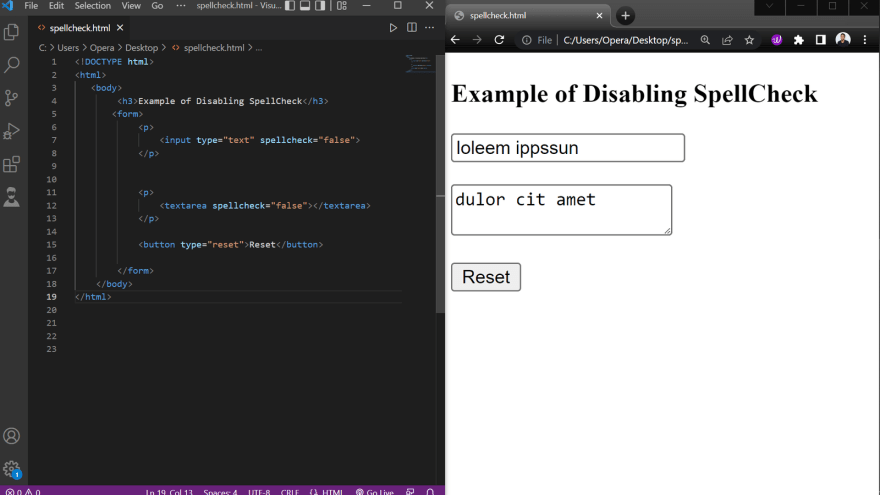
Output:
notice that while we typed in the
inputandtextarea box, it was not checking the spelling and thus ignored “loleem ippssun” and “dulor cit amet” that was wrongly spelt.
Accept
The accept attribute specifies the types of files that the server accepts (that can be submitted through a file upload).
This attribute specifies the type of file that the server accepts. This attribute can be used with element only. This attribute is not used for validation tool because file uploads should be validated on the Server.
Syntax:
<input accept = "file_extension">
Attribute Values:
- file_extension : It Specify the file extension(s) like .gif, .jpg, .png, .doc) the user can pick from.
- audio/* : The user can pick all sound files.
- video/* : The user can pick all video files.
- image/* : A valid media type, with no parameters. Look at IANA Media Types for a complete list standard media types
- media_type : A valid media type without parameters.
Example:
In this example we will specify that the server accepts only image files in the file upload:
    <!DOCTYPE html>
    <html>
        <head>
            <title>accept attribute</title>
        </head>
        <body>
            <h2>Accept attribute</h2>
            <form action=" ">
            <label for="img">Select image:</label>
            <input type="file" name="img" accept="image/*">
            <input type="submit">
            </form>
        </body>
    </html>
Output:
Note: The
acceptattribute can only be used with<input type="file">.
Download
The download attribute specifies that the target (the file specified in the href attribute) will be downloaded when a user clicks on the hyperlink.
The optional value of the download attribute will be the new name of the file after it is downloaded. It is used in <a> and <area> element.
There are no restrictions on allowed values, and the browser will automatically detect the correct file extension and add it to the file (.img, .pdf, .txt, .html, etc.).
If the value is omitted, the original filename is used.
Syntax:
<element download="filename">
Attribute Values:
It contains single value “filename” which is optional. It specifies the new filename for the downloaded file.
You may see an example of download attribute implementation as follows:
<a href="document.pdf" download>Download PDF</a>
Without the download attribute above, then the browser will navigate to the document.pdf location and open the file in the browser.
When you specify the download attribute, then the computer will either:
- Save the file in the default download location defined in your browser settings
- Or ask you where to save the file before downloading
The download attribute also accepts a value that you can specify as the filename alias:
<a href="document.pdf" download="HTML5_download.pdf">Download PDF</a>
note: When you download the
document.pdffile, the browser will automatically rename the file with thedownloadattribute value.
itemscope
The HTML itemscope attribute works with item types to ensure that the HTML contained in a block is about a particular item. Defining the itemscope attribute for any element creates a new item, which results in a number of name-value pairs that are associated with the element.
A related attribute, itemtype, is used to specify the valid URL of a vocabulary (such as a portfolio site) that describes the item and its properties context.
Syntax:
<element itemscope></element>
When you specify the itemscope attribute for an element, a new item is created. The item consists of a group of name-value pairs. For elements with an itemscope attribute and an itemtype attribute, you may also specify an id attribute. You can use the id attribute to set a global identifier for the new item. A global identifier allows the item to relate to other items found on pages across the Web.
Example:
Representing structured data for a portfolio:
The following example specifies the itemtype and specifies four related itemprop attributes.
| itemtype | portfolio | ||
|---|---|---|---|
| itemprop | (itemprop name) | (itemprop value) | |
| itemprop | developer | Johnpaul Eze | |
| Itemscope | itemprop | stack | Frontend Dev |
| itemprop | name | Avatar | |
| itemprop | portfolio | Visit portfolio |
HTML
    <!DOCTYPE html>
    <html lang="en">
    <head>
        <meta charset="UTF-8">
        <meta http-equiv="X-UA-Compatible" content="IE=edge">
        <meta name="viewport" content="width=device-width, initial-scale=1.0">
        <title>HTML itemscope Attribute</title>
    </head>
    <body>
        <div itemscope itemtype="https://johnpauleze.netlify.app">
            <h1 itemprop="name">Avatar</h1>
            <span>Developer: <span itemprop="developer">Johnpaul Eze</span> (born june 26th)</span>
            <span itemprop="stack">Frontend dev</span>
            <a href="https://johnpauleze.netlify.app" itemprop="Portfolio">Visit Portfolio</a>
          </div>

    </body>
    </html>
Output:
Find more about
itempropattributes here.
itemtype
The itemtype attribute specifies the URL but the URLs are not connected with any resources rather they are used by browsers to act as the identifiers. The itemtype attribute can only be specified on those elements that contain the itemscope attribute otherwise it will not execute properly. The types of items used in the itemtype URL must be of those types that are defined in specifications provided by schema.org. Some of the browsers that refer to microdata on schema.org look for specific resources on the webpage and there these itemtype and itemscope attributes are mostly used. The itemtype attribute should have a value containing the unordered set of unique tokens & those are case-sensitive, specifying each contains the absolute & valid URL. The value of the attribute should contain a minimum of 1 token.
Syntax:
    <div itemscope itemtype="URL">
        <span itemprop="item1">item name</span>
        <span itemprop="item2">item name</span>
    </div>
Note: The
itemtypemust be a URL or you can also use URN (Uniform Resource Name) as we have used in the below example.
Attribute Value: The attribute must contain a valid URL consisting of no leading & trailing whitespaces.
Supported tags:
<div> and <span> tags.
Example:
This example describes the implementation of the itemtype attribute in HTML.
HTML
    <!DOCTYPE html>
    <html>
    <head>
        <title>HTML itemtype attribute</title>
    </head>
    <body>
        <h1>FreeCodeCamp</h1>
        <h4>Tutorials and Courses</h4>
        <div itemscope itemtype=
            "https://www.freecodecamp.org/">
            <span itemprop="description">
                FreeCodeCamp is a portal for developers.
                It has tutorials on various topics.
            </span>
            <br>
            Course: <span itemprop="course">JavaScript</span>
            <br>
            Tutorial: <span itemprop="tutorial">React</span>
            <br>
        </div>
    </body>
    </html>
Output:
Find more about
itempropattributes here.
Dropzone
The dropzone attribute in HTML is used to specify whether the dragged data copied, moved, or linked when it is dropped on any element. This attribute is new in HTML5.
Syntax:
<element dropzone = "copy | move | link">
Attribute Value:
Copy: Dropping the data will result in a copy of the dragged data.
Move: Dropping the data will result in that the dragged data being moved to the new location.
Link: Dropping the data will result in a link to the original data
Example:
    <!DOCTYPE html>
    <html>
    <head>
        <title>dropzone</title>
    </head>
    <body draggable="true">
        <h2> dropzone attribute</h2>
        <div dropzone="copy">DIV</div>
        <div dropzone="move">DIV1</div>
        <div dropzone="copy">DIV2</div>
    </body>
    </html>
Note: The dropzone attribute isn’t supported by the popular browsers.
Conclusion:
In this article, we highlighted the top 10 HTML elements that could prove useful for a beginner in software development. It is recommended to use them to improve the accessibility and SEO of your website.
Resources:
Follow this link to check out more amazing HTML elements/attributes.
This content originally appeared on DEV Community 👩💻👨💻 and was authored by Johnpaul Eze
Johnpaul Eze | Sciencx (2023-01-31T22:54:18+00:00) Top 10 html elements to use in 2023. Retrieved from https://www.scien.cx/2023/01/31/top-10-html-elements-to-use-in-2023/
Please log in to upload a file.
There are no updates yet.
Click the Upload button above to add an update.


