This content originally appeared on Level Up Coding - Medium and was authored by Itsuki
Okay, honestly speaking maybe 1 + 1.5 is what I actually meant?
Here is what we will do in this article.
- SwiftUI: Importing from and Exporting to Files App using fileImporter and fileExporter
- UIKit: importing and Exporting using UIDocumentPickerController
- SwiftUI: importing and Exporting using UIDocumentPickerController

Specifically, while we export, our user should be able to choose the destination folder as well as specify a file name.
Why did I keep emphasizing this part? Because this is actually my initial problem that I was trying to solve and literally took me forever to find the solution.
Before we start coding, grab a cup of coffee and couple cookies, and let me share with you my (stupid) little background story.
In one of my previous article, I have shared with you on how to save to Files app by writing directly to the documentDirectory like following.
do  {
    let fileUrl =  try FileManager.default.url(for: .documentDirectory, in: .userDomainMask, appropriateFor: nil, create: true)
    let destinationUrl = fileUrl.appendingPathComponent("checkmark.png")
    if FileManager().fileExists(atPath: destinationUrl.path) {
        try FileManager().removeItem(at: destinationUrl)
    }
    let rawData: Data? = UIImage(systemName: "checkmark")?.pngData()
    try rawData?.write(to: destinationUrl)
} catch (let error) {
    print(error)
}
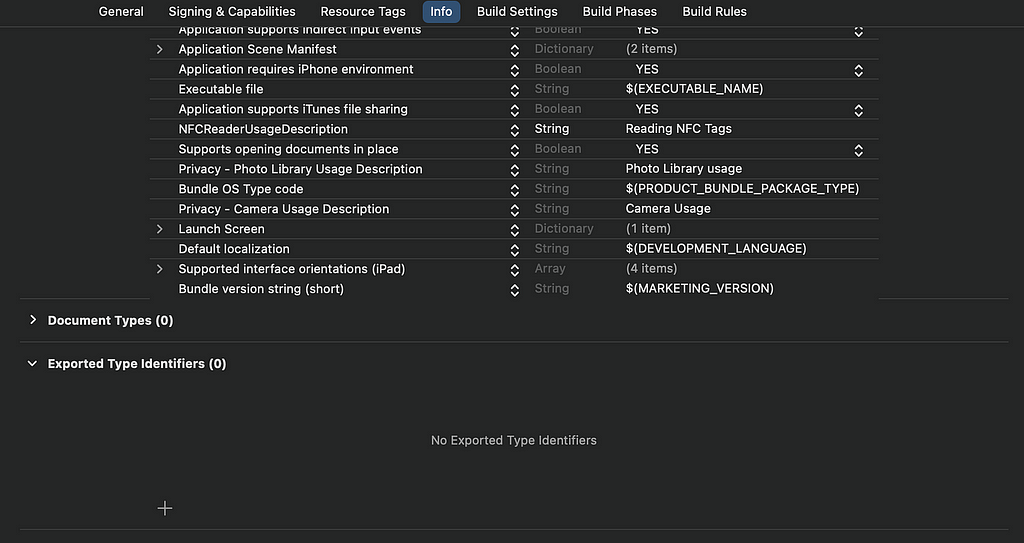
If you have added the UIFileSharingEnabled and LSSupportsOpeningDocumentsInPlace key to your info.plist and setting the value to YES for both of them, your user will indeed be able to see the file you save.
However, by using this approach, our user doesn’t get the opportunity to
- Select a directory to save the file. It will automatically be in the document directory that the system created specialized to our App.
- Specify/Modify the file name
like we do when downloading files from Safari, or saving using the Save to Files option in a share sheet. Technically speaking, our user won’t even know that we are writing to the Files App!
I really do NOT like it. However, I originally thought that this is some capability save for system (Apple-made) apps so I kind of gave up on it.
UNTIL I found out LinkedIn is doing something similar where we get to save files directly (that is not by using the Save to Files option in a share sheet or a Activity Controller) by pressing on the download button with the ability to choose the directory and enter a file name.
If LinkedIn engineers can do it, I can! (Oops, not trying to be offensive here to those whoever working at LinkedIn.) And here we go! What I am sharing here with you.
The Key is
EXPORT! NOT SAVE, NOT CREATE!
Why is it taking me so long to realize it? Probably due to the preconceptions from
- Jetpack Compose where we “Create” a new document in Files App and write to the URL after creation; and
- How the label in Share Sheet is Save to Files
I was limited to only able to think in those two way(saving, creating)!
But the solution is EXPORTING!
The second I realized that, everything is solved!
I was actually only interested in the exporting part, but things won’t be complete without import (and it is super simple and straightforward) so let’s also take a look at how to do it here!
Enough of my personal talk! Let’s head to Xcode!
FileExporter and FileImporter
This one is my favorite so I will do it first!
SwiftUI has a fileExporter modifier for exporting documents or Transferable items, and a fileImporter for allowing the user to import one or multiple files.
Let’s start with fileExporter here!
Exporting
To use the fileExporter modifier, three steps.
- Create a data model conform to FileDocument protocol
- Create a State variable to track whether if we want the exporter UI to be displayed
- Attach the modifier to a view and passing in the state, the document to export using the data model we created, and the content type. We can also set a default name for the document here.
Simple Text Type Documents
Let’s start with a simple UTType.text to get a general understanding of how fileExporter works. I will then show you how we can create a Custom UTType to handle any file types.
We will first need a struct conforming to FileDocument protocol, A type that we use to serialize documents to and from file.
import UniformTypeIdentifiers

struct TextDocument: FileDocument {
    var text: String = ""

    init(_ text: String = "") {
        self.text = text
    }

    static var readableContentTypes: [UTType] = [.text]

    init(configuration: ReadConfiguration) throws {
        if let data = configuration.file.regularFileContents {
            text = String(decoding: data, as: UTF8.self)
        }
    }

    func fileWrapper(configuration: WriteConfiguration) throws -> FileWrapper {
        let data = Data(text.utf8)
        return FileWrapper(regularFileWithContents: data)
    }
}
We can then use it like following.
import SwiftUI

struct ContentView: View {
    @State private var showingExporter = false

    var body: some View {
        VStack {
            Button(action: {
                showingExporter = true
            }, label: {
                (Text("Export!  ") + Text(Image(systemName: "square.and.arrow.down")))
                    .font(.system(size: 32))
                    .foregroundStyle(.white)
                    .padding()
                    .background(RoundedRectangle(cornerRadius: 16).fill(Color.black))
            })
        }
        .fileExporter(
            isPresented: $showingExporter,
            document: TextDocument("hey!"),
            contentType: .text,
            defaultFilename: "document.txt"
        ) { result in
            switch result {
            case .success(let url):
                print("Saved to \(url)")
            case .failure(let error):
                print(error.localizedDescription)
            }
        }
        .frame(maxWidth: .infinity, maxHeight: .infinity, alignment: .center)
        .background(.gray.opacity(0.2))
    }
}

Custom Document Type
Obviously, in real world, we don’t always know what type of document our user will like to save and here is where a Custom document type can come in handy.
We will first need to define a custom Uniform Type Identifiers that we can use for all types of documents.
Two steps here.
- Declare the type by Extending the UTType
- Add the type to the project’s Info.plist
Let’s first import UniformTypeIdentifiers and add the following extension to it.
extension UTType {
    static let customDocumentType = UTType(exportedAs: "com.example.customDocumentType")
}
When initializing a UTType, we have init(importedAs:conformingTo:) and init(exportedAs:conformingTo:). importedAs is for declaring a type that the app uses but does NOT own, whereas exportedAs creates a type that our app owns based on an identifier.
Remember to replace com.example with the Bundle ID of your app!
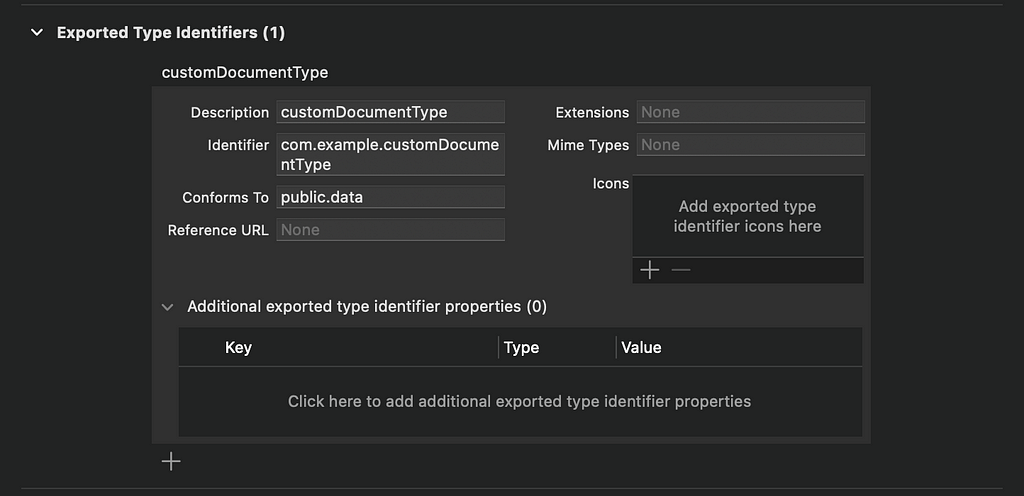
We can then head to our project info.plist to add the corresponding entry. Click on the + under Exported Type identifiers.

For description, enter customDocumentType. For Identifier, enter the what you have for exportedAs above.
Conforms To define our custom type’s conformance to system-declared types. For example, if our app uses a proprietary file format based on JSON, use public.json.
Here, we will have public.data.

Now, we can use it to create our CustomDocument conforming to FileDocument like following.
struct CustomDocument: FileDocument {
    var data: Data = Data()

    init(_ data: Data) {
        self.data = data
    }

    static var readableContentTypes: [UTType] = [.customDocumentType]

    init(configuration: ReadConfiguration) throws {
        if let data = configuration.file.regularFileContents {
            self.data = data
        }
    }

    func fileWrapper(configuration: WriteConfiguration) throws -> FileWrapper {
        return FileWrapper(regularFileWithContents: data)
    }

}
Let’s test it out by simply exporting an image and a text.
import SwiftUI

struct ContentView: View {
    @State private var showingExporter = false
    @State private var exportingImage = true

    var body: some View {
        VStack(spacing: 40) {
            Button(action: {
                showingExporter = true
                exportingImage = true
            }, label: {
                Text("Export Image!")
                    .font(.system(size: 32))
                    .foregroundStyle(.white)
                    .padding()
                    .frame(maxWidth: .infinity)
                    .background(RoundedRectangle(cornerRadius: 16).fill(Color.black))
            })


            Button(action: {
                showingExporter = true
                exportingImage = false
            }, label: {
                Text("Export Text!")
                    .font(.system(size: 32))
                    .foregroundStyle(.white)
                    .padding()
                    .frame(maxWidth: .infinity)
                    .background(RoundedRectangle(cornerRadius: 16).fill(Color.black))
            })
        }
        .fixedSize()
        .fileExporter(
            isPresented: $showingExporter,
            document: CustomDocument(exportingImage ? UIImage(systemName: "checkmark")!.pngData()! : Data("hey!".utf8)),
            contentType: .customDocumentType,
            defaultFilename: "\(Date()).\(exportingImage ? "png" : "txt")"
        ) { result in
            switch result {
            case .success(let url):
                print("Saved to \(url)")
            case .failure(let error):
                print(error.localizedDescription)
            }
        }
        .frame(maxWidth: .infinity, maxHeight: .infinity, alignment: .center)
        .background(.gray.opacity(0.2))
    }
}

Claps!!!
One important thing I would like to note here!
Provide the defaultFilename with the correct extension.
This is needed so that the system actually knows what types of data the file actually contains and is crucial for the user to be actually view the file content in the Files App.
We are now able to handle any types of files we want without trying to find the correct UTType for it!
(Okay, I guess I have to admit that in this case, you can actually just use [.data] for readableContentTypes. But! But! But! It is always good to know how to define your own types!)
Importing
Time for importing!
It is so simple and straightforward and I really don’t think I need say anything other than just showing the code!
struct SwiftUIContentView: View {
    // ...

    @State private var showImporter = false
    @State private var importedText: String? = nil


    var body: some View {
        VStack(spacing: 40) {
            // ...

            Button(action: {
                showImporter = true
            }, label: {
                Text("Import!")
                    .font(.system(size: 32))
                    .foregroundStyle(.white)
                    .padding()
                    .frame(maxWidth: .infinity)
                    .background(RoundedRectangle(cornerRadius: 16).fill(Color.black))
            })

            if let importedText = importedText {
                Text("File Content: \n\(importedText)")
                    .font(.system(size: 32))
                    .foregroundStyle(.white)
                    .multilineTextAlignment(.center)
                    .padding()
                    .frame(maxWidth: .infinity)
                    .background(RoundedRectangle(cornerRadius: 16).fill(Color.black))
            }
        }
        // ...
        .fileImporter(
            isPresented: $showImporter,
            allowedContentTypes: [.text],
            allowsMultipleSelection: false
        ) { result in
            print("result: \(result)")

            switch result {
            case .success(let urls):
                print("success url: \(urls)")
                guard let url = urls.first else {return}
                guard let fileContent = try? String(contentsOf: url, encoding: .utf8) else {return}
                self.importedText = fileContent
            case .failure(let error):
                print("failed with error: \(error.localizedDescription)")
            }
        }
    }
}

I have specified the import type here to be .text so that I can display it. But if you are importing, for example, for a mailing app attachment, you can specify the type to simply be .data to let your user select from all the files. If preview of the file is needed, you can do it with Webview by simply load it with file URL.
UIKit
We have done our SwiftUI Approach #1 so let’s see how we can do the same thing in UIKit using UIDocumentPickerViewController.
Again EXPORT is the key idea! (Not Save, Not Move, Not Create!)
That is we will initialize our UIDocumentPickerViewController using init(forExporting:). A little different from the approach above using fileExporter, this requires us to provide a URL for the data we would like to save to the Files App.
Here are the steps.
- Have our ViewController conform to UIDocumentPickerDelegate
- Write the data to a temporary URL for exporting
- Initialize our UIDocumentPickerViewController using init(forExporting:) and provide the URL
- Remove the temp file after export finish in the documentPicker(_:didPickDocumentsAt:) delegate function. Save your user some storage, they will appreciate that (hopefully)!
Import works in pretty much the same way as above where we obtain the URL for the file user selects and read from it. It is so simple that I will just included here without further explanation.
import UIKit
import UniformTypeIdentifiers

class ViewController: UIViewController, UIDocumentPickerDelegate {

    var tempUrl: URL?
    @IBOutlet weak var contentLabel: UILabel!
    var didPickDocumentCallback: ((URL) -> Void) = {_ in }


    override func viewDidLoad() {
        super.viewDidLoad()
        self.contentLabel.isHidden = true
    }

    @IBAction func onExportButtonPress(_ sender: UIButton) {
        do {
            // save file temporarily
            let fileUrl =  try FileManager.default.url(for: .documentDirectory, in: .userDomainMask, appropriateFor: nil, create: true)
            let destinationUrl = fileUrl.appendingPathComponent("UIKitcheckmark\(Date()).png")
            self.tempUrl = destinationUrl
            if FileManager().fileExists(atPath: destinationUrl.path) {
                try FileManager().removeItem(at: destinationUrl)
            }
            let rawData: Data? = UIImage(systemName: "checkmark")?.pngData()
            try rawData?.write(to: destinationUrl)

            self.didPickDocumentCallback = {_ in
                try? FileManager().removeItem(at: destinationUrl)
            }

            let documentPickerViewController =  UIDocumentPickerViewController(forExporting: [destinationUrl])
            documentPickerViewController.delegate = self
            self.present(documentPickerViewController, animated: true)

        } catch(let error) {
            print(error.localizedDescription)
            return
        }

    }

    @IBAction func onImportButtonPress(_ sender: UIButton) {
        self.didPickDocumentCallback = {fileURL in
            do {
                guard fileURL.startAccessingSecurityScopedResource() else { return }
                defer { fileURL.stopAccessingSecurityScopedResource() }
                let fileContent = try String(contentsOf: fileURL, encoding: .utf8)
                self.contentLabel.text = "File Content: \n\(fileContent)"
                self.contentLabel.isHidden = false
                print(fileContent)
            } catch {
                print("Failed to import")
            }

        }


        let documentPickerViewController =  UIDocumentPickerViewController(forOpeningContentTypes: [.text], asCopy: false)
        documentPickerViewController.delegate = self
        self.present(documentPickerViewController, animated: true)
    }


    func documentPicker(_ controller: UIDocumentPickerViewController, didPickDocumentAt url: URL) {
        self.didPickDocumentCallback(url)
    }

}

Ha! The ridiculous I am UIKit Label! I needed it so that I know where I am right now!
One thing I would like to point out here.
I have noticed some of the articles online suggested the following for exporting where we initialize the picker using UIDocumentPickerViewController(forOpeningContentTypes:) and write to the URL received.
import UIKit
import UniformTypeIdentifiers

class ViewController: UIViewController, UIDocumentPickerDelegate {

    override func viewDidLoad() {
        super.viewDidLoad()
    }

    @IBAction func onExportButtonPress(_ sender: UIButton) {
        let documentPickerViewController =  UIDocumentPickerViewController(forOpeningContentTypes: [UTType.folder], asCopy: false)
        documentPickerViewController.delegate = self
        self.present(documentPickerViewController, animated: true)
    }

    func documentPicker(_ controller: UIDocumentPickerViewController, didPickDocumentAt url: URL) {
        guard url.startAccessingSecurityScopedResource() else { return }
        defer { url.stopAccessingSecurityScopedResource() }
        let newFileURL = url.appendingPathComponent("\(Date()).txt")
        do {
            try "hey!".write(to: newFileURL, atomically: true, encoding: .utf8)
        } catch(let error) {
            print(error.localizedDescription)
        }
    }
}
However, they are couple things I do not like about this approach!
- Yes, your user is able to pick the folder, BUT they will not be able to specify the file name.
- You have to remember to call startAccessingSecurityScopedResource and stopAccessingSecurityScopedResource. Here is what will happen if you don’t based on Apple.
If you fail to relinquish your access to file-system resources when you no longer need them, your app leaks kernel resources. If sufficient kernel resources leak, your app loses its ability to add file-system locations to its sandbox, such as with Powerbox or security-scoped bookmarks, until relaunched.
I have bad memory so I don’t want to deal with all the scoping and let’s just have our wonderful system handle that for us by simply using the init(forExporting:) initializer.
Use DocumentPickerController in SwiftUI
I personally do NOT like using UIKit in SwiftUI, nor vice versa. However, I decided to include this option here because there are indeed benefits of using UIDocumentPickerViewController instead of fileExporter.
One of the big one is that you don’t have to deal with all the UTTypes and FileDocuments mess and can just dump the data to a temporary URL and wait for that to be exported.
It will basically be the same as above for what we did in UIKit, other than we need to create a Delegate class conforming to UIDocumentPickerDelegate and a UIViewControllerRepresentable for the showing the UIDocumentPickerViewController from a SwiftUI View.
import SwiftUI
import UIKit
import UniformTypeIdentifiers


extension URL: @retroactive Identifiable {
    public var id: String {
        return absoluteString
    }
}

struct UIKitContentView: View {
    @State private var showsImportDocumentPicker = false
    @State private var importedText: String? = nil
    @State private var tempExportUrl: URL? = nil

    var body: some View {
        VStack(spacing: 40) {
            Button(action: {
                do {
                    // save file temporarily
                    let fileUrl =  try FileManager.default.url(for: .documentDirectory, in: .userDomainMask, appropriateFor: nil, create: true)
                    let destinationUrl = fileUrl.appendingPathComponent("checkmark\(Date()).png")
                    if FileManager().fileExists(atPath: destinationUrl.path) {
                        try FileManager().removeItem(at: destinationUrl)
                    }
                    let rawData: Data? = UIImage(systemName: "checkmark")?.pngData()
                    try rawData?.write(to: destinationUrl)
                    tempExportUrl = destinationUrl

                } catch(let error) {
                    print(error.localizedDescription)
                    return
                }

            }, label: {
                Text("Export!")
                    .font(.system(size: 32))
                    .foregroundStyle(.white)
                    .padding()
                    .frame(maxWidth: .infinity)
                    .background(RoundedRectangle(cornerRadius: 16).fill(Color.black))
            })

            Button(action: {
                showsImportDocumentPicker = true
            }, label: {
                Text("Import!")
                    .font(.system(size: 32))
                    .foregroundStyle(.white)
                    .padding()
                    .frame(maxWidth: .infinity)
                    .background(RoundedRectangle(cornerRadius: 16).fill(Color.black))
            })

            if let importedText = importedText {
                Text("File Content: \n\(importedText)")
                    .font(.system(size: 32))
                    .foregroundStyle(.white)
                    .multilineTextAlignment(.center)
                    .padding()
                    .frame(maxWidth: .infinity)
                    .background(RoundedRectangle(cornerRadius: 16).fill(Color.black))
            }
        }
        .fixedSize()
        .frame(maxWidth: .infinity, maxHeight: .infinity, alignment: .center)
        .background(.gray.opacity(0.2))
        .sheet(item: $tempExportUrl, content: { url in
            DocumentPickerView(exportingUrls: [url], didPickDocumentCallback: {_ in
                if let tempExportUrl = tempExportUrl {
                    try? FileManager().removeItem(at: tempExportUrl)
                    self.tempExportUrl = nil
                }
            })
            .ignoresSafeArea(.all)

        })
        .sheet(isPresented: $showsImportDocumentPicker) {
            DocumentPickerView(openingContentTypes: [UTType.text], didPickDocumentCallback: {fileURL in
                do {
                    guard fileURL.startAccessingSecurityScopedResource() else { return }
                    defer { fileURL.stopAccessingSecurityScopedResource() }
                    let fileContent = try String(contentsOf: fileURL, encoding: .utf8)
                    self.importedText = fileContent
                    print(fileContent)
                } catch {
                    print("Failed to import")
                }

            })
            .ignoresSafeArea(.all)
        }
    }
}

class DocumentDelegate: NSObject, UIDocumentPickerDelegate {
    var didPickDocumentCallback: ((URL) -> Void)

    init(_ didPickDocumentCallback: @escaping ((URL) -> Void)) {
        self.didPickDocumentCallback = didPickDocumentCallback
    }

    func documentPicker(_ controller: UIDocumentPickerViewController, didPickDocumentAt url: URL) {
        self.didPickDocumentCallback(url)
    }
}


struct DocumentPickerView: UIViewControllerRepresentable {
    private var openingContentTypes: [UTType]? = nil
    private var exportingUrls: [URL]? = nil
    private let delegate: DocumentDelegate


    init(openingContentTypes: [UTType], didPickDocumentCallback: @escaping ((URL) -> Void)) {
        self.openingContentTypes = openingContentTypes
        self.delegate = DocumentDelegate(didPickDocumentCallback)
    }

    init(exportingUrls: [URL], didPickDocumentCallback: @escaping ((URL) -> Void) ) {
        self.exportingUrls = exportingUrls
        self.delegate = DocumentDelegate(didPickDocumentCallback)
    }

    func makeUIViewController(context: Context) -> UIDocumentPickerViewController {
        let documentPickerViewController: UIDocumentPickerViewController
        if let openingContentTypes = openingContentTypes {
            documentPickerViewController =  UIDocumentPickerViewController(forOpeningContentTypes: openingContentTypes, asCopy: false)
        } else if let exportingUrls = exportingUrls {
            documentPickerViewController =  UIDocumentPickerViewController(forExporting: exportingUrls)
        } else {
            documentPickerViewController = UIDocumentPickerViewController()
        }
        documentPickerViewController.delegate = delegate
        return documentPickerViewController
    }

    func updateUIViewController(_ uiViewController: UIDocumentPickerViewController, context: Context) {}
}
The reason I have my URL conform to identifiable and use it as the binding for the sheet item is because the following will NOT work.
@State private var showsExportDocumentPicker = false
// ...
Button(action: {
    do {
        // save file temporarily
        let fileUrl =  try FileManager.default.url(for: .documentDirectory, in: .userDomainMask, appropriateFor: nil, create: true)
        let destinationUrl = fileUrl.appendingPathComponent("checkmark\(Date()).png")
        if FileManager().fileExists(atPath: destinationUrl.path) {
            try FileManager().removeItem(at: destinationUrl)
        }
        let rawData: Data? = UIImage(systemName: "checkmark")?.pngData()
        try rawData?.write(to: destinationUrl)
        tempExportUrl = destinationUrl
        showsExportDocumentPicker = true

    } catch(let error) {
        print(error.localizedDescription)
        return
    }

}
//...
)
// ...
.sheet(isPresented: $showsExportDocumentPicker) {
    DocumentPickerView(exportingUrls: tempExportUrl == nil ? [] : [tempExportUrl!])
}
If we do it this way, the tempExportUrl will actually still be nil by the time the DocumentPickerView initialized.
Another thing I would like to point out (that has nothing to do with exporting/importing logic). Remember to add the ignoresSafeArea modifier to the DocumentPickerView when presenting in sheet! Otherwise, you will recognize a weird gap at bottom.

(Oops, checkmarks overwhelming!)
Thank you for reading! That’s all I have for today!
I normally don’t enjoy dealing with people with bias and preconceptions, and (I thought) I always try my best to avoid Preconceptions. However, here I am, being that person I hate… and this is what happened, spending days looking for a solution on a problem that should only take couple seconds (maybe overly exaggerated?) to solve…
Anyway!
Happy exporting!
Swift/iOS: File Import and Export 3 ways(Choose Destination Folder/FileName and Save to Files App) was originally published in Level Up Coding on Medium, where people are continuing the conversation by highlighting and responding to this story.
This content originally appeared on Level Up Coding - Medium and was authored by Itsuki
Itsuki | Sciencx (2024-06-25T16:15:18+00:00) Swift/iOS: File Import and Export 3 ways(Choose Destination Folder/FileName and Save to Files App). Retrieved from https://www.scien.cx/2024/06/25/swift-ios-file-import-and-export-3-wayschoose-destination-folder-filename-and-save-to-files-app/
Please log in to upload a file.
There are no updates yet.
Click the Upload button above to add an update.
