
This content originally appeared on Telerik Blogs and was authored by Rick Hellwege
Both the client and server in a real-time app are constantly sending and receiving information. Fiddler Everywhere can provide insights on that data and its performance.
Real-time communication in applications is a great tool to provide your users with the most up-to-date information. This might take the form of a message on social media, a breaking news story or an updated stock quote. Every piece of information is urgently needed by some users.
In a real-time application, information is constantly flowing between the client and the server. This can be minuscule synchronization and keep-alive messages, or large amounts of text. To better understand what information is being exchanged, how often it is exchanged and how that affects performance, a tool like Progress Telerik Fiddler Everywhere is invaluable.
To achieve real-time communication in a web application, both the client and server need to send and receive information using the same technology. One solution is gRPC, which is a protocol on top of HTTP/2. Another solution is called WebSockets, which is its own separate protocol over a TCP connection. Microsoft also provides an abstraction called SignalR for real-time communication, which transports data using WebSockets (most of the time).
MessagePack is a super simple way to improve both WebSockets and SignalR communication. It is an “efficient binary serialization format.” In short, it encodes the plain-text JSON data traditionally sent by SignalR to binary. This will roughly halve the size of the message. Since the longest part of the real-time communication process is often transmission of data, this can greatly improve application performance. What’s even better, those encoded messages can now be natively read and decoded in Fiddler Everywhere.
Creating a SignalR Application
The instructions below are an updated and abridged version of Use ASP.NET Core SignalR with Blazor. For a more detailed tutorial, follow the above link above.
Prerequisites
- Visual Studio (2022 or later)
- ASP.NET and web development workload
- .NET Core SDK 8.0 or later
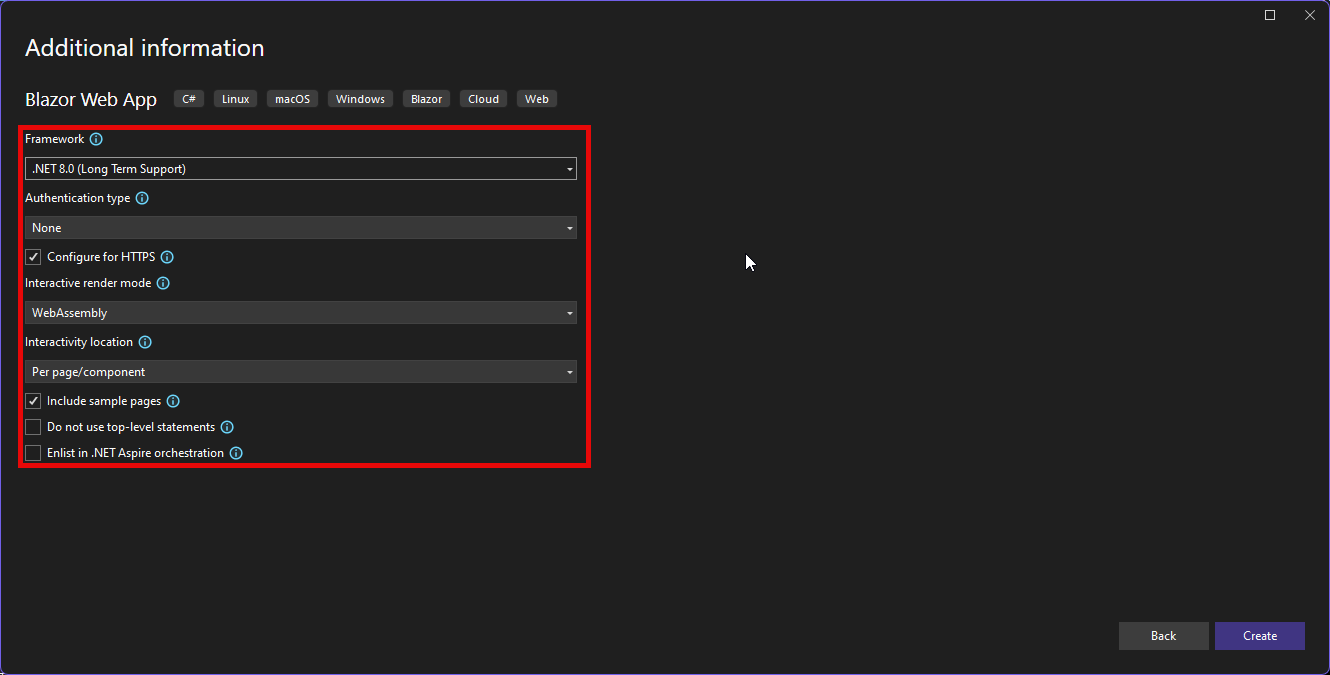
Create a Blazor Web Application
- Create a new Blazor Web App project.

- Give your sample project a suitable name, such as BlazorSignalRApp.
- Configure your project as below:
Add the SignalR Client Library
- Add the following package to your client app, e.g., BlazorSignalRApp.Client:
Microsoft.AspNetCore.SignalR.Client
Add a SignalR Hub
In the server app, e.g., BlazorSignalRApp, create a Hubs folder and add ChatHubs.cs to the folder.
In Hubs/ChatHubs.cs paste the below code:
using Microsoft.AspNetCore.SignalR;

namespace BlazorSignalRApp.Hubs;

public class ChatHub : Hub
{
    public async Task SendMessage(string user, string message)
    {
        await Clients.All.SendAsync("ReceiveMessage", user, message);
    }
}
Add Services and an Endpoint for the SignalR Hub
- In the Program.cs file of the server app, add the below namespaces.
using Microsoft.AspNetCore.ResponseCompression;
using BlazorSignalRApp.Hubs;
- Add SignalR and Response Compression Middleware service:
builder.Services.AddSignalR();

builder.Services.AddResponseCompression(opts =>
{
   opts.MimeTypes = ResponseCompressionDefaults.MimeTypes.Concat(
       ["application/octet-stream"]);
});
- Use Response Compression Middleware at the top of the processing pipeline’s configuration. Place the following line of code immediately after the line that builds the app (
var app = builder.Build();):
app.UseResponseCompression();
- Add an endpoint for the hub immediately before the line that runs the app (
app.Run();):
app.MapHub<ChatHub>("/chathub");
Add Razor Component Code for Chat
In the client app, create a razor page named Pages/Chat.razor.
Paste the following into Pages/Chat.razor:
@page "/chat"
@rendermode InteractiveWebAssembly
@using Microsoft.AspNetCore.SignalR.Client
@inject NavigationManager Navigation
@implements IAsyncDisposable

<PageTitle>Chat</PageTitle>

<div class="form-group">
    <label>
        User:
        <input @bind="userInput" />
    </label>
</div>
<div class="form-group">
    <label>
        Message:
        <input @bind="messageInput" size="50" />
    </label>
</div>
<button @onclick="Send" disabled="@(!IsConnected)">Send</button>

<hr>

<ul id="messagesList">
    @foreach (var message in messages)
    {
        <li>@message</li>
    }
</ul>

@code {
    private HubConnection? hubConnection;
    private List<string> messages = new List<string>();
    private string? userInput;
    private string? messageInput;

    protected override async Task OnInitializedAsync()
    {
        hubConnection = new HubConnectionBuilder()
            .WithUrl(Navigation.ToAbsoluteUri("/chathub"))
            .Build();

        hubConnection.On<string, string>("ReceiveMessage", (user, message) =>
        {
            var encodedMsg = $"{user}: {message}";
            messages.Add(encodedMsg);
            InvokeAsync(StateHasChanged);
        });

        await hubConnection.StartAsync();
    }

    private async Task Send()
    {
        if (hubConnection is not null)
        {
            await hubConnection.SendAsync("SendMessage", userInput, messageInput);
        }
    }

    public bool IsConnected =>
        hubConnection?.State == HubConnectionState.Connected;

    public async ValueTask DisposeAsync()
    {
        if (hubConnection is not null)
        {
            await hubConnection.DisposeAsync();
        }
    }
}
- Add an entry to the NavMenu for our new chat page. In the server app, add the below to Components/Layout/NavMenu.razor:
<div class="nav-item px-3">
    <NavLink class="nav-link" href="chat">
        <span class="bi bi-list-nested-nav-menu" aria-hidden="true"></span> Chat
    </NavLink>
</div>
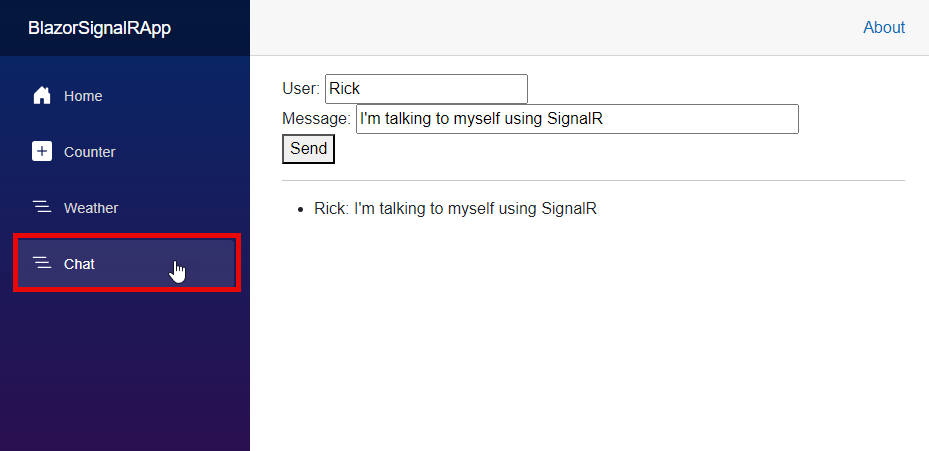
Run the App
- Build and run the server app to test our progress. You should see the below:
Adding MessagePack
Now that we have a fully functional web application that uses standard plain-text SignalR, let’s add MessagePack to serialize our messages to binary.
In BOTH the server app AND the client app, add the below package:
Microsoft.AspNetCore.SignalR.Protocols.MessagePackIn the server app, update the SignalR service to include MessagePack:
services.AddSignalR()
    .AddMessagePackProtocol();
- In the client app update the hubConnection in Pages/Chat.razor to include MessagePack:
var hubConnection = new HubConnectionBuilder()
                        .WithUrl("/chathub")
                        .AddMessagePackProtocol()
                        .Build();
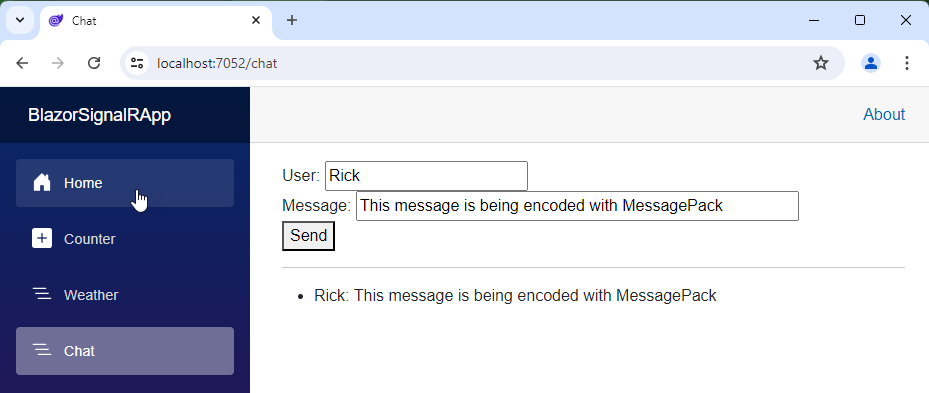
- Build/run the updated app.
Finding WebSocket Connection in Fiddler Everywhere
To inspect SignalR traffic in Progress Telerik Fiddler Everywhere, you must first identify the WebSockets connection. SignalR will use WebSockets by default, wherever it is supported—gracefully falling back on older technologies when WebSockets are not supported. Since this is a seldom occurrence, it’s safe to assume that WebSockets are being used.
First, we should identify the URL and port of our running application and use that to filter Fiddler Everywhere traffic. We can do this even before we start listening to the traffic.

Now, we can filter Fiddler Everywhere traffic like this:
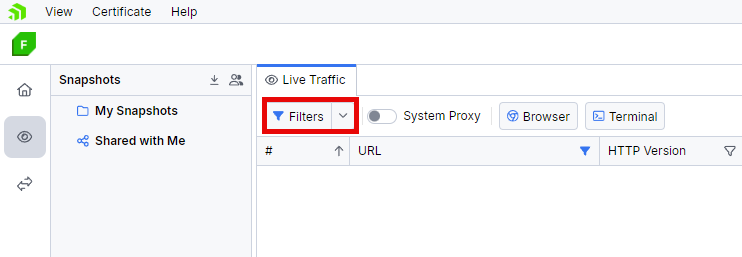

We can now launch our application and begin inspecting traffic.
Inspecting Traffic
Click the System Proxy switch to turn on the system network proxy a being inspecting all traffic. Everything not conforming to our filter will be discarded.
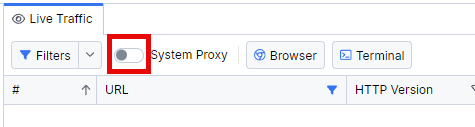
After running our application, we’ll see traffic start to appear in the Live Traffic window. All of this traffic is very informative, but we’re specifically looking for the WebSockets entry.
There are a few hints as to which item we need:
- It will be a GET request.
- We should see a status code 101 (switching protocols).
- Fiddler Everywhere represents WebSockets traffic with a plug icon.
- An open connection has a green dot.
![]()
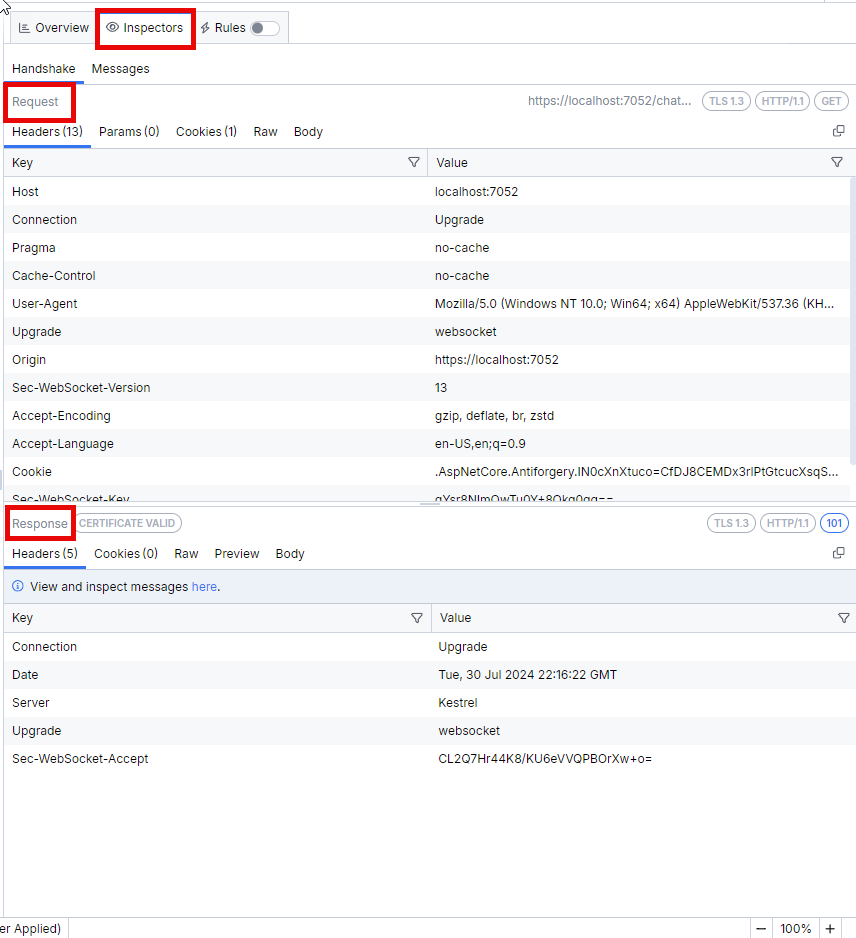
Selecting the connection, we can now use the Inspectors tab to view the Request and Response panels:
Decoding MessagePack
To view the messages being sent and received over SignalR (WebSockets), we’ll switch from the Handshake tab (focused on the connection) to the Messages tab (focused on the content).
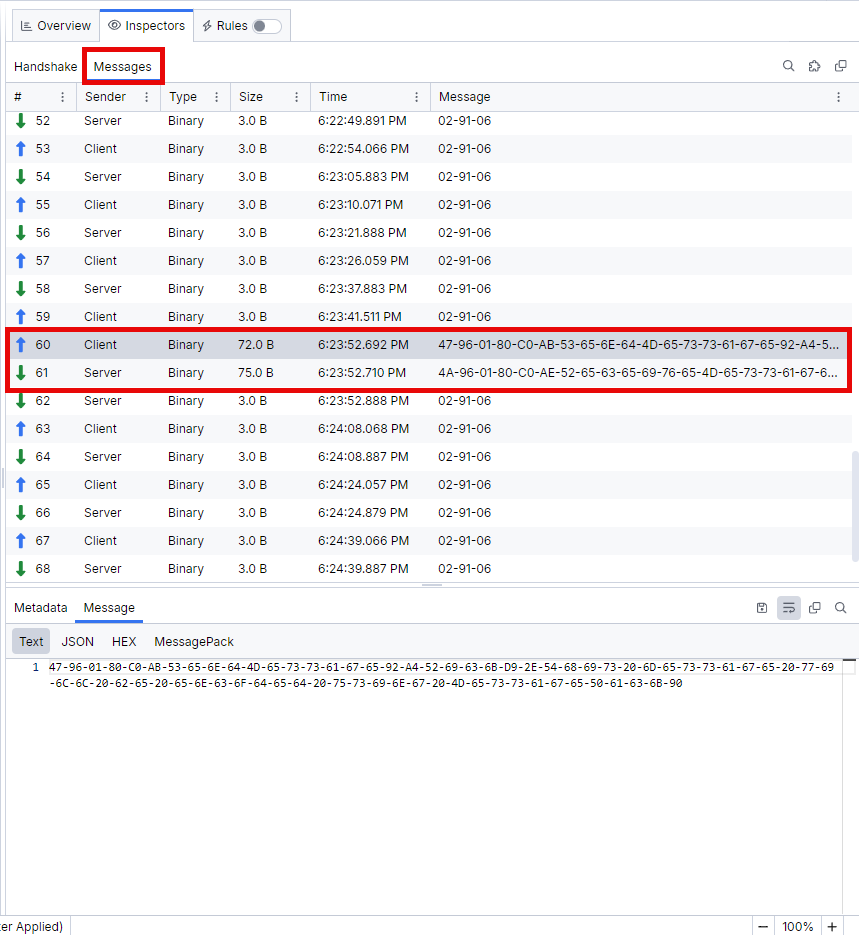
You notice that for each message sent in the app, we see both a client and server response. This is because our simple chat application sends a message and receives the same message back from the SignalR Hub.
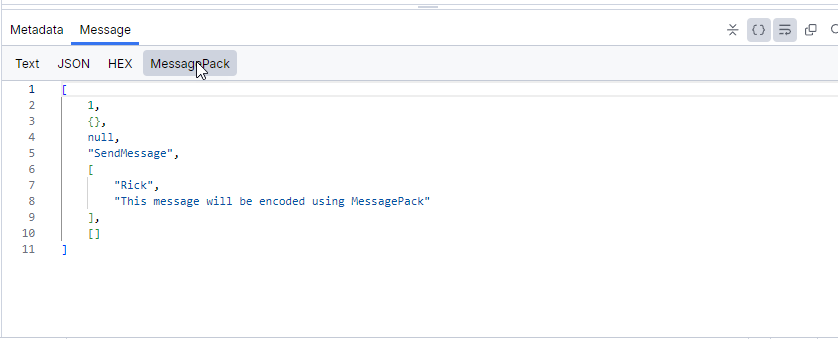
You’ll also notice that the raw content of that message is in binary (displayed in HEX values). This is MessagePack doing its job. To decode the message, open the MessagePack tab.
Conclusion
Fiddler Everywhere can be used during all stages of your real-time web application development lifecycle. Early in development, you may allow SignalR to send plain-text messages for easier debugging. You might also check the number of requests being sent and their size, and profile their performance metrics. In late-stage development, you can enable MessagePack and other optimization/compression protocols to increase performance. Doing so does not sacrifice your ability to read and understand the data passing through your servers or degrade your ability to inspect and profile applications in production.
If you haven’t already used Fiddler Everywhere, you can try it for free today!
This content originally appeared on Telerik Blogs and was authored by Rick Hellwege
Rick Hellwege | Sciencx (2024-08-27T09:33:00+00:00) How to Use Fiddler Everywhere with MessagePack. Retrieved from https://www.scien.cx/2024/08/27/how-to-use-fiddler-everywhere-with-messagepack/
Please log in to upload a file.
There are no updates yet.
Click the Upload button above to add an update.