This content originally appeared on Level Up Coding - Medium and was authored by Senthil E

Step-by-Step Guide to Creating AI Tools with OpenAI API and Streamlit
Introduction: Building Smart AI Apps 🚀
In this article, we will cover the development of three exciting AI-powered applications — an
- AI Homework Helper 📝,
- a Text-to-SQL Query Tool 🗃️,
- a Document RAG (Retrieval-Augmented Generation) Application 📄.
Each of these apps leverages the power of OpenAI’s API 🤖 to make complex tasks more accessible. We’ll dive into the features, folder structure, and technical implementation for each of these applications, showing how you can create smart, efficient tools that interact seamlessly with data using natural language 🌟. Whether you’re looking to create your own AI homework assistant, generate SQL from text, or develop an intelligent document analysis tool, this article has got you covered!
Project: 1-Building an 🤖 Homework Helper App with OpenAI API and Streamlit 🚀

Creating a 📝 homework helper app is simple with tools like OpenAI’s API 🤖 and Streamlit 🎨. Today, I will guide you through developing an AI-powered Homework Helper app. We’ll cover the core code 🧑💻, folder structure 📂, and packaging tools 📦 used, so you can easily replicate or extend this idea in your own projects. This app uses Streamlit for a friendly user interface 💻, and the OpenAI API to provide detailed, intelligent responses that help students learn 📚.
🔍 Overview of the AI Homework Helper App
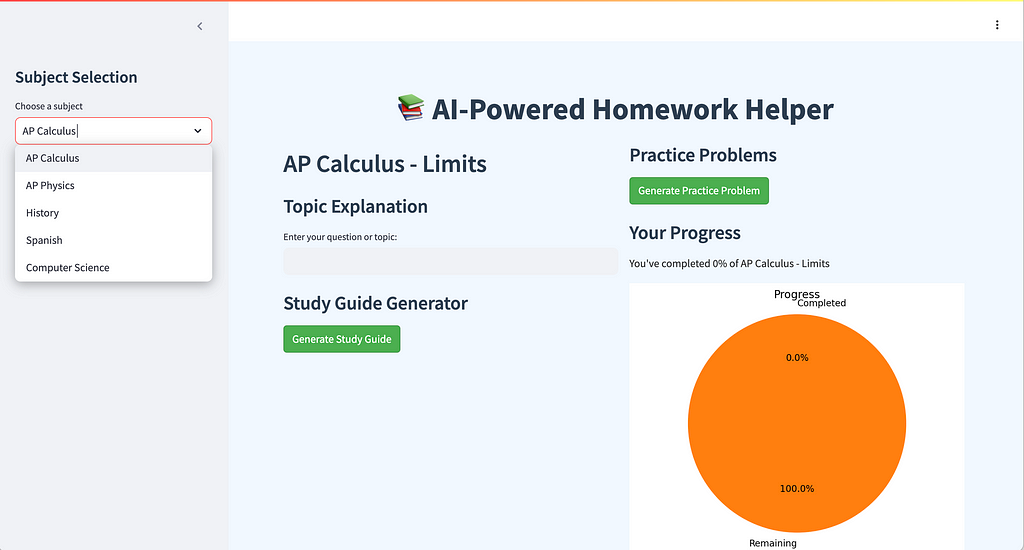
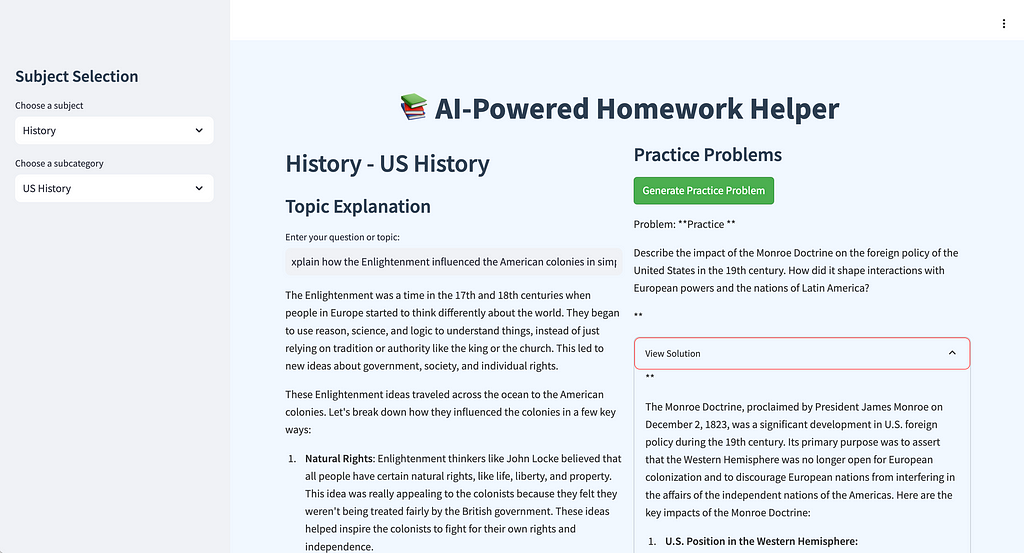
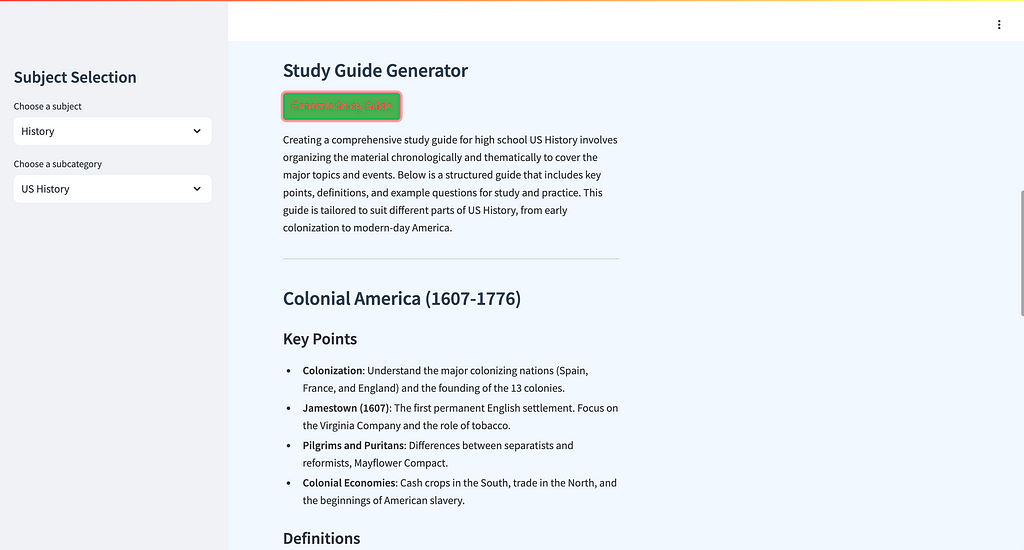
The AI Homework Helper app is built to assist students in understanding challenging topics like physics ⚛️ or chemistry 🧪, generating study guides 📖, and solving practice problems. It features a straightforward UI where users select subjects like “AP Physics,” then dive deeper into subtopics, such as “Electricity ⚡ and Magnetism.” They can generate study guides 📘, get practice questions, and even track their progress visually 📊.
The UI screenshots provided give a sense of the clear and intuitive interface, with dropdown menus ⬇️ and progress tracking 📈, that helps make complex subjects accessible. Now let’s get into the nitty-gritty of how the app is structured and what makes it work under the hood 🔧.
📂 Folder Structure and Files
To make the app modular and easy to manage, the code is organized into multiple scripts 🗂️, each handling a specific responsibility. This way, different parts of the code can be managed independently, ensuring better readability and maintainability. Below is an overview of the main files in the project:
ai_homework_helper/
│
├── main.py                     # Main script for Streamlit UI
├── subject_data.py             # Contains data and logic for different subjects
├── homework_helper.db          # SQLite database for storing homework data
├── utils.py                    # Utility functions used across the project
├── requirements.txt            # Dependencies required to run the project
└── README.md                   # Project documentation
- main.py: The main entry point for the Streamlit app. This script handles the UI components and interactions, such as rendering buttons and displaying study guides.
import streamlit as st
import sqlite3
from openai_helper import get_ai_explanation, generate_study_guide, generate_practice_problem
from database import init_db, save_progress, get_progress
from subject_data import subjects, subcategories
from utils import create_progress_chart

# Initialize the database
init_db()

st.set_page_config(page_title="AI Homework Helper", page_icon="📚", layout="wide")

# Custom CSS
st.markdown('''
<style>
.stApp {
    background-color: #f0f8ff;
    color: #333333;
}
.stButton>button {
    background-color: #4CAF50;
    color: white;
    border-radius: 5px;
}
.stTextInput>div>div>input {
    border-radius: 5px;
}
h1, h2, h3 {
    color: #2c3e50;
}
</style>
''', unsafe_allow_html=True)

# Attractive header
st.markdown("<h1 style='text-align: center; color: #2c3e50;'>📚 AI-Powered Homework Helper</h1>", unsafe_allow_html=True)

# Sidebar for subject and subcategory selection
st.sidebar.title("Subject Selection")
selected_subject = st.sidebar.selectbox("Choose a subject", list(subjects.keys()))
selected_subcategory = st.sidebar.selectbox("Choose a subcategory", subcategories[selected_subject])

# Main content area with columns
col1, col2 = st.columns(2)

with col1:
    st.markdown(f"<h2 style='color: #2c3e50;'>{selected_subject} - {selected_subcategory}</h2>", unsafe_allow_html=True)

    st.markdown("<h3 style='color: #2c3e50;'>Topic Explanation</h3>", unsafe_allow_html=True)
    user_question = st.text_input("Enter your question or topic:")
    if user_question:
        explanation = get_ai_explanation(user_question, selected_subject, selected_subcategory)
        st.write(explanation)

    st.markdown("<h3 style='color: #2c3e50;'>Study Guide Generator</h3>", unsafe_allow_html=True)
    if st.button("Generate Study Guide", key="study_guide"):
        study_guide = generate_study_guide(selected_subject, selected_subcategory)
        st.write(study_guide)

with col2:
    st.markdown("<h3 style='color: #2c3e50;'>Practice Problems</h3>", unsafe_allow_html=True)
    if st.button("Generate Practice Problem", key="practice_problem"):
        problem, solution = generate_practice_problem(selected_subject, selected_subcategory)
        st.write("Problem:", problem)
        with st.expander("View Solution"):
            st.write(solution)

    st.markdown("<h3 style='color: #2c3e50;'>Your Progress</h3>", unsafe_allow_html=True)
    progress = get_progress(selected_subject, selected_subcategory)
    st.write(f"You've completed {progress}% of {selected_subject} - {selected_subcategory}")
    st.pyplot(create_progress_chart(progress))

    if st.button("Update Progress", key="update_progress"):
        new_progress = min(progress + 10, 100)  # Increment progress by 10%
        save_progress(selected_subject, selected_subcategory, new_progress)
        st.success(f"Progress updated to {new_progress}%!")
        st.experimental_rerun()

# Footer
st.markdown("---")
st.markdown("<p style='text-align: center; color: #7f8c8d;'>AI Homework Helper - Powered by OpenAI and Streamlit</p>", unsafe_allow_html=True)
- utils.py: Contains utility functions, such as data formatting, which are used across multiple scripts.
import matplotlib.pyplot as plt

def create_progress_chart(progress):
    fig, ax = plt.subplots()
    ax.pie([progress, 100-progress], labels=['Completed', 'Remaining'], autopct='%1.1f%%', startangle=90)
    ax.axis('equal')
    plt.title('Progress')
    return fig
- openai_helper.py: A helper module responsible for interacting with the OpenAI API 🤖, including generating completions for study guides or answering user questions.
import os
from openai import OpenAI

OPENAI_API_KEY = os.environ.get("OPENAI_API_KEY")
openai_client = OpenAI(api_key=OPENAI_API_KEY)

def send_openai_request(prompt: str) -> str:
    completion = openai_client.chat.completions.create(
        model="gpt-4o", messages=[{"role": "user", "content": prompt}], max_tokens=500
    )
    content = completion.choices[0].message.content
    if not content:
        raise ValueError("OpenAI returned an empty response.")
    return content

def get_ai_explanation(question: str, subject: str, subcategory: str) -> str:
    prompt = f"Explain the following {subject} ({subcategory}) concept for a high school student: {question}"
    return send_openai_request(prompt)

def generate_study_guide(subject: str, subcategory: str) -> str:
    prompt = f"Create a comprehensive study guide for high school {subject} ({subcategory}). Include key points, definitions, and example problems."
    return send_openai_request(prompt)

def generate_practice_problem(subject: str, subcategory: str) -> tuple:
    prompt = f"Generate a high school level {subject} ({subcategory}) practice problem with its solution."
    response = send_openai_request(prompt)
    # Assuming the response is formatted as "Problem: ... Solution: ..."
    parts = response.split("Solution:")
    problem = parts[0].replace("Problem:", "").strip()
    solution = parts[1].strip() if len(parts) > 1 else "Solution not provided."
    return problem, solution
- subject_data.py: Manages the information related to subjects and subcategories, like AP Physics or Chemistry, which is used to populate dropdown menus.
subjects = {
    "AP Calculus": ["Limits", "Derivatives", "Integrals", "Applications"],
    "AP Physics": ["Mechanics", "Electricity and Magnetism", "Waves and Optics", "Modern Physics"],
    "History": ["US History", "World History", "California History", "Social Studies"],
    "Spanish": ["Grammar", "Vocabulary", "Conversation", "Literature"],
    "Computer Science": ["Programming Fundamentals", "Data Structures", "Algorithms", "Web Development"]
}

subcategories = {subject: categories for subject, categories in subjects.items()}- database.py: This script interacts with an SQLite database 🗄️ to save user progress. It allows for recording completed topics, which helps track the student’s progress.
import sqlite3
import os

DB_NAME = "homework_helper.db"

def get_db_connection():
    conn = sqlite3.connect(DB_NAME)
    conn.row_factory = sqlite3.Row
    return conn

def init_db():
    conn = get_db_connection()
    c = conn.cursor()
    c.execute('''CREATE TABLE IF NOT EXISTS progress
                 (id INTEGER PRIMARY KEY AUTOINCREMENT,
                  subject TEXT,
                  subcategory TEXT,
                  progress INTEGER,
                  UNIQUE(subject, subcategory))''')
    conn.commit()
    conn.close()

def save_progress(subject, subcategory, progress):
    conn = get_db_connection()
    c = conn.cursor()
    c.execute('''INSERT OR REPLACE INTO progress (subject, subcategory, progress)
                 VALUES (?, ?, ?)''', (subject, subcategory, progress))
    conn.commit()
    conn.close()

def get_progress(subject, subcategory):
    conn = get_db_connection()
    c = conn.cursor()
    c.execute('''SELECT progress FROM progress
                 WHERE subject = ? AND subcategory = ?''', (subject, subcategory))
    result = c.fetchone()
    conn.close()
    return result['progress'] if result else 0
- requirements.txt: This file is used for managing the dependencies of the project 📦, making it easy to replicate or share the project.
📝 The main.py File — Building the Streamlit Interface
The main.py script is where the app comes to life in Streamlit. This script handles all the user interface (UI) elements and interactions.
Explanation:
- Select Boxes: Users can select subjects and subcategories using dropdown menus ⬇️, making the app easy to navigate.
- Button Interaction: When the user clicks the “Generate Study Guide” button, the app calls the generate_response() function from openai_helper.py to fetch AI-generated content.
- Progress Tracking: The get_user_progress() function retrieves the student’s current progress and displays it visually using st.progress(), keeping users motivated.
🛠️ The utils.py File — Utility Functions
The utils.py file contains utility functions that are used throughout the application to keep the code clean and reusable. For example:
Explanation: This utility function helps format the response from OpenAI 🤖, making it more readable before displaying it to the user. By stripping unnecessary whitespace and replacing newline characters, it ensures a polished output.
🤖 The openai_helper.py File — Integrating OpenAI API
The magic of this homework app happens through the integration with OpenAI’s API. The openai_helper.py module is responsible for sending requests to OpenAI and processing the responses.
Explanation:
- API Key Configuration: The openai.api_key is fetched from environment variables, ensuring sensitive information remains secure 🔒.
- Prompt Engineering: The generate_response() function dynamically creates a prompt based on the user's selection, ensuring the content is relevant.
- Completion Request: A request is sent to OpenAI using the text-davinci-003 engine, which generates the study guide.
📚 The subject_data.py File — Managing Subject Data
The subject_data.py file is used to manage subjects and subcategories.
Explanation: These functions provide the list of subjects and their corresponding subcategories, making the UI dynamic and easy to extend with new content. The modular approach allows you to easily add or modify subjects without affecting the rest of the code.
🗄️ The database.py File — Tracking Student Progress
Tracking progress is crucial for a homework app. The database.py file handles database operations using SQLite, making it easy to store and retrieve user data.
Explanation:
- Database Setup: A simple SQLite database 🗄️ is used to store progress. This approach keeps the app lightweight and easy to set up.
- Progress Functions: The save_progress() and get_user_progress() functions interact with the database to save and fetch progress, allowing users to resume where they left off.
📦 Dependency Management with requirements.txt
Managing dependencies can be challenging, especially when sharing or deploying code. In this project, requirements.txt is used to handle dependencies and package management, simplifying the process for sharing and deploying the code.
Here’s an excerpt from requirements.txt:
Explanation:
- Dependency Declaration: The requirements.txt file lists all the dependencies required for the project, ensuring a consistent environment.
- Version Control: Using pip install -r requirements.txt, you can install all the dependencies, ensuring everyone has the same package versions installed.
🎯 Conclusion
This AI Homework Helper app shows how combining simple, modular code with powerful APIs can create impactful educational tools 📚. By breaking the project into smaller, manageable pieces — like main.py for the UI, openai_helper.py for API interactions, and database.py for persistence—developers can focus on each component without getting overwhelmed by complexity.Using requirements.txt for dependency management further simplifies the development experience, ensuring that all contributors can quickly get up and running 💨.
Project : 2 — 🌟 Building a Text-to-SQL App Using OpenAI API 🤖 and Streamlit 🎨

Creating a Text-to-SQL 📝 app can be an exciting journey 🚀, especially when leveraging the power ⚡ of OpenAI’s API 🤖 to transform natural language 🗣️ into SQL queries 📊. In this article, we will explore how to develop a Text-to-SQL app using Streamlit 🎨 and OpenAI’s ChatGPT API to help users interact with an order management database 🗄️ using plain language. We will cover the core features ✨ of the app, the folder structure 📂, and the technical details 🔧 to make it all work smoothly. Let’s dive in! 🌊
🔍 Overview of the Text-to-SQL App
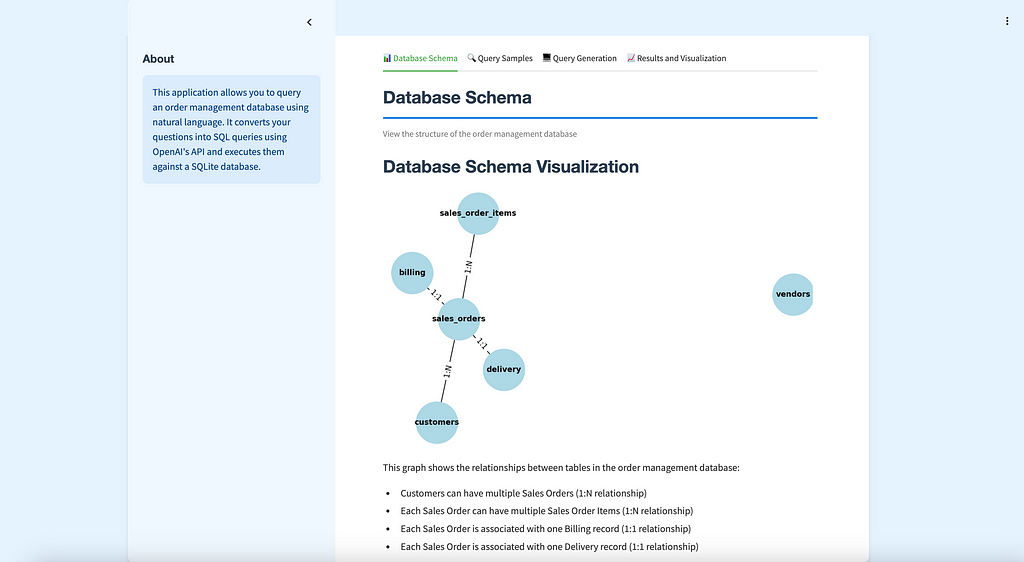
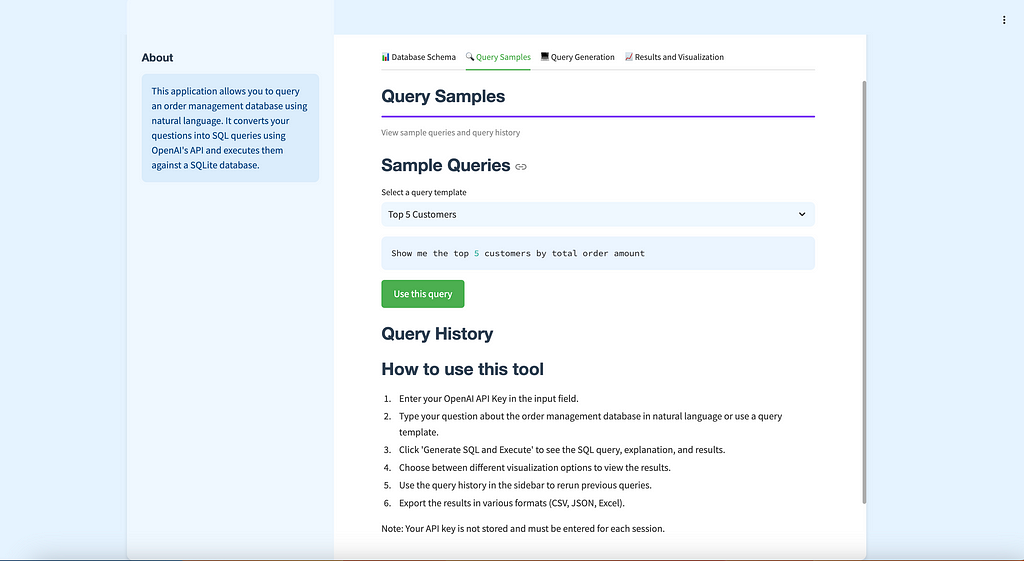
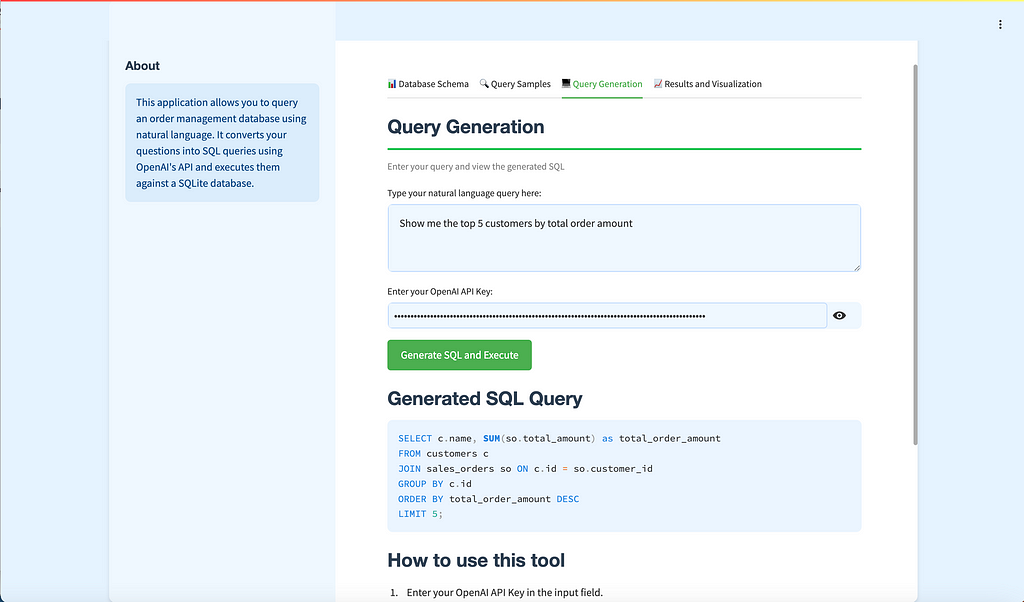
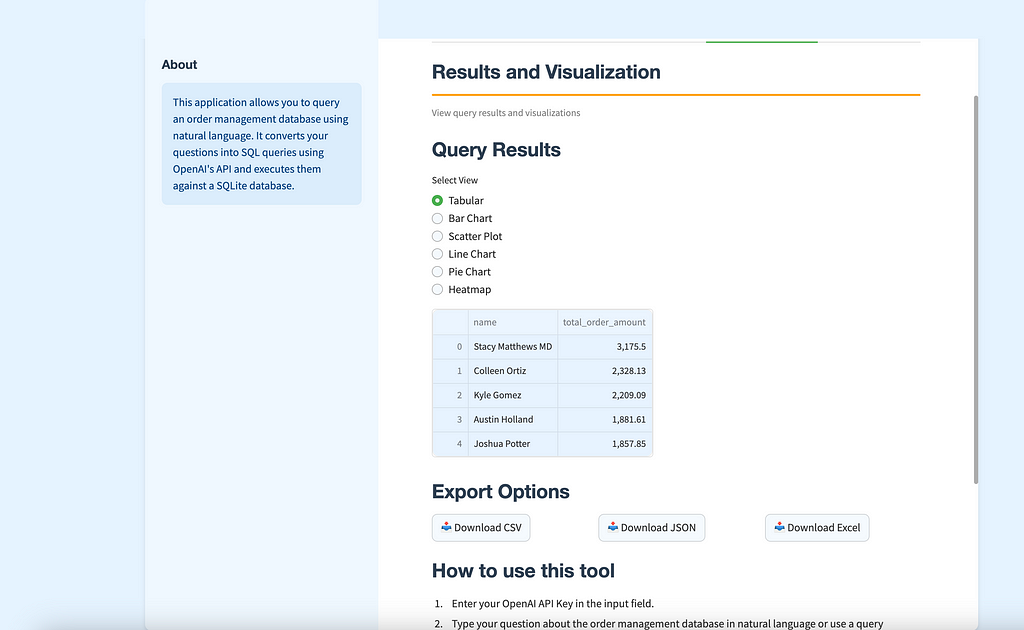
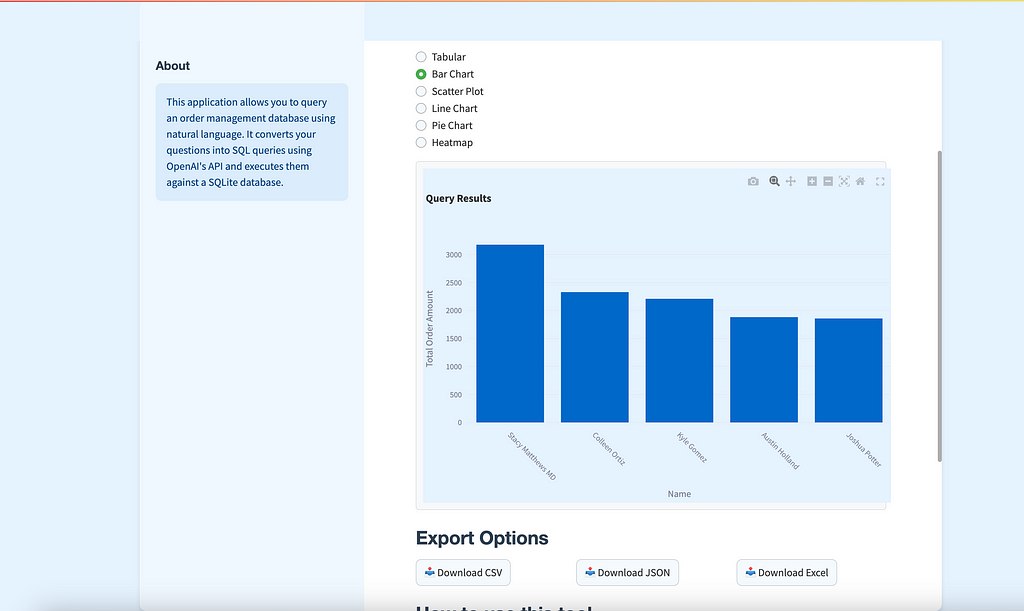
The Text-to-SQL app is designed to let users interact with a custom order management database 🗄️ using natural language 🗣️. Users can type in questions like, “Show me the top 5 customers by total order amount 💰,” and get back the SQL query along with the results displayed in a neat, user-friendly interface. The app also offers visualizations 📊 like bar charts 📉, line charts 📈, and tables to better understand the data.
📂 Folder Structure and Files
The app is built with modularity in mind to ensure maintainability and readability. Here’s an overview of the core components and files used in the project:
text_to_sql/
│
├── main.py                     # Main script for Streamlit UI
├── nlp_to_sql.py               # Handles natural language to SQL conversion
├── database.py                 # Manages SQLite database connections and queries
├── schema_visualizer.py        # Visualizes the database schema
├── query_utils.py              # Helper functions for managing saved queries
├── utils.py                    # General utility functions
├── sample_queries.py           # Contains sample queries for the sidebar
├── order_management.db         # SQLite database for order management
├── requirements.txt            # Dependencies required to run the project
└── README.md                   # Project documentation
- main.py: The main script responsible for rendering the Streamlit user interface 💻 and managing user interactions.
import streamlit as st
import pandas as pd
import plotly.express as px
import plotly.graph_objects as go
from database import create_database, execute_query
from nlp_to_sql import convert_to_sql
from utils import sanitize_input
from sample_queries import SAMPLE_QUERIES
from query_utils import add_to_query_history, get_query_history, get_query_templates
from schema_visualizer import visualize_schema
from streamlit_extras.colored_header import colored_header
from streamlit_extras.add_vertical_space import add_vertical_space
import logging
import time
import io

logging.basicConfig(level=logging.INFO, format='%(asctime)s - %(levelname)s - %(message)s')

create_database()

st.markdown('''
<style>
    body {
        color: #333;
        background-color: #e6f3ff;
    }
    .stApp {
        max-width: 1200px;
        margin: 0 auto;
        background-color: #ffffff;
        padding: 20px;
        border-radius: 10px;
        box-shadow: 0 4px 6px rgba(0, 0, 0, 0.1);
    }
    .stButton>button {
        background-color: #4CAF50;
        color: white;
        font-weight: bold;
        border-radius: 5px;
        border: none;
        padding: 10px 20px;
        transition: background-color 0.3s;
    }
    .stButton>button:hover {
        background-color: #45a049;
    }
    .stTextInput>div>div>input, .stTextArea>div>div>textarea {
        background-color: #f0f8ff;
        border: 1px solid #bbd6ff;
        border-radius: 5px;
    }
    h1, h2, h3 {
        color: #2c3e50;
        font-family: 'Helvetica Neue', sans-serif;
    }
    .stTab {
        background-color: #d4edda;
        color: #155724;
        font-weight: bold;
        border-radius: 5px;
        padding: 5px 10px;
    }
    .stDataFrame {
        border: 1px solid #e0e0e0;
        border-radius: 5px;
        overflow: hidden;
    }
    .stPlotlyChart {
        border: 1px solid #e0e0e0;
        border-radius: 5px;
        padding: 10px;
        background-color: #f8f9fa;
    }
</style>
''', unsafe_allow_html=True)

colored_header(label="Text-to-SQL Query Tool", description="Query your database using natural language", color_name="green-70")
add_vertical_space(2)

# Sidebar content
st.sidebar.subheader("About")
st.sidebar.info("""
This application allows you to query an order management database using natural language.
It converts your questions into SQL queries using OpenAI's API and executes them against a SQLite database.
""")

# Main content organized into tabs
tab1, tab2, tab3, tab4 = st.tabs(["📊 Database Schema", "🔍 Query Samples", "💻 Query Generation", "📈 Results and Visualization"])

with tab1:
    colored_header(label="Database Schema", description="View the structure of the order management database", color_name="blue-70")
    visualize_schema()

with tab2:
    colored_header(label="Query Samples", description="View sample queries and query history", color_name="violet-70")

    st.subheader("Sample Queries")
    query_templates = get_query_templates()
    selected_template = st.selectbox("Select a query template", list(query_templates.keys()))
    if selected_template:
        st.session_state.user_query = query_templates[selected_template]
        st.code(st.session_state.user_query)

    if st.button("Use this query"):
        st.session_state.user_query = st.session_state.user_query
        st.rerun()

    st.subheader("Query History")
    query_history = get_query_history()
    for idx, query in enumerate(reversed(query_history), 1):
        if st.button(f"{idx}. {query[:50]}...", key=f"history_{idx}"):
            st.session_state.user_query = query
            st.code(query)
        if st.button("Use this query", key=f"use_history_{idx}"):
            st.session_state.user_query = query
            st.rerun()

with tab3:
    colored_header(label="Query Generation", description="Enter your query and view the generated SQL", color_name="green-70")
    user_query = st.text_area("Type your natural language query here:", value=st.session_state.get('user_query', ''), height=100)
    openai_api_key = st.text_input("Enter your OpenAI API Key:", type="password")

    if 'sql_query' not in st.session_state:
        st.session_state.sql_query = ""
    if 'results' not in st.session_state:
        st.session_state.results = pd.DataFrame()

    if st.button("Generate SQL and Execute"):
        if not openai_api_key:
            st.error("Please enter your OpenAI API Key.")
        elif not user_query:
            st.error("Please enter a query.")
        else:
            sanitized_query = sanitize_input(user_query)
            try:
                start_time = time.time()
                with st.spinner("Generating SQL query..."):
                    st.session_state.sql_query = convert_to_sql(sanitized_query, openai_api_key)
                st.subheader("Generated SQL Query")
                st.code(st.session_state.sql_query, language="sql")

                with st.spinner("Executing query..."):
                    st.session_state.results = execute_query(st.session_state.sql_query)
                end_time = time.time()
                execution_time = end_time - start_time

                add_to_query_history(user_query)

                with st.spinner("Generating explanation..."):
                    explanation = convert_to_sql(f"Explain this SQL query in simple terms: {st.session_state.sql_query}", openai_api_key)
                st.subheader("Query Explanation")
                st.write(explanation)

                st.info(f"Query executed in {execution_time:.2f} seconds")

                logging.info(f"Results shape: {st.session_state.results.shape}")
                logging.info(f"Results data types: {st.session_state.results.dtypes}")
                logging.info(f"Data sample: {st.session_state.results.head()}")
            except ValueError as ve:
                st.error(f"Error in SQL generation: {str(ve)}")
                logging.error(f"SQL generation error: {str(ve)}")
            except Exception as e:
                st.error(f"An error occurred: {str(e)}")
                logging.error(f"General error: {str(e)}")

    if st.session_state.sql_query:
        st.subheader("Generated SQL Query")
        st.code(st.session_state.sql_query, language="sql")

with tab4:
    colored_header(label="Results and Visualization", description="View query results and visualizations", color_name="orange-70")
    if not st.session_state.results.empty:
        st.subheader("Query Results")

        def determine_chart_type(df):
            if len(df.columns) == 2:
                if df.dtypes.value_counts().index.isin(['int64', 'float64']).sum() == 1:
                    return 'bar'
            elif len(df.columns) > 2:
                numeric_cols = df.select_dtypes(include=['int64', 'float64']).columns
                if len(numeric_cols) >= 2:
                    return 'scatter'
            if df.select_dtypes(include=['datetime64']).columns.any():
                return 'line'
            if len(df.select_dtypes(include=['int64', 'float64']).columns) >= 1:
                return 'bar'
            return 'table'

        view_type = st.radio("Select View", ("Tabular", "Bar Chart", "Scatter Plot", "Line Chart", "Pie Chart", "Heatmap"))

        if view_type == "Tabular":
            st.dataframe(st.session_state.results)
        else:
            try:
                logging.info(f"Full dataset: {st.session_state.results.to_dict()}")
                logging.info(f"Column names: {st.session_state.results.columns}")
                logging.info(f"Data types: {st.session_state.results.dtypes}")
                logging.info(f"Number of rows: {len(st.session_state.results)}")

                if view_type == "Bar Chart":
                    chart_type = 'bar'
                elif view_type == "Scatter Plot":
                    chart_type = 'scatter'
                elif view_type == "Line Chart":
                    chart_type = 'line'
                elif view_type == "Pie Chart":
                    chart_type = 'pie'
                elif view_type == "Heatmap":
                    chart_type = 'heatmap'
                else:
                    chart_type = determine_chart_type(st.session_state.results)

                logging.info(f"Chart type determined: {chart_type}")

                if chart_type == 'bar':
                    if len(st.session_state.results.columns) == 2:
                        x_col = st.session_state.results.columns[0]
                        y_col = st.session_state.results.columns[1]
                    else:
                        x_col = st.session_state.results.select_dtypes(exclude=['int64', 'float64']).columns[0]
                        y_col = st.session_state.results.select_dtypes(include=['int64', 'float64']).columns[0]
                    fig = px.bar(st.session_state.results, x=x_col, y=y_col, title='Query Results')
                    fig.update_xaxes(title_text=str(x_col).replace('_', ' ').title(), tickangle=45)
                    fig.update_yaxes(title_text=str(y_col).replace('_', ' ').title())
                elif chart_type == 'scatter':
                    numeric_cols = st.session_state.results.select_dtypes(include=['int64', 'float64']).columns
                    fig = px.scatter(st.session_state.results, x=numeric_cols[0], y=numeric_cols[1], title='Query Results')
                elif chart_type == 'line':
                    date_col = st.session_state.results.select_dtypes(include=['datetime64']).columns[0]
                    numeric_col = st.session_state.results.select_dtypes(include=['int64', 'float64']).columns[0]
                    fig = px.line(st.session_state.results, x=date_col, y=numeric_col, title='Query Results')
                elif chart_type == 'pie':
                    if len(st.session_state.results.columns) >= 2:
                        values_col = st.session_state.results.select_dtypes(include=['int64', 'float64']).columns[0]
                        names_col = st.session_state.results.select_dtypes(exclude=['int64', 'float64']).columns[0]
                        fig = px.pie(st.session_state.results, values=values_col, names=names_col, title='Query Results')
                    else:
                        st.warning("Pie chart requires at least two columns (one for names and one for values)")
                        fig = None
                elif chart_type == 'heatmap':
                    if len(st.session_state.results.columns) >= 3:
                        x_col = st.session_state.results.columns[0]
                        y_col = st.session_state.results.columns[1]
                        z_col = st.session_state.results.columns[2]
                        fig = px.density_heatmap(st.session_state.results, x=x_col, y=y_col, z=z_col, title='Query Results')
                    else:
                        st.warning("Heatmap requires at least three columns")
                        fig = None
                else:
                    st.warning("Unable to create a suitable chart. Showing data table instead.")
                    st.dataframe(st.session_state.results)
                    fig = None

                if fig:
                    fig.update_layout(height=500, width=700)
                    st.plotly_chart(fig)
            except Exception as chart_error:
                st.error(f"Error creating chart: {str(chart_error)}")
                logging.error(f"Chart creation error: {str(chart_error)}")
                st.dataframe(st.session_state.results)
    else:
        st.warning("No data to visualize.")

    if not st.session_state.results.empty:
        st.subheader("Export Options")
        export_col1, export_col2, export_col3 = st.columns(3)

        with export_col1:
            csv = st.session_state.results.to_csv(index=False)
            st.download_button(
                label="📥 Download CSV",
                data=csv,
                file_name="query_results.csv",
                mime="text/csv",
            )

        with export_col2:
            json = st.session_state.results.to_json(orient="records")
            st.download_button(
                label="📥 Download JSON",
                data=json,
                file_name="query_results.json",
                mime="application/json",
            )

        with export_col3:
            excel_buffer = io.BytesIO()
            with pd.ExcelWriter(excel_buffer, engine='openpyxl') as writer:
                st.session_state.results.to_excel(writer, index=False)
            excel_data = excel_buffer.getvalue()
            st.download_button(
                label="📥 Download Excel",
                data=excel_data,
                file_name="query_results.xlsx",
                mime="application/vnd.openxmlformats-officedocument.spreadsheetml.sheet",
            )

# How to use this tool (moved outside of tabs)
st.subheader("How to use this tool")
st.write("""
1. Enter your OpenAI API Key in the input field.
2. Type your question about the order management database in natural language or use a query template.
3. Click 'Generate SQL and Execute' to see the SQL query, explanation, and results.
4. Choose between different visualization options to view the results.
5. Use the query history in the sidebar to rerun previous queries.
6. Export the results in various formats (CSV, JSON, Excel).

Note: Your API key is not stored and must be entered for each session.
""")
- nlp_to_sql.py: Contains the function that interacts with the OpenAI API 🤖 to convert natural language inputs 🗣️ into SQL queries.
import os
from openai import OpenAI
import logging

# Configure logging
logging.basicConfig(level=logging.INFO, format='%(asctime)s - %(levelname)s - %(message)s')

def convert_to_sql(natural_language_query, api_key):
    client = OpenAI(api_key=api_key)

    # Provide context about the database schema
    schema_context = """
    Database Schema:
    - customers (id, name, email, address)
    - vendors (id, name, contact_info)
    - sales_orders (id, customer_id, order_date, total_amount)
    - sales_order_items (id, order_id, product_name, quantity, unit_price)
    - billing (id, order_id, billing_date, amount_due, payment_status)
    - delivery (id, order_id, shipping_address, delivery_date, status)
    """

    prompt = f"""
    Given the following database schema:
    {schema_context}

    Task: Convert the following natural language query to SQL:
    {natural_language_query}

    Requirements:
    1. Use SQLite-compatible date functions for date-based queries.
    2. For queries involving time periods, use the date('now', ...) function.
    3. Use strftime() for date formatting and extraction.
    4. Your response must be a valid SQL query starting with SELECT or WITH.
    5. Return only the SQL query, without any additional explanation.
    """

    try:
        logging.info(f"Sending prompt to OpenAI API: {prompt}")
        completion = client.chat.completions.create(
            model="gpt-3.5-turbo",  # Updated to gpt-3.5-turbo
            messages=[{"role": "user", "content": prompt}],
            max_tokens=500
        )
        logging.info(f"Raw API response: {completion}")
        response = completion.choices[0].message.content.strip()

        # Log the API response for debugging
        logging.info(f"OpenAI API Response: {response}")

        # Updated validation check
        if not (response.strip().lower().startswith("select") or
                response.strip().lower().startswith("with") or
                response.strip().lower().startswith("```sql")):
            logging.error(f"Invalid SQL query generated: {response}")
            raise ValueError(f"The generated text does not appear to be a valid SQL query. Generated text: {response}")

        # If the response starts with ```sql, remove it
        if response.strip().lower().startswith("```sql"):
            response = response.split("```sql", 1)[1].strip()
        if response.strip().endswith("```"):
            response = response.rsplit("```", 1)[0].strip()

        # Add more detailed logging before returning the response
        logging.info(f"Final SQL query: {response}")
        return response
    except ValueError as ve:
        logging.error(f"Validation error: {str(ve)}")
        raise
    except Exception as e:
        logging.error(f"Error in converting natural language to SQL: {str(e)}")
        raise Exception(f"Error in processing request: {str(e)}. Please try rephrasing your query or check your API key.")
- database.py: Manages connections to the SQLite database 🗄️ and provides utility functions for executing SQL queries.
import sqlite3
import pandas as pd
from faker import Faker
import random
from datetime import datetime, timedelta

DB_NAME = "order_management.db"

def create_database():
    conn = sqlite3.connect(DB_NAME)
    c = conn.cursor()

    # Create tables
    c.execute('''CREATE TABLE IF NOT EXISTS customers
                 (id INTEGER PRIMARY KEY, name TEXT, email TEXT, address TEXT)''')

    c.execute('''CREATE TABLE IF NOT EXISTS vendors
                 (id INTEGER PRIMARY KEY, name TEXT, contact_info TEXT)''')

    c.execute('''CREATE TABLE IF NOT EXISTS sales_orders
                 (id INTEGER PRIMARY KEY, customer_id INTEGER, order_date TEXT, total_amount REAL)''')

    c.execute('''CREATE TABLE IF NOT EXISTS sales_order_items
                 (id INTEGER PRIMARY KEY, order_id INTEGER, product_name TEXT, quantity INTEGER, unit_price REAL)''')

    c.execute('''CREATE TABLE IF NOT EXISTS billing
                 (id INTEGER PRIMARY KEY, order_id INTEGER, billing_date TEXT, amount_due REAL, payment_status TEXT)''')

    c.execute('''CREATE TABLE IF NOT EXISTS delivery
                 (id INTEGER PRIMARY KEY, order_id INTEGER, shipping_address TEXT, delivery_date TEXT, status TEXT)''')

    conn.commit()

    # Generate fake data if tables are empty
    if c.execute("SELECT COUNT(*) FROM customers").fetchone()[0] == 0:
        generate_fake_data(conn)

    conn.close()

def generate_fake_data(conn):
    fake = Faker()
    c = conn.cursor()

    # Generate customers
    for _ in range(100):
        c.execute("INSERT INTO customers (name, email, address) VALUES (?, ?, ?)",
                  (fake.name(), fake.email(), fake.address()))

    # Generate vendors
    for _ in range(100):
        c.execute("INSERT INTO vendors (name, contact_info) VALUES (?, ?)",
                  (fake.company(), fake.phone_number()))

    # Generate sales orders and related data
    for _ in range(100):
        customer_id = random.randint(1, 100)
        order_date = fake.date_time_between(start_date="-1y", end_date="now")
        total_amount = round(random.uniform(10, 1000), 2)

        c.execute("INSERT INTO sales_orders (customer_id, order_date, total_amount) VALUES (?, ?, ?)",
                  (customer_id, order_date.strftime("%Y-%m-%d %H:%M:%S"), total_amount))

        order_id = c.lastrowid

        # Generate order items
        for _ in range(random.randint(1, 5)):
            c.execute("INSERT INTO sales_order_items (order_id, product_name, quantity, unit_price) VALUES (?, ?, ?, ?)",
                      (order_id, fake.word(), random.randint(1, 10), round(random.uniform(5, 100), 2)))

        # Generate billing
        billing_date = order_date + timedelta(days=random.randint(1, 30))
        payment_status = random.choice(["Paid", "Pending", "Overdue"])
        c.execute("INSERT INTO billing (order_id, billing_date, amount_due, payment_status) VALUES (?, ?, ?, ?)",
                  (order_id, billing_date.strftime("%Y-%m-%d %H:%M:%S"), total_amount, payment_status))

        # Generate delivery
        delivery_date = order_date + timedelta(days=random.randint(1, 14))
        status = random.choice(["Shipped", "Delivered", "Pending"])
        c.execute("INSERT INTO delivery (order_id, shipping_address, delivery_date, status) VALUES (?, ?, ?, ?)",
                  (order_id, fake.address(), delivery_date.strftime("%Y-%m-%d %H:%M:%S"), status))

    conn.commit()

def execute_query(query):
    conn = sqlite3.connect(DB_NAME)
    try:
        df = pd.read_sql_query(query, conn)
        return df
    except sqlite3.Error as e:
        raise Exception(f"SQLite error: {e}")
    finally:
        conn.close()
- schema_visualizer.py: Handles the visualization of the database schema to help users understand the underlying structure of the data 📊.
import streamlit as st
import networkx as nx
import matplotlib.pyplot as plt

def create_schema_graph():
    G = nx.Graph()

    # Add nodes (tables)
    tables = [
        "customers", "vendors", "sales_orders",
        "sales_order_items", "billing", "delivery"
    ]
    G.add_nodes_from(tables)

    # Add edges (relationships)
    edges = [
        ("customers", "sales_orders"),
        ("sales_orders", "sales_order_items"),
        ("sales_orders", "billing"),
        ("sales_orders", "delivery")
    ]
    G.add_edges_from(edges)

    return G

def visualize_schema():
    st.subheader("Database Schema Visualization")

    G = create_schema_graph()

    # Create a Matplotlib figure
    fig, ax = plt.subplots(figsize=(10, 6))
    pos = nx.spring_layout(G)
    nx.draw(G, pos, with_labels=True, node_color='lightblue',
            node_size=3000, font_size=10, font_weight='bold', ax=ax)

    # Add edge labels
    edge_labels = {
        ("customers", "sales_orders"): "1:N",
        ("sales_orders", "sales_order_items"): "1:N",
        ("sales_orders", "billing"): "1:1",
        ("sales_orders", "delivery"): "1:1"
    }
    nx.draw_networkx_edge_labels(G, pos, edge_labels=edge_labels, ax=ax)

    # Use Streamlit to display the Matplotlib figure
    st.pyplot(fig)

    st.write("""
    This graph shows the relationships between tables in the order management database:
    - Customers can have multiple Sales Orders (1:N relationship)
    - Each Sales Order can have multiple Sales Order Items (1:N relationship)
    - Each Sales Order is associated with one Billing record (1:1 relationship)
    - Each Sales Order is associated with one Delivery record (1:1 relationship)
    """)
- query_utils.py: Implements helper functions for managing saved queries, like saving 💾, loading 📂, and displaying past queries.
import streamlit as st
from typing import List, Dict

def add_to_query_history(query: str):
    if 'query_history' not in st.session_state:
        st.session_state.query_history = []
    st.session_state.query_history.append(query)
    # Keep only the last 10 queries
    st.session_state.query_history = st.session_state.query_history[-10:]

def get_query_history() -> List[str]:
    return st.session_state.get('query_history', [])

QUERY_TEMPLATES: Dict[str, str] = {
    "Top 5 Customers": "Show me the top 5 customers by total order amount",
    "Monthly Sales": "What is the average order value for each month in the last year?",
    "Popular Products": "Show me the products that have been ordered more than 10 times",
    "Overdue Payments": "List all overdue payments with customer details",
    "Recent Orders": "Show me the 10 most recent orders with their delivery status"
}

def get_query_templates() -> Dict[str, str]:
    return QUERY_TEMPLATES
- utils.py: Contains utility functions that are used across multiple parts of the app, like formatting responses.
import re

def sanitize_input(input_string):
    # Remove any SQL keywords or special characters that could be used for SQL injection
    sql_keywords = ["SELECT", "FROM", "WHERE", "INSERT", "UPDATE", "DELETE", "DROP", "TABLE", "DATABASE"]
    pattern = r'\b(' + '|'.join(sql_keywords) + r')\b'
    sanitized = re.sub(pattern, '', input_string, flags=re.IGNORECASE)

    # Remove special characters
    sanitized = re.sub(r'[;\'"\\/]', '', sanitized)

    return sanitized
- sample_queries.py: Stores example queries that are used in the sidebar to help users get started 🚀.
SAMPLE_QUERIES = [
    "Show me the top 5 customers by total order amount",
    "List all orders with their delivery status",
    "What is the average order value for each month in the last year?",
    "Show me the products that have been ordered more than 10 times",
    "List all overdue payments with customer details",
]
- requirements.txt: A simple file that declares all the dependencies required to run the project 📦, making it easy for others to set up the same environment.
🗄️ Setting Up the SQLite Database
To make this app functional, we first need a database. The database.py script sets up an SQLite database 🗄️, which includes tables like customers, vendors, sales_orders, sales_order_items, billing, and delivery. These tables are populated with realistic fake data 🗂️ using the Faker library, providing a rich set of data to query.
The database.py file connects to the SQLite database 🗄️ and handles executing SQL queries, while ensuring that connections are securely closed 🔒 after each interaction. This database setup allows us to perform various operations and get meaningful results for our natural language queries.
💻 User Interface in main.py
The main.py script brings the app to life using Streamlit 🎨. The user interface includes the following components:
- Input for OpenAI API Key 🔑: Users are required to input their OpenAI API key to use the app.
- Text Area for Natural Language Queries 🗣️: This is where users type their questions about the order management data.
- Generated SQL Query Display 📝: After the user submits a question, the generated SQL query is displayed.
- Query Results 📊: The results of the executed query are shown in a tabular format, with options for different visualizations.
🤖 Natural Language to SQL Conversion in nlp_to_sql.py
The nlp_to_sql.py file is responsible for converting natural language queries 🗣️ into SQL 📊. This script interacts with the OpenAI API 🤖, providing the database schema as context to ensure that the generated SQL is accurate. Below is a simplified version of how this interaction happens:
Explanation: The generate_sql_query() function takes the user's input and generates an SQL query using the OpenAI API 🤖. The function passes the user's question as part of the prompt, and the API returns the SQL code.
🗄️ Executing Queries and Displaying Results
Once an SQL query is generated, it needs to be executed against the SQLite database 🗄️. The database.py script handles this by providing functions for executing SQL queries and fetching results:
Explanation: This function connects to the SQLite database 🗄️, executes the SQL query, and fetches the results. In case of an error, a user-friendly message is returned.
📊 Data Visualization
To make the query results more insightful, the app provides several visualization options 📈. Users can choose between bar charts 📊, line charts 📉, and other visualizations, depending on the type of data returned. The main.py script handles the UI for visualizations, allowing users to switch between different views of the data. Here’s an example of how visualizations are integrated:
📂 Sidebar with Sample Queries
The sample_queries.py file contains a list of example queries to help users understand the capabilities of the app. These examples are available in the sidebar, allowing users to click and use them directly:
📦 Dependency Management with requirements.txt
Managing dependencies is essential for setting up the development environment consistently.
Here’s an excerpt from requirements.txt:
streamlit==1.0.0
openai==0.27.0
chromadb
PyPDF2
pandas
Explanation: The requirements.txt file lists all the packages 📦 required for the project, ensuring that everyone working on the app can easily recreate the environment.
🎯 Conclusion
The Text-to-SQL app demonstrates how you can use natural language 🗣️ to interact with complex databases 🗄️ in an intuitive and accessible way. By combining Streamlit 🎨 for the user interface, SQLite for database management, and OpenAI’s API 🤖 for natural language processing, we have created a powerful tool that can be used by anyone, even those without SQL knowledge.
The modular structure of this project, with separate files handling specific tasks like database management 🗄️, query conversion 🤖, and user interface 🎨, makes it easy to extend and maintain. Feel free to explore adding more visualization types 📊, expanding the database schema 🗂️, or integrating additional data sources to enhance the app’s functionality!
Project :3-📄 Building a Document RAG (Retrieval-Augmented Generation) App Using OpenAI 🤖 and ChromaDB 🧠

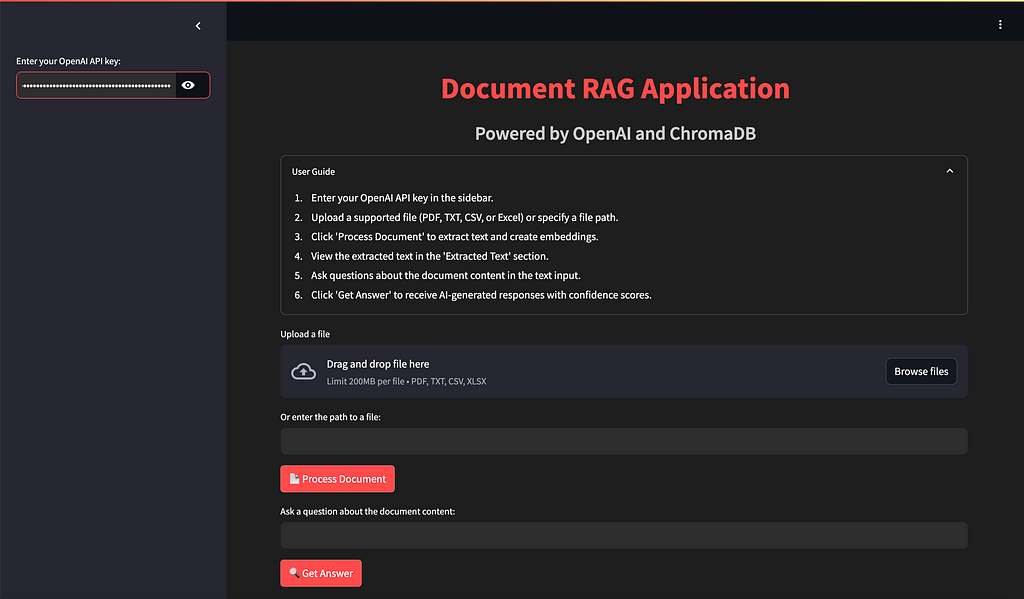
Building a Document RAG app that leverages OpenAI’s API 🤖 and ChromaDB 📊 for smart document interactions is both fascinating and highly rewarding. In this article, we will guide you through developing a Retrieval-Augmented Generation (RAG) app 🛠️ using OpenAI’s ChatGPT API 🤖 and Streamlit 🎨 to help users extract, analyze, and query document content 📄 using natural language 🗣️. We’ll discuss the app’s features ✨, the folder structure 📂, and all the technical details 🧩 to bring it to life. Let’s get started! 🚀
🔍 Overview of the Document RAG Application
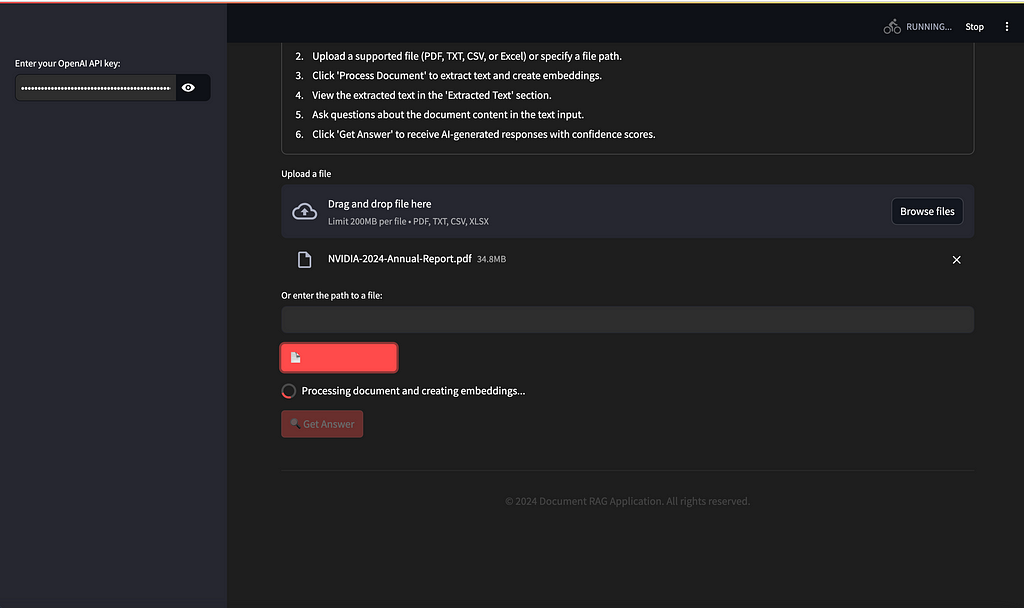
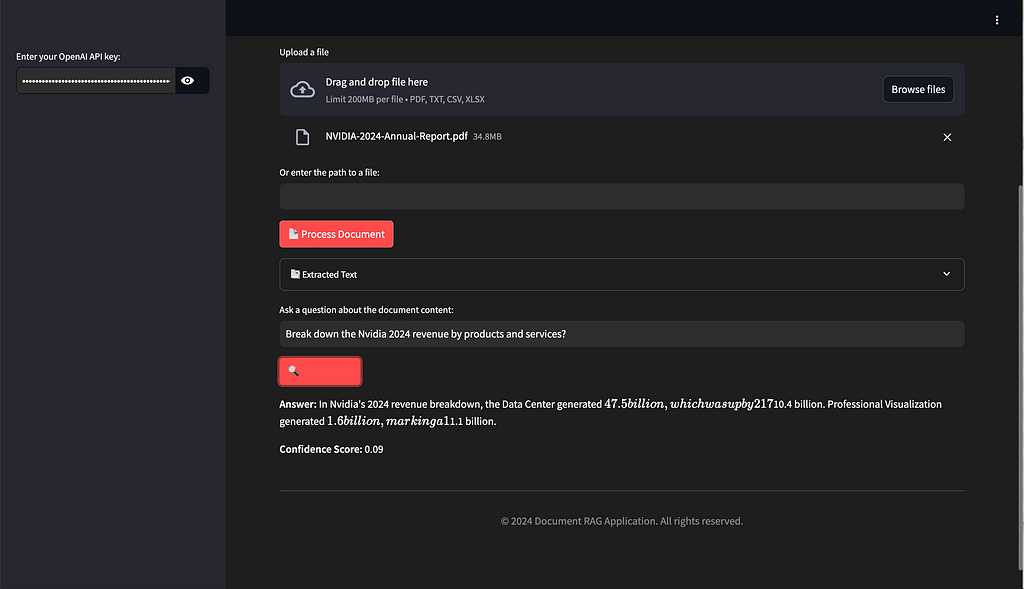
The Document RAG app is designed to let users interact with documents (such as PDF 📄, CSV 📊, and TXT 📝 files) in a natural and intuitive way. Users can upload a file 📤, extract key information ℹ️ from it, and then ask questions ❓ about the document content — like “Break down Nvidia’s 2024 revenue by products and services?” — and get AI-generated responses 💬 along with confidence scores 📈 to gauge the accuracy of the answers.
The app integrates with ChromaDB 📊, which stores vector embeddings of document content, enabling fast ⚡ and efficient retrieval during Q&A sessions. This, coupled with OpenAI’s GPT model 🤖, creates an intelligent document query system 🧠.
📂 Folder Structure and Files
The Document RAG app is designed for scalability 📈 and maintainability 🔧. Here’s an overview of the key components and files 📂:
document_rag_app/
│
├── main.py                     # Main script for Streamlit UI
├── rag_pipeline.py             # Core RAG pipeline handling embeddings and responses
├── document_processor.py       # Processes uploaded documents for text extraction
├── pdf_processor.py            # Handles PDF-specific text extraction
├── openai_handler.py           # Manages interaction with OpenAI API
├── chromadb_handler.py         # Manages storage and retrieval of embeddings in ChromaDB
├── requirements.txt            # Dependencies required to run the project
└── README.md                   # Project documentation
- main.py: The main script 📝 that runs the Streamlit user interface 💻 and manages user interactions.
import streamlit as st
import os
from document_processor import extract_text_from_file, chunk_text
from openai_handler import get_embeddings, get_chat_completion
from chromadb_handler import ChromaDBHandler
from rag_pipeline import process_query

# Set page configuration
st.set_page_config(page_title="Document RAG App", layout="wide")

# Initialize session state
if 'chroma_client' not in st.session_state:
    st.session_state.chroma_client = None
if 'collection' not in st.session_state:
    st.session_state.collection = None
if 'extracted_text' not in st.session_state:
    st.session_state.extracted_text = None

def main():
    st.markdown('''
    <style>
    .stApp {
        background-color: #1E1E1E;
        color: #FFFFFF;
    }
    .stButton>button {
        color: #FFFFFF;
        background-color: #FF4B4B;
        border-radius: 5px;
    }
    .stTextInput>div>div>input {
        color: #FFFFFF;
        background-color: #2E2E2E;
    }
    .stTextArea>div>div>textarea {
        color: #FFFFFF;
        background-color: #2E2E2E;
    }
    </style>
    ''', unsafe_allow_html=True)

    st.markdown("<h1 style='text-align: center; color: #FF4B4B;'>Document RAG Application</h1>", unsafe_allow_html=True)
    st.markdown("<h3 style='text-align: center; color: #CCCCCC;'>Powered by OpenAI and ChromaDB</h3>", unsafe_allow_html=True)

    # User guide
    with st.expander("User Guide", expanded=False):
        st.markdown("""
        1. Enter your OpenAI API key in the sidebar.
        2. Upload a supported file (PDF, TXT, CSV, or Excel) or specify a file path.
        3. Click 'Process Document' to extract text and create embeddings.
        4. View the extracted text in the 'Extracted Text' section.
        5. Ask questions about the document content in the text input.
        6. Click 'Get Answer' to receive AI-generated responses with confidence scores.
        """)

    # Sidebar for API key input
    with st.sidebar:
        api_key = st.text_input("Enter your OpenAI API key:", type="password")
        if api_key:
            os.environ["OPENAI_API_KEY"] = api_key

    # File upload or file path input
    uploaded_file = st.file_uploader("Upload a file", type=["pdf", "txt", "csv", "xlsx"])
    file_path = st.text_input("Or enter the path to a file:")

    if st.button("📄 Process Document"):
        if uploaded_file is not None:
            file_type = uploaded_file.name.split('.')[-1].lower()
            document_text = extract_text_from_file(uploaded_file, file_type)
        elif file_path:
            file_type = file_path.split('.')[-1].lower()
            with open(file_path, "rb") as f:
                document_text = extract_text_from_file(f, file_type)
        else:
            st.error("Please upload a file or provide a valid file path.")
            return

        with st.spinner("Processing document and creating embeddings..."):
            st.session_state.extracted_text = document_text
            chunks = chunk_text(document_text)
            embeddings = [get_embeddings(chunk) for chunk in chunks]
            st.session_state.chroma_client = ChromaDBHandler()
            st.session_state.collection = st.session_state.chroma_client.create_collection("document_collection")
            st.session_state.collection.add(
                embeddings=embeddings,
                documents=chunks,
                ids=[str(i) for i in range(len(chunks))]
            )
        st.success("Document processed and embeddings created successfully!")

    # Display extracted text
    if st.session_state.extracted_text:
        with st.expander("📑 Extracted Text", expanded=False):
            st.text_area("Document Content", st.session_state.extracted_text, height=300)

    # Query input and processing
    query = st.text_input("Ask a question about the document content:")
    if st.button("🔍 Get Answer"):
        if not query:
            st.warning("Please enter a question.")
            return
        if st.session_state.collection is None:
            st.error("Please process a document first.")
            return

        with st.spinner("Generating answer..."):
            result = process_query(query, st.session_state.collection)
            st.markdown(f"**Answer:** {result['answer']}")
            st.markdown(f"**Confidence Score:** {result['confidence_score']:.2f}")

    # Footer
    st.markdown("<hr>", unsafe_allow_html=True)
    st.markdown("<p style='text-align: center; color: #888888;'>© 2024 Document RAG Application. All rights reserved.</p>", unsafe_allow_html=True)

if __name__ == "__main__":
    main()
- rag_pipeline.py: The core pipeline 🔄 that handles document processing 📄, embedding creation 🧩, and question-answering logic 💬.
import os
import nltk
from nltk.corpus import wordnet
from rank_bm25 import BM25Okapi
import numpy as np
from openai_handler import get_chat_completion, get_embeddings

# Set the NLTK data path
nltk.data.path.append(os.path.join(os.getcwd(), 'nltk_data'))

# Download NLTK data
nltk.download('punkt', download_dir=os.path.join(os.getcwd(), 'nltk_data'))
nltk.download('wordnet', download_dir=os.path.join(os.getcwd(), 'nltk_data'))
nltk.download('averaged_perceptron_tagger', download_dir=os.path.join(os.getcwd(), 'nltk_data'))

def expand_query(query: str) -> str:
    """
    Expand the query by adding synonyms for nouns and verbs.

    Args:
        query (str): The original query.

    Returns:
        str: The expanded query.
    """
    try:
        words = nltk.word_tokenize(query)
        pos_tags = nltk.pos_tag(words)
        expanded_words = []

        for word, pos in pos_tags:
            expanded_words.append(word)
            if pos.startswith('NN') or pos.startswith('VB'):
                synsets = wordnet.synsets(word)
                for synset in synsets[:2]:  # Add up to 2 synonyms
                    for lemma in synset.lemmas():
                        if lemma.name() != word and lemma.name() not in expanded_words:
                            expanded_words.append(lemma.name())
                            break

        return ' '.join(expanded_words)
    except LookupError as e:
        print(f"NLTK Error: {str(e)}")
        return query  # Return the original query if NLTK fails

def rerank_results(query: str, documents: list, top_k: int = 3) -> list:
    """
    Rerank the retrieved documents using BM25.

    Args:
        query (str): The user's question.
        documents (list): List of retrieved documents.
        top_k (int): Number of top results to return.

    Returns:
        list: Reranked list of documents.
    """
    tokenized_corpus = [doc.split() for doc in documents]
    bm25 = BM25Okapi(tokenized_corpus)
    tokenized_query = query.split()
    doc_scores = bm25.get_scores(tokenized_query)
    top_n = np.argsort(doc_scores)[::-1][:top_k]
    return [documents[i] for i in top_n]

def process_query(query: str, collection) -> dict:
    """
    Process a user query using the RAG pipeline with query expansion and reranking.

    Args:
        query (str): The user's question.
        collection (chromadb.Collection): The ChromaDB collection to query.

    Returns:
        dict: A dictionary containing the generated answer and confidence score.
    """
    # Expand the query
    expanded_query = expand_query(query)

    # Get embeddings for the expanded query
    query_embedding = get_embeddings(expanded_query)

    # Query the collection for relevant context
    results = collection.query(
        query_embeddings=[query_embedding],
        n_results=10  # Retrieve more results for reranking
    )

    # Rerank the results
    reranked_documents = rerank_results(query, results['documents'][0])

    # Calculate confidence score based on BM25 score of the top result
    bm25 = BM25Okapi([doc.split() for doc in reranked_documents])
    top_score = bm25.get_scores(query.split())[0]
    confidence_score = min(top_score / 10, 1.0)  # Normalize the score

    # Construct the prompt for the language model
    context = " ".join(reranked_documents[:3])  # Use top 3 reranked documents
    prompt = f"""Given the following context and question, provide a concise and accurate answer. If the answer is not contained within the context, respond with "I don't have enough information to answer that question."

Context: {context}

Question: {query}

Answer:"""

    # Get the answer from the language model
    answer = get_chat_completion(prompt)

    return {
        "answer": answer,
        "confidence_score": confidence_score
    }
- document_processor.py: Extracts and preprocesses text 📜 from uploaded documents 📤.
import PyPDF2
import io
import csv
import pandas as pd

def extract_text_from_pdf(file):
    """
    Extract text from a PDF file.

    Args:
        file: A file-like object containing the PDF.

    Returns:
        str: Extracted text from the PDF.
    """
    try:
        pdf_reader = PyPDF2.PdfReader(file)
        text = ""
        for page in pdf_reader.pages:
            text += page.extract_text()
        return text
    except Exception as e:
        raise Exception(f"Error extracting text from PDF: {str(e)}")

def extract_text_from_txt(file):
    """
    Extract text from a plain text file.

    Args:
        file: A file-like object containing the text.

    Returns:
        str: Extracted text from the file.
    """
    try:
        return file.read().decode('utf-8')
    except Exception as e:
        raise Exception(f"Error extracting text from text file: {str(e)}")

def extract_text_from_csv(file):
    """
    Extract text from a CSV file.

    Args:
        file: A file-like object containing the CSV data.

    Returns:
        str: Extracted text from the CSV file.
    """
    try:
        csv_reader = csv.reader(io.StringIO(file.read().decode('utf-8')))
        return "\n".join([",".join(row) for row in csv_reader])
    except Exception as e:
        raise Exception(f"Error extracting text from CSV file: {str(e)}")

def extract_text_from_excel(file):
    """
    Extract text from an Excel file.

    Args:
        file: A file-like object containing the Excel data.

    Returns:
        str: Extracted text from the Excel file.
    """
    try:
        df = pd.read_excel(file)
        return df.to_string(index=False)
    except Exception as e:
        raise Exception(f"Error extracting text from Excel file: {str(e)}")

def extract_text_from_file(file, file_type):
    """
    Extract text from a file based on its type.

    Args:
        file: A file-like object containing the data.
        file_type: The type of the file (pdf, txt, csv, xlsx).

    Returns:
        str: Extracted text from the file.
    """
    if file_type == 'pdf':
        return extract_text_from_pdf(file)
    elif file_type == 'txt':
        return extract_text_from_txt(file)
    elif file_type == 'csv':
        return extract_text_from_csv(file)
    elif file_type == 'xlsx':
        return extract_text_from_excel(file)
    else:
        raise ValueError(f"Unsupported file type: {file_type}")

def chunk_text(text: str, chunk_size: int = 1000, overlap: int = 200) -> list:
    """
    Split the input text into overlapping chunks.

    Args:
        text (str): The input text to be chunked.
        chunk_size (int): The size of each chunk in characters.
        overlap (int): The number of overlapping characters between chunks.

    Returns:
        list: A list of text chunks.
    """
    chunks = []
    start = 0
    end = chunk_size

    while start < len(text):
        chunk = text[start:end]
        chunks.append(chunk)
        start = end - overlap
        end = start + chunk_size

    return chunks
- pdf_processor.py: Specifically handles extracting text 📝 from PDF files using tools 🛠️ like PyPDF2.
import PyPDF2
import io

def extract_text_from_pdf(file):
    """
    Extract text from a PDF file.

    Args:
        file: A file-like object containing the PDF.

    Returns:
        str: Extracted text from the PDF.
    """
    try:
        pdf_reader = PyPDF2.PdfReader(file)
        text = ""
        for page in pdf_reader.pages:
            text += page.extract_text()
        return text
    except Exception as e:
        raise Exception(f"Error extracting text from PDF: {str(e)}")

def chunk_text(text: str, chunk_size: int = 1000, overlap: int = 200) -> list:
    """
    Split the input text into overlapping chunks.

    Args:
        text (str): The input text to be chunked.
        chunk_size (int): The size of each chunk in characters.
        overlap (int): The number of overlapping characters between chunks.

    Returns:
        list: A list of text chunks.
    """
    chunks = []
    start = 0
    end = chunk_size

    while start < len(text):
        chunk = text[start:end]
        chunks.append(chunk)
        start = end - overlap
        end = start + chunk_size

    return chunks
- openai_handler.py: Interacts with the OpenAI API 🤖 to generate answers based on the extracted content 📊.
import os
from openai import OpenAI

openai_client = OpenAI()

def get_embeddings(text: str) -> list:
    """
    Get embeddings for the given text using OpenAI's API.

    Args:
        text (str): The input text to embed.

    Returns:
        list: The embedding vector.
    """
    try:
        response = openai_client.embeddings.create(
            model="text-embedding-ada-002",
            input=text
        )
        return response.data[0].embedding
    except Exception as e:
        raise Exception(f"Error getting embeddings: {str(e)}")

def get_chat_completion(prompt: str) -> str:
    """
    Get a chat completion from OpenAI's API.

    Args:
        prompt (str): The input prompt for the chat completion.

    Returns:
        str: The generated response.
    """
    try:
        completion = openai_client.chat.completions.create(
            model="gpt-4",
            messages=[{"role": "user", "content": prompt}],
            max_tokens=300
        )
        content = completion.choices[0].message.content
        if not content:
            raise ValueError("OpenAI returned an empty response.")
        return content
    except Exception as e:
        raise Exception(f"Error getting chat completion: {str(e)}")
- chromadb_handler.py: Manages the connection 🔌 and interactions with ChromaDB 📊, storing and retrieving vector embeddings 📈.
import chromadb

class ChromaDBHandler:
    def __init__(self):
        self.client = chromadb.Client()

    def create_collection(self, collection_name: str):
        """
        Create a new collection in ChromaDB.

        Args:
            collection_name (str): The name of the collection to create.

        Returns:
            chromadb.Collection: The created collection.
        """
        return self.client.create_collection(collection_name)

    def query_collection(self, collection, query_texts: list, n_results: int = 5):
        """
        Query the collection for similar documents.

        Args:
            collection (chromadb.Collection): The collection to query.
            query_texts (list): List of query texts.
            n_results (int): Number of results to return.

        Returns:
            dict: Query results.
        """
        return collection.query(
            query_texts=query_texts,
            n_results=n_results
        )
- requirements.txt: A list 📋 of all dependencies required to run the project 📦.
📄 Uploading and Processing Documents in document_processor.py
The document_processor.py file is responsible for handling the different types of documents 📂 that users can upload. Here’s a snippet 🖋️ demonstrating how it extracts content from PDFs 📄, CSVs 📊, and text files 📝:
Explanation: The DocumentProcessor class processes uploaded files 📄. It has methods for reading PDF files using PyPDF2 📜, as well as extracting text from CSV files 📊. This makes it easy to handle various file formats consistently ✅.
💻 User Interface in main.py
The main.py script uses Streamlit 🎨 to create a sleek and intuitive user interface 🖥️ for the Document RAG app. Users can upload files 📤, view the extracted content 📜, and ask questions ❓ about it. The UI includes:
- Input for OpenAI API Key 🔑: Users need to input their OpenAI API key to access the app.
- File Upload Component 📂: Allows users to upload documents for analysis.
- Question Area 🗣️: Users type their questions about the document here.
- Answer Display 💬: The AI-generated answer, along with a confidence score 📈, is shown here.
Here’s an example of how the UI components are set up:
🔄 RAG Pipeline in rag_pipeline.py
The rag_pipeline.py file is the heart ❤️ of the application, responsible for connecting different components 🔗 and executing the RAG (Retrieval-Augmented Generation) process 🔄. This file handles embedding creation 🧩 using ChromaDB 📊 and generates answers 💬 to user queries via OpenAI 🤖.
Explanation: The RAGPipeline class interacts with ChromaDB 📊 to create embeddings 🧩 for the extracted document text and retrieve relevant information during a user’s query 🔍. It uses OpenAI 🤖 to generate a final answer 💬, which is then displayed to the user.
Key Modules in rag_pipeline.py
- Query Expansion 🗣️ ➡️ 📜: This module takes the user’s query and enriches it with relevant context. For example, if the user asks a general question, query expansion ensures that the relevant document sections are used to enhance the question, providing better search accuracy.
- Reranker 🔍📊: Once the system retrieves the relevant document chunks, the reranker module helps prioritize these chunks based on relevance. It uses scoring mechanisms to ensure that the most informative pieces are passed to the language model for generating an answer.
- Document Retrieval 📂📈: This module communicates with ChromaDB to store and retrieve document embeddings efficiently. It uses vector similarity to find the best matches for a given question, making the retrieval process both fast ⚡ and reliable.
- Embedding Creation 🧩➡️📊: This part of the pipeline generates vector embeddings for documents and user queries. It sends requests to OpenAI’s API to create text embeddings, which are then stored in ChromaDB.
- Answer Generation 🤖💬: The module takes the retrieved document content and generates a detailed response using OpenAI’s GPT model. It utilizes the best-ranked document chunks to create a coherent answer.
🗂️ Managing Embeddings in chromadb_handler.py
The chromadb_handler.py file manages all interactions with ChromaDB 📊, including storing and querying vector embeddings 📈. This helps keep the RAG pipeline efficient ⚡ and organized 📚.
Explanation: The ChromaDBHandler class is responsible for storing and retrieving embeddings 📈 from ChromaDB 📊, ensuring that the RAG pipeline can efficiently find relevant information based on user questions ❓.
🤖 Interaction with OpenAI in openai_handler.py
The openai_handler.py handles the connection 🔌 to OpenAI 🤖, ensuring that the requests to generate responses 💬 or embeddings 🧩 are properly encapsulated. It centralizes API calls for better code maintainability 🛠️ and reuse 🔄.
📊 Confidence Score and Answer Generation
After users ask a question ❓, the app uses the combined capabilities of ChromaDB 📊 and OpenAI 🤖 to generate an answer 💬. A confidence score 📈 is also generated to help users understand the reliability of the provided answer.
The confidence score is calculated based on the similarity of document embeddings to the question 🧩, helping users trust 🤝 the answers provided by the AI 🤖.
📦 Dependency Management with requirements.txt
Dependency management is crucial 🔑 to ensure that the environment setup remains consistent across different systems 🖥️.
Here’s an example of the requirements.txt for this project:
Explanation: This file lists all the packages 📦 required to run the application. It ensures that other developers or users can quickly set up their environment using the same dependencies 🔗.
🎯 Conclusion
The Document RAG app showcases how the combination of OpenAI’s GPT model 🤖 and ChromaDB 📊 can create a powerful and intuitive way to interact with documents 📄. Users can upload their files 📤, ask complex questions ❓, and get detailed answers 💬 without needing to manually comb through the text 📜.
The app’s modular structure 🏗️, with separate files managing specific tasks — such as document processing 📜, embedding creation 🧩, and response generation 💬 — ensures scalability 📈 and maintainability 🔧. Whether you are looking to expand your app to support more file types 📂 or integrate different database solutions 🗄️, the RAG app’s design makes it easy to enhance.
References:
- OpenAI API Documentation https://platform.openai.com/docs/ (For information on using OpenAI’s API for text generation and embeddings)
2. Streamlit Documentation https://docs.streamlit.io/ (For details on building interactive web applications with Streamlit)
3. ChromaDB Documentation https://docs.trychroma.com/ (For information on using ChromaDB for vector storage and retrieval)
4. Langchain Documentation https://python.langchain.com/docs/get_started/introduction (For concepts related to building RAG applications)
5. PyPDF2 Documentation https://pypdf2.readthedocs.io/en/latest/ (For extracting text from PDF files)
6. Pandas Documentation https://pandas.pydata.org/docs/ (For handling CSV and Excel files)
7. NLTK Documentation https://www.nltk.org/ (For natural language processing tasks like tokenization and part-of-speech tagging)
8. Plotly Documentation https://plotly.com/python/ (For creating interactive visualizations)
9. SQLite Documentation https://www.sqlite.org/docs.html (For information on working with SQLite databases)
10. “Building RAG-based LLM Applications for Production” by Chip Huyen https://huyenchip.com/2023/05/02/rag-llm-production.html (For best practices in building RAG applications)
Building Smart AI Apps: Homework Helper, Text-to-SQL, and RAG Using OpenAI & Streamlit was originally published in Level Up Coding on Medium, where people are continuing the conversation by highlighting and responding to this story.
This content originally appeared on Level Up Coding - Medium and was authored by Senthil E
Senthil E | Sciencx (2024-10-06T20:55:22+00:00) Building Smart AI Apps: Homework Helper, Text-to-SQL, and RAG Using OpenAI & Streamlit. Retrieved from https://www.scien.cx/2024/10/06/building-smart-ai-apps-homework-helper-text-to-sql-and-rag-using-openai-streamlit/
Please log in to upload a file.
There are no updates yet.
Click the Upload button above to add an update.
