
This content originally appeared on Level Up Coding - Medium and was authored by Nathan Rosidi
In the age of automation, the mixture of AI knowledge and laziness may be magical if you are both lazy and knowledgeable.

We are all aware of the hype surrounding AI, but this use of it with Cookiecutter will change the way data projects are conducted in the future.
In this article, we have explored this, and in the end, you can generate your Data Science Projects(streamlit app) by just prompting via the terminal. We’ll use ChatGPT API, too, so let’s get started!
What is Cookiecutter?
Cookiecutter is a shorter way of creating data projects. If you develop data projects so often, you can skip the boring parts using Cookiecutter. Before creating a simple Cookiecutter application, let’s install it on your local environment first.
pip install cookiecutter
Simple Cookiecutter Application
Now, all you have to do is create a project structure that is similar to the one below at first:
cookiecutter-streamlit/
├── {{cookiecutter.project_name}}/
│   ├── app/
│   │   └── main.py
│   ├── requirements.txt
│   └── README.md
├── cookiecutter.json
You can do this by using your IDE. Now you know the structure of the cookiecutter.
Inside this cookiecutter structure, you should have a cookiecutter.json file that includes questions that will be asked while generating your project. Here is an example:
{
    "project_name": "my_streamlit_app",
    "author_name": "What is the name of your author",
    "description": "Describe your project",
    "python_version": "What is the version of your python(For example 3.9)",
    "requirements": "List libraries separated by commas (e.g., streamlit, pandas, numpy)",
    "install_requirements": "Do you want to install the dependencies now? (yes/no)"
}
If you set this project up above and run the cookiecutter like this via the terminal,
cookiecutter ./cookiecutter-streamlit
I don’t want to confuse you. The name of my app that will automate project generation with cookiecutter is cookiecutter-streamlit; that’s why I am using the code above. So, after running this code on your terminal, it will ask you questions from cookiecutter.json one by one.

Next, a data project will be generated in your directory based on your answers. Check the screenshot, please:

It is fantastic, but let’s make it more amazing!
Advanced Cookiecutter with Hooks to create Streamlit APP with ChatGPT

Now, let’s structure our data science project using an advanced cookie cutter. Follow the step-by-step guide below to set up a dynamic Streamlit app generator powered by Cookiecutter and the ChatGPT API.
Step 1- Install Libraries
Before we begin, let’s ensure you have the library installed on your system.
pip install streamlit
pip install openai
pip install cookiecutter
Step 2 — Structure Your Project
To structure your project, we should have a cookiecutter template, as you see in the previous section. Here is the structure:
cookiecutter-streamlit/
├── {{cookiecutter.project_name}}/
│   ├── app/
│   │   └── main.py
│   ├── requirements.txt
│   └── README.md
├── cookiecutter.json
└── hooks/
    └── post_gen_project.py
Step 3 — Create cookiecutter.json
At this step, we will create a cookiecutter.json that includes questions you will be asked.
{
    "project_name": "my_streamlit_app",
    "author_name": "What is your name?",
    "description": "Describe your project",
    "python_version": "What is the version of Python? (e.g., 3.9)",
    "requirements": "List libraries separated by commas (e.g., streamlit, pandas, numpy)",
    "install_requirements": "Do you want to install the dependencies now? (yes/no)"
}
Step 4- Add a Hook to Generate Code Dynamically
At this step, we will add a hook to automate even more, like installing required libraries, creating the code of streamlit by using ChatGPT, and running the code at the end! Amazing. Let’s see the code.
Step 4.1
At the end of this project, ChatGPT will use this description to create the app, so be careful.
project_description = input(
    "\nWhat kind of project do you want me to create?\n(e.g., Create a Streamlit app that predicts house prices): "
)
Step 4.2
Here, we will use ChatGPT API to create code automatically. In the end, we’ll do some tricks to scrape Python code from the GPT’s output.
print("\nGenerating project code with ChatGPT...")
response = client.chat.completions.create(
    model="gpt-4",
    messages=[
        {
            "role": "system",
            "content": (
                "Generate Python code for a Streamlit app. Do not include explanations, comments, or anything else. "
                "The app should simulate data inline instead of loading files (like CSVs) from disk or external sources. "
                "Ensure the code is self-contained and ready to run without requiring additional resources."
            )
        },
        {"role": "user", "content": f"{project_description}"}
    ],
    max_tokens=500,
    temperature=0  # Set temperature to 0 for deterministic responses
)

response_content = response.choices[0].message.content
# Parse out the Python code
start_marker = "```python"
end_marker = "```"
if start_marker in response_content and end_marker in response_content:
    # Extract code between the markers
    generated_code = response_content.split(start_marker)[1].split(end_marker)[0].strip()
else:
    generated_code = "No code block found in the response."
Step 4.3
Here, the code asks libraries to the user.
requirements = input("\nList the libraries required (e.g., streamlit, pandas, numpy): ").strip()
requirements_file_path = os.path.join(os.getcwd(), "requirements.txt")

print("\nGenerating requirements.txt...")
with open(requirements_file_path, "w") as req_file:
    req_file.write(requirements)
Step 4.4
Here, the code will install the requirements.
install = input("\nDo you want to install the requirements now? (yes/no): ").strip().lower()

if install == "yes":
    print("\nInstalling requirements...")
    try:
        subprocess.check_call(["pip", "install", "-r", requirements_file_path])
        print("Requirements installed successfully!")
    except Exception as e:
        print(f"Failed to install requirements: {e}")
Step 4.5
The code asks you to run the code at this step.
run_app = input("\nDo you want to run the Streamlit app now? (yes/no): ").strip().lower()
if run_app == "yes":
    print("\nRunning the Streamlit app...")
    subprocess.call(["streamlit", "run", app_file_path])
else:
    print("\nYou can run the app later with: streamlit run app/main.py")
Here is the entire code.
import os
from openai import OpenAI
import subprocess

api_key = “enter_your_api_key_here”

client = OpenAI(api_key=api_key)

project_description = input(
    "\nWhat kind of project do you want me to create?\n(e.g., Create a Streamlit app that predicts house prices): "
)

print("\nGenerating project code with ChatGPT...")
response = client.chat.completions.create(
    model="gpt-4",
    messages=[
        {
            "role": "system",
            "content": (
                "Generate Python code for a Stream lit app. Do not include explanations, comments, or anything else. "
                "The app should simulate data inline instead of loading files (like CSVs) from disk or external sources. "
                "Ensure the code is self-contained and ready to run without requiring additional resources."
            )
        },
        {"role": "user", "content": f"{project_description}"}
    ],
    max_tokens=500,
    temperature=0  # Set temperature to 0 for deterministic responses
)

response_content = response.choices[0].message.content

start_marker = "```python"
end_marker = "```"
if start_marker in response_content and end_marker in response_content:
    # Extract code between the markers
    generated_code = response_content.split(start_marker)[1].split(end_marker)[0].strip()
else:
    generated_code = "No code block found in the response."

app_dir = os.path.join(os.getcwd(), "app")
app_file_path = os.path.join(app_dir, "main.py")
os.makedirs(app_dir, exist_ok=True)

print("\nWriting the generated code to app/main.py...")
with open(app_file_path, "w") as file:
    file.write(generated_code)

requirements = "streamlit"  # Add Streamlit as the default requirement
print("\nGenerating requirements.txt...")
requirements_file_path = os.path.join(os.getcwd(), "requirements.txt")
with open(requirements_file_path, "w") as req_file:
    req_file.write(requirements)

print("\nInstalling requirements...")
try:
    subprocess.check_call(["pip", "install", "-r", requirements_file_path])
    print("Requirements installed successfully!")
except Exception as e:
    print(f"Failed to install requirements: {e}")

run_app = input("\nDo you want to run the Streamlit app now? (yes/no): ").strip().lower()
if run_app == "yes":
    print("\nRunning the Streamlit app...")
    subprocess.call(["streamlit", "run", app_file_path])
else:
    print("\nYou can run the app later with: streamlit run app/main.py")
Let’s go to your working directory and use this code to test this app

cookiecutter ./cookiecutter-streamlit
Here are my answers.

Here, it starts to generate project code with ChatGPT after asking a few questions.

Now, it asks me to run the app; check the screenshot below.
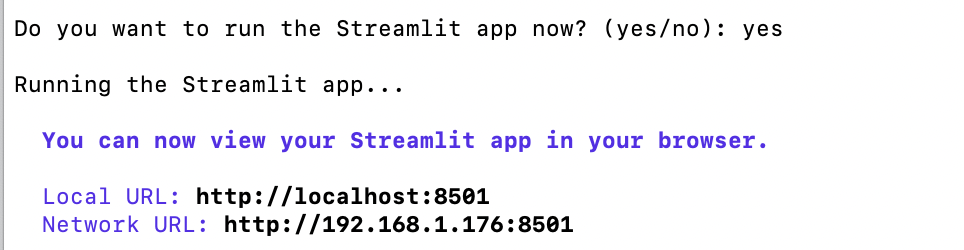
Good, let’s visit the local host. And here your app is ready:
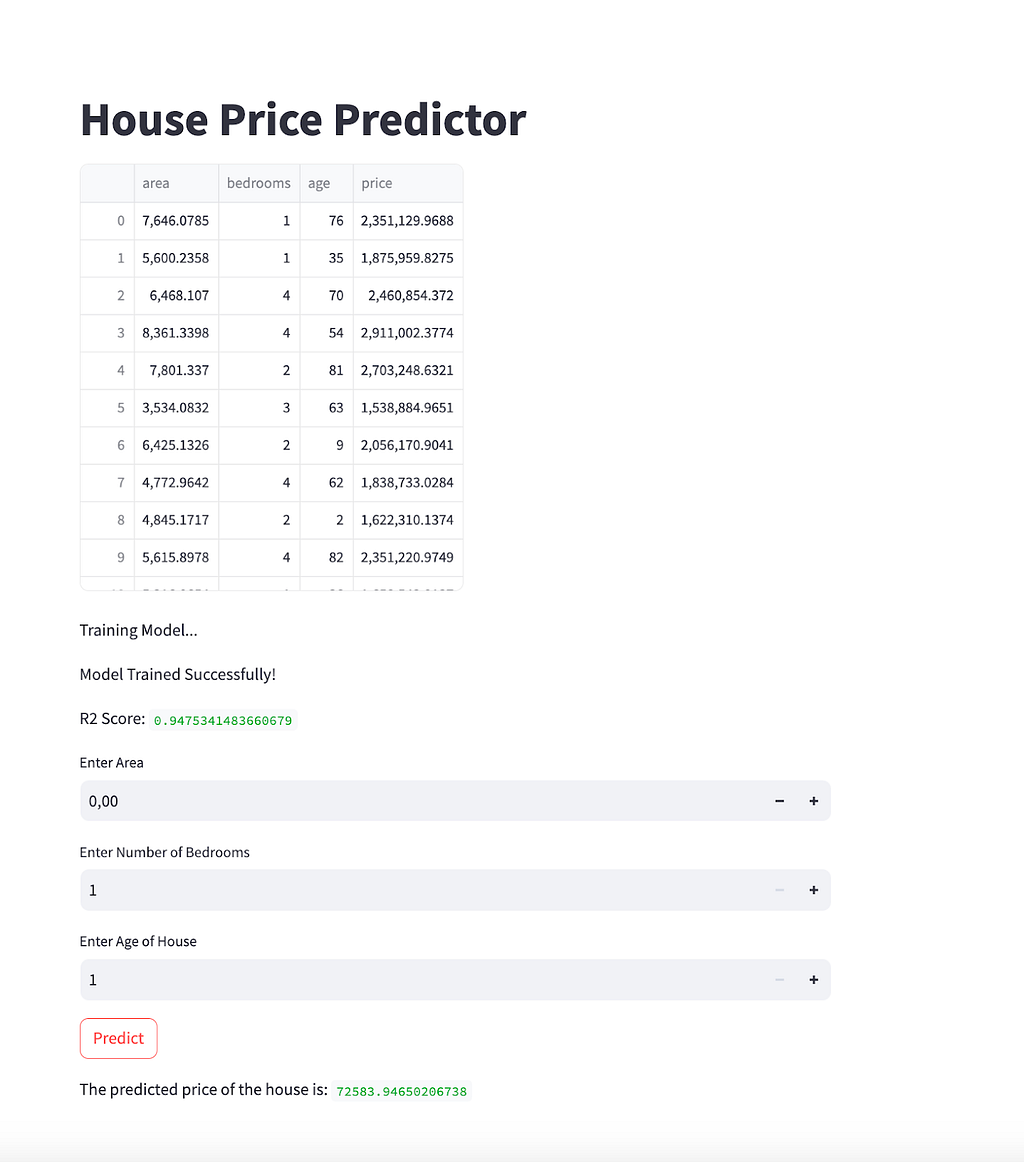
Also, when I go to the project directory, here is the Streamlit code that ChatGPT’s API created and Cookiecutter pasted into main.py and executed.
import streamlit as st
import pandas as pd
import numpy as np
from sklearn.model_selection import train_test_split
from sklearn.linear_model import LinearRegression
from sklearn.metrics import r2_score

def generate_data():
    np.random.seed(0)
    area = np.random.normal(5000, 1500, 100)
    bedrooms = np.random.randint(1, 5, 100)
    age = np.random.randint(1, 100, 100)
    price = area * 300 + bedrooms * 100000 + age * 1000 + np.random.normal(0, 100000, 100)

    return pd.DataFrame({
        'area': area,
        'bedrooms': bedrooms,
        'age': age,
        'price': price
    })

def run():
    st.title('House Price Predictor')

    df = generate_data()

    st.write(df)

    x = df[['area', 'bedrooms', 'age']]
    y = df['price']

    x_train, x_test, y_train, y_test = train_test_split(x, y, test_size=0.2, random_state=42)

    st.write('Training Model...')
    model = LinearRegression()
    model.fit(x_train, y_train)

    st.write('Model Trained Successfully!')

    y_pred = model.predict(x_test)

    st.write('R2 Score:', r2_score(y_test, y_pred))

    area = st.number_input('Enter Area')
    bedrooms = st.number_input('Enter Number of Bedrooms', min_value=1, max_value=10, step=1)
    age = st.number_input('Enter Age of House', min_value=1, max_value=100, step=1)

    if st.button('Predict'):
        price = model.predict([[area, bedrooms, age]])
        st.write('The predicted price of the house is:', price[0])

if __name__ == '__main__':
    run()
Final Thoughts
In this article, we have started the streamlit app by using ChatGPT API and cookiecutter by just prompting on the terminal. The pace of AI and its integration with tools like Cookiecutter can change how data science projects are done.
Best Practices for Structuring Data Science Projects with Cookiecutter was originally published in Level Up Coding on Medium, where people are continuing the conversation by highlighting and responding to this story.
This content originally appeared on Level Up Coding - Medium and was authored by Nathan Rosidi
Nathan Rosidi | Sciencx (2024-12-31T20:41:15+00:00) Best Practices for Structuring Data Science Projects with Cookiecutter. Retrieved from https://www.scien.cx/2024/12/31/best-practices-for-structuring-data-science-projects-with-cookiecutter/
Please log in to upload a file.
There are no updates yet.
Click the Upload button above to add an update.